Posts Tagged ‘canvas element’

A look at 2D vs WebGL canvas performance

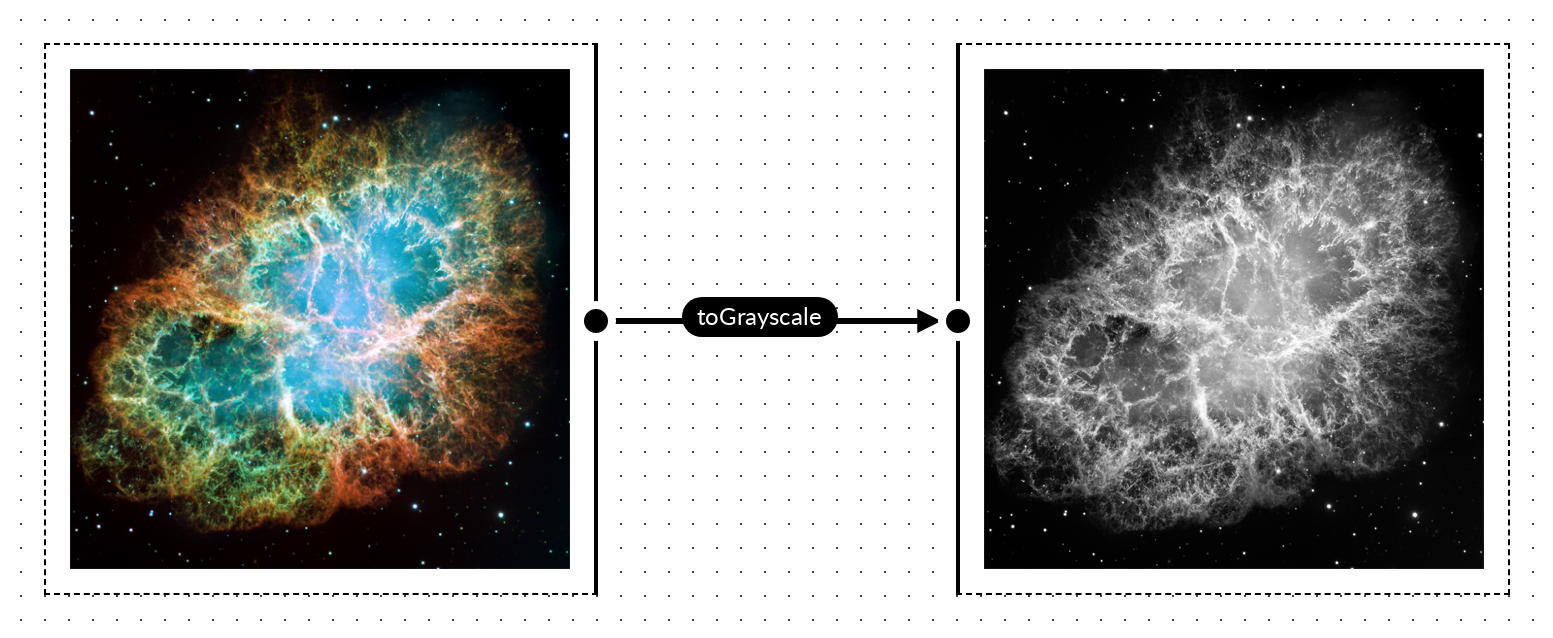
I did some quick benchmarking with canvas-image-transformer, looking at the performance between directly manipulating pixels on a 2D canvas versus using a fragment shader on a WebGL canvas. For testing, I used a grayscale transformation as it can be done with a simple weighted sum (R*0.2126 + G*0.7152 + B*0.0722) and there’s a high degree of parity between the fragment shader code and the code for pixel operations on a 2D canvas.

Converting to grayscale

Pixel operations on the 2D canvas are as follows:

for(var i=0; i<pixels.data.length; i+=4) { var grayPixel = parseInt(((0.2126*(pixels.data[i]/255.0)) + (0.7152*(pixels.data[i+1]/255.0)) + (0.0722*(pixels.data[i+2]/255.0))) * 255.0); pixels.data[i] = grayPixel; pixels.data[i + 1] = grayPixel; pixels.data[i + 2] = grayPixel; }

The corresponding fragment shader for the WebGL canvas is as follows:

precision mediump float; uniform sampler2D uSampler; varying vec2 vTextureCoord; void main(void) { vec4 src = texture2D( uSampler, ( vTextureCoord ) ); float grayPx = src.r*0.2126 + src.g*0.7152 + src.b*0.0722; gl_FragColor = vec4(grayPx, grayPx, grayPx, 1); }

Performance comparisons in Chrome

Here’s the setup for comparing performance of the 2 method:

  • Input was a 3864×3864 image of the Crab Nebula, rendered onto a 2D canvas (note that time to render onto the 2D canvas is not considered in the data points below)
  • Output is the 2D canvas that the input image was render on
  • CPU was an AMD Ryzen 7 5700X
  • GPU was a RTX 2060
  • OS is Windows 10 Build 19044
  • Browser is Chrome 108.0.5359.125
  • Hard refresh on page load to bypass any browser-level caching
  • Transformation via WebGL approach for 25 iterations
  • Transformation via 2D canvas approach for 25 iterations

Visually, this is what’s being done:

canvas-image-transformer grayscale conversion

I tried to eliminate as much background noise as possible from the result; that is, eliminating anything that may have a impact on CPU or GPU usage: closing other applications that may have significant usage, not having any other tabs open in the browser, and not having DevTools open when image processing was being done. That said, I was not rigorous about this and the numbers presented are to show overall/high-level behavior and performance; they’re not necessarily representative of what peak performance would be on the machine or browser.

It’s also worth noting that canvas-image-transformer doesn’t attempt to do any sort of caching in the first iteration (i.e. textures are re-created, shaders are re-compiled, etc. on each iteration), so we shouldn’t expect large variances in performance from one iteration to the next.

Graphing the data points for each approach, for each iteration, I got the following (note that what’s presented is just the data for 1 test run; I did test multiple times and consistently saw the same behavior but, for simplicity, I just graphed the values from 1 test run):

canvas-image-transformer performance data

So, the data points for the first iteration are interesting.

  • On the 2d canvas, the transformation initially takes 371.8ms
  • On the webgl2, the transformation initially takes 506.5ms

That’s a massive gap in performance between the 2 methods, with the 2d canvas method being significantly faster. I would have expected the WebGL approach to be faster here as, generally, graphics-related things would be faster with a lower-level GPU interface, but that’s clearly not the case here.

For subsequent iterations, we can see that performance improves and normalizes for both approaches, with significantly better performance using the WebGL approach; however, why don’t we see this sort of performance during the first iteration? Profiling the code, I noticed I was consistently seeing the majority of execution time spent on texImage2D() during the first iteration:

gl.texImage2D(gl.TEXTURE_2D, 0, gl.RGBA8, gl.RGBA, gl.UNSIGNED_BYTE, srcCanvas);

Looking at the execution time of texImage2D() across iterations, we get the following:

canvas-image-transformer texImage2D execution time

We see 486.9ms spent in texImage2D() during the first iteration but then execution time drops to only ~0.1ms in subsequent iterations. It’s clear that loading data into a texture is the most costly operation on the first iteration, however it looks like there’s some sort of caching mechanism, likely in Chrome’s GPU component, that essentially eliminates this cost on subsequent iterations.

In an attempt to optimize the call in the first iteration, I briefly looked into potential optimizations to the texImage2D() call but didn’t find much. There’s no mipmap creation or doing any sort of format conversion here, so we’re just bound by how quickly we can get the pixels into VRAM.

Normal refresh (after previous page load)

There’s a bit more nuance here that’s worth touching on. Looking at just the first iteration in Chrome, after normal/soft refreshes, we see some interesting behavior:

canvas-image-transformer performance data, first iteration only
  • For the 2d canvas, the first iteration transformation times look the same as when doing a hard refresh
  • For the WebGL canvas, we’re getting the transformation times we saw after the first iteration when doing a soft refresh!

It looks like Chrome’s texture caching mechanism is in play and preserves cache entries across soft page refreshes.

What about Firefox and other browsers?

I would expect most Webkit-based browsers would have similar behavior to what’s in Chrome and some quick testing in Edge confirms this.

Firefox is a different beast. Testing in Firefox 108.0.2, we see the following transformation times:

canvas-image-transformer performance data

Performance, overall, is much more consistent than in Chrome, but not always better.

  • For the 2d canvas method, performance is simply worse; on the first iteration we see transformations take 150+ milliseconds more than in Chrome, and on subsequent iterations the performance gap is even wider.
  • For the WebGL method, our first iteration performance is significantly better than Chrome, reduced by more than 175 milliseconds. However, on subsequent iterations we don’t see the drastic performance improvement we see in Chrome.

For the 2d canvas method, it’s hard to say why it performs so differently than Chrome. However, for the WebGL method, a bit of profiling led to some interesting insights. In Firefox, the execution time of texImage2D() is consistent across iterations, hovering ~40ms; this means it performs significantly better than Chrome’s worst case (first iteration) and significantly worse than Chrome’s best case (non-first iteration where execution time is below 0.1ms), as shown below.

canvas-image-transformer performance data

The other significant aspect to Firefox’s performance is in the performance of the Canvas drawImage() call, in drawing from a WebGL canvas to a 2D canvas. At the tail end of the transformation process, canvas-image-transformer does the following:

const srcCtx = srcCanvas.getContext('2d'); srcCtx.drawImage(glCanvas, 0, 0, srcCanvas.width, srcCanvas.height);

Basically, it’s taking what’s on the WebGL canvas and writing it out to the input/source canvas, which is a 2D canvas. In Chrome this is a very fast operation, typically less that 2ms, in Firefox I see this typically going above 200ms.

canvas-image-transformer performance data

Firefox consistency

Finally, looking at transformation times across soft refreshes, we see Firefox performance is very consistent for both the 2D canvas and WebGL method:

canvas-image-transformer performance data

However, I did encounter a case where WebGL performance was more erratic. This was testing when I had a lot of tabs open and I suspect there was some contention for GPU resources.

Takeaways

There’s perhaps a number of small insights here depending on use-case and audience, but there’s 2 significant high-level takeaways for me:

  • GPUs are very fast at parallel processing but loading data to be processed and retrieving the processed data can be expensive operations
  • It’s worthwhile to measure things; I was fairly surprised by the different performance profiles between Firefox and Chrome

Pushing computation to the front: video snapshots

Video and the Canvas API

The Canvas API is surprising versatile. The image parameter of the CanvasRenderingContext2D.drawImage() method will accept images from a number of different sources including an HTMLVideoElement. I touched on this a bit in a previous post about processing the data from video streams, however HTMLVideoElement can also handle loading and rendering video files, with all modern browsers capable of tackling the non-trivial tasks of decoding and rendering H.264 MP4 or VP8/VP9 WebM content (and, of course, you get all the benefits of the client’s GPU hardware that the browser takes advantage of). This opens up the possibility of capturing frames from video files which can be used for preview images, poster images, or substituting in an image when video playback isn’t possible (e.g. for a print layout, which is the issue I’ve run into with ScratchGraph).

Setting up the HTMLVideoElement

This is fairly standard, here we’ll load an H.264 MP4 with the filename “test.mp4”:

const video = document.createElement('video'); const videoSource = document.createElement('source'); videoSource.setAttribute('type', 'video/mp4'); videoSource.setAttribute('src', 'test.mp4'); video.appendChild(videoSource);

For reference, here’s the test video:

Next, we want to seek to a point in the video where we want to capture the frame and also bind to an event that’ll tell us when we’re able to read the frame data from the HTMLVideoElement. The seeked event works well. The other potentially viable option is the loadeddata event, but I ran into some issues here, which I’ll describe later.

video.addEventListener('seeked', function(e) { // capture the video frame at the point seeked to... }); // seek to 2s video.currentTime = 2;

Render the frame onto a canvas

The Canvas API makes this really easy and the process mirrors what’s described in the post on thumbnail generation:

/** * * @param {HTMLVideoElement} video * @param {Number} newWidth * @param {Number} newHeight * @param {Boolean} proportionalScale * @returns {Canvas} */ videoFrameToCanvas: function(video, newWidth, newHeight, proportionalScale) { if(proportionalScale) { if(video.videoWidth > video.videoHeight) { newHeight = newHeight * (video.videoHeight / video.videoWidth); } else if(video.height > video.videoWidth) { newWidth = newWidth * (video.videoWidth / video.videoHeight); } else {} } const canvas = document.createElement('canvas'); canvas.width = newWidth; canvas.height = newHeight; const canvasCtx = canvas.getContext('2d'); canvasCtx.drawImage(video, 0, 0, newWidth, newHeight); return canvas; }

I added this method to the canvas-image-transformer library; referencing the method we can now flesh out the seeked event handler. For this test, we’ll also render out what’s on the canvas to an <img> element in the document to see what’s been captured.

video.addEventListener('seeked', function(e) { // capture the video frame at the point seeked to const frameOnCanvas = CanvasImageTransformer.videoFrameToCanvas(video, 500, 500, true); document.getElementById('testImage').src = frameOnCanvas.toDataURL(); });

frameOnCanvas is a canvas with the captured frame, and here’s what it looks like transformed & rendered into an <img> element:

canvas-image-transformer-test-video-frame-capture

Issues

  • Something not immediately obvious is that the seeked event is not fired if video.currentTime = 0 (i.e. you want to seek to the first frame of a video). However, you can use a very small time value (e.g. video.currentTime = 0.000000001), which will typically seek to the first frame in most cases. That said, it is a hacky/non-elegant solution.
  • There are cross-browser issues with the loadeddata event. In Firefox, you will only get a frame capture if you don’t seek. If you do attempt to seek, you’ll get a empty frame and the canvas will have a transparent image. Conversely, in Chrome (and other Webkit-based browsers), you will only get a frame if you do seek. The standard states that the event should be fired when “the user agent can render the media data at the current playback position for the first time” which seem to indicate an implementation flaw in both browsers.
  • The test video was taken on my phone and the frames themselves are upsided-down, this is typical with smartphone videos as it’s expected that playback will take into account metadata indicating orientation. In Firefox, this isn’t taken into account when using CanvasRenderingContext2D.drawImage() with HTMLVideoElement, so you get an upsided-down image on the canvas.

Alternatives & limitations

I couldn’t think of a ton of options for decoding H.264 or VP8/VP9. If you’re looking to create something yourself, a server-side service invoking FFmpeg seems like the best option. I played around with Puppeteer, but Puppeteer comes with Chromium, which lacks the audio and video support you get out-of-the box with Chrome. Although, installing and using Chrome server-side with Puppeteer has potential.

There are also third-party services which can handle video decoding and transcoding, and those are solid server-side options.

As with thumbnail generation, here again we’re looking at workloads that have potential to be moved to the frontend, where you have hardware better suited for graphics work and the possibility of reducing backend complexity. On the other hand, the same limitations comes into play, as you have less control over the execution environment and no clear path for backfill or migration needs.

Pushing computation to the front: thumbnail generation

Frontend possibilities

As the APIs brought forward by HTML5 about a decade ago have matured and the devices running web browsers have continued to improve in computational power, looking at what’s possible on the frontend and the ability to bring backend computations to the frontend has been increasingly interesting to me. Such architectures would see each user’s browsers as a worker for certain tasks and could simply backend systems, as those tasks are pushed forward to the client. Using Canvas for image processing tasks is one area that interesting and that I’ve had success with.

For Mural, I did the following Medium-esque image preload effect, the basis of which is generating a tiny (16×16) thumbnail which is loaded with the page. That thumbnail is blurred via CSS filter, and transitions to the full-resolution image once it’s loaded. The thumbnail itself is generated entirely on the frontend when a card is created and saved alongside the card data.

In this post, I’ll run though generating and handling that 16×16 thumbnail. This is fairly straightforward use of the Canvas API, but it does highlight how frontend clients can be utilized for operations typically relegated to server-side systems.

The image processing code presented is encapsulated in the canvas-image-transformer library.

<img> → <canvas>

A precursor for any sort of image processing is getting the image data into a <canvas>. The <img> element and corresponding HTMLImageElement interface don’t provide any sort of pixel-level read/write functionality, whereas the <canvas> element and corresponding HTMLCanvasElement interface does. This transformation is pretty straightforward:

The code is as follows (an interesting thing to note here is that this can all be done without injecting anything into the DOM or rendering anything onto the screen):

const img = new Image(); img.onload = function() { const canvas = document.createElement('canvas'); canvas.width = img.width; canvas.height = img.height; const canvasCtx = canvas.getContext('2d'); canvasCtx.drawImage(img, 0, 0, img.width, img.width); // the image has now been rendered onto canvas } img.src = "https://some-image-url";

Resizing an image

Resizing is trivial, as it can be handled directly via arguments to CanvasRenderingContext2D.drawImage(). Adding in a bit of math to do proportional scaling (i.e. preserve aspect ratio), we can wrap the transformation logic into the following method:

/** * * @param {HTMLImageElement} img * @param {Number} newWidth * @param {Number} newHeight * @param {Boolean} proportionalScale * @returns {Canvas} */ imageToCanvas: function(img, newWidth, newHeight, proportionalScale) { if(proportionalScale) { if(img.width > img.height) { newHeight = newHeight * (img.height / img.width); } else if(img.height > img.width) { newWidth = newWidth * (img.width / img.height); } else {} } var canvas = document.createElement('canvas'); canvas.width = newWidth; canvas.height = newHeight; var canvasCtx = canvas.getContext('2d'); canvasCtx.drawImage(img, 0, 0, newWidth, newHeight); return canvas; }

Getting the transformed image from the canvas

My goto method for getting the data off a canvas and into a more interoperable form is to use the HTMLCanvasElement.toDataURL() method, which allows easily getting the image as a PNG or JPEG. I do have mixed feeling about data-URIs; they’re great for the web, because so much of the web is textually based, but they’re also horribly bloated and inefficient. In any case, I think interoperability and ease-of-use usually wins out (esp. here where we’re dealing with a 16×16 thumbnail and the data-uri is relatively lightweight) and getting a data-uri is generally the best solution.

Using CanvasRenderingContext2D.getImageData() to get the raw pixel from a canvas is also an option but, for a lot of use-cases, you’d likely need to compress and/or package the data in some way to make use of it.

Save the transformed image

With a data-uri, saving the image is pretty straightforward. Send it to the server via some HTTP method (POST, PUT, etc.) and save it. For a 16×16 PNG the data-uri textual representation is small enough that we can put it directly in a relational database and not worry about a conversion to binary.

Alternatives & limitations

The status quo alternative is having this sort of image manipulation logic encapsulated within some backend component (method, microservice, etc.) and, to be fair, such systems work well. There’s also some very concrete benefits:

  • You are aware of and have control over the environment in which the image processing is done, so you’re isolated from browser quirks or issues stemming from a user’s computing environment.
  • You have an easier path for any sort of backfill (e.g. how do you generate thumbnails for images previously uploaded?) or migration needs (e.g. how can you move to a different sized thumbnail?); you can’t just run though rows in a database and make a call to get what you need.

However, something worth looking at is that backend systems and server-side environments are typically not optimized for any sort of graphics workload, as processing is centered around CPU cores. In contrast, the majority of frontend environments have access to a GPU, even fairly cheap phone have some sort of GPU that is better suited for “embarassing parallel”-esque graphics operations, the performance benefits of which you get for free with the Canvas API in all modern browsers.

In Chrome, see the output of chrome://gpu:

chrome settings, canvas hardware acceleration

Scale, complexity and cost also come into play. Thinking of frontend clients as computational nodes can change the architecture of systems. The need for server-side resources (hardware, VMs, containers, etc.) is eliminated. Scaling concerns are also, to a large extent, eliminated or radically changed as operations are pushed forward to the client.

Future work

What’s presented here is just scratching the surface of what’s possible with Canvas. WebGL also presents as a ton of possibilities and abstraction layers like gpu.js are really interesting. Overall, it’s exciting to see the web frontend evolve beyond a mechanism for user input and into a layer in which substantive computation can be done.

Real-time image processing on the web

A while ago I began playing around with grabbing a video stream from a webcam and seeing what I could do with the captured data. Capturing the video stream using the navigator.getUserMedia() navigator.mediaDevices.getUserMedia() method was straightforward, but directly reading and writing the image data of the video stream isn’t possible. That said, the stream data can be put onto a canvas using CanvasRenderingContext2D.drawImage(), giving you the ability to manipulate the pixel data.

const videoElem = document.querySelector('video'); // Request video stream navigator.mediaDevices.getUserMedia({video: true, audio: false}) .then(function(_videoStream) { // Render video stream on <video> element videoElem.srcObject =_videoStream; }) .catch(function(err) { console.log(`getUserMedia error: ${err}`); } ); const videoElem = document.querySelector('video'); const canvas = document.querySelector('canvas'); const ctx = canvas.getContext('2d'); // put snapshot from video stream into canvas ctx.drawImage(videoElem, 0, 0);

You can read and write to the <canvas> element, so hiding the <video> element with the source data and just showing the <canvas> element seems logical, but the CanvasRenderingContext2D.drawImage() call is expensive; looking at the copied stream on the <canvas> element there is, very noticeable, visual lag. Another reason to avoid this option is that the frequency at which you render (e.g. 30 FPS), isn’t necessarily the frequency at which you’d want to grab and process image data (e.g. 10 FPS). The disassociation allows you to keep the video playback smooth, for a better user experience, but more effectively utilize CPU cycles for image processing. At least in my experience so far, a small delay in visual feedback from image processing is acceptable and looks perfectly fine intermixed with the higher-frequency video stream.

So the best options all seem to involve showing the <video> element with the webcam stream and placing visual feedback on top of the video in some way. A few ideas:

  • Write pixel data to another canvas and render it on top of the <video> element
  • Render SVG elements on top of the <video> element
  • Render DOM elements (absolutely positioned) on top of the <video> element

The third option is an ugly solution, but it’s fast to code and thus allows for quick prototyping. The demo and code below shows a quick demo I slapped together using <div> elements as markers for hotspots, in this case bright spots, within the video.

Here’s the code for the above demo:

<!DOCTYPE html> <html> <head> <title>Webcam Cap</title> <meta charset="UTF-8"> <meta name="viewport" content="width=device-width, initial-scale=1.0"> <style type="text/css"> * { margin:0; padding:0; border:none; overflow:hidden; } </style> </head> <body> <div> <video style="width:640px; height:480px;" width="640" height="480" autoplay></video> <canvas style="display:none; width:640px; height:480px;" width="640" height="480"></canvas> </div> <div class="ia-markers"></div> <script type="text/javascript"> const videoElem = document.querySelector('video'); const canvas = document.querySelector('canvas'); const ctx = canvas.getContext('2d'); var snapshotIntv = null; const width = 640; const height = 480; // Request video stream navigator.mediaDevices.getUserMedia({video: true, audio: false}) .then(function(_videoStream) { // Render video stream on <video> element videoElem.srcObject =_videoStream; // Take a snapshot of the video stream 10ms snapshotIntv = setInterval(function() { processSnapshot(_videoStream); }, 100); }) .catch(function(err) { console.log(`getUserMedia error: ${err}`); } ); // Take a snapshot from the video stream function processSnapshot() { // put snapshot from video stream into canvas ctx.drawImage(videoElem, 0, 0); // Clear old snapshot markers var markerSetParent = (document.getElementsByClassName('ia-markers'))[0]; markerSetParent.innerHTML = ''; // Array to store hotzone points var hotzones = []; // Process pixels var imageData = ctx.getImageData(0, 0, width, height); for (var y = 0; y < height; y+=16) { for (var x = 0; x < width; x+=16) { var index = (x + y * imageData.width) << 2; var r = imageData.data[index + 0]; var g = imageData.data[index + 1]; var b = imageData.data[index + 2]; if(r > 200 && g > 200 && b > 200) { hotzones.push([x,y]); } } } // Add new hotzone elements to DOM for(var i=0; i<hotzones.length; i++) { var x = hotzones[i][0]; var y = hotzones[i][1]; var markerDivElem = document.createElement("div"); markerDivElem.setAttribute('style', 'position:absolute; width:16px; height:16px; border-radius:8px; background:#0f0; opacity:0.25; left:' + x + 'px; top:' + y + 'px'); markerDivElem.className = 'ia-hotzone-marker'; markerSetParent.appendChild(markerDivElem); } } </script> </body> </html>

Edit (8/1/2020): The code has been updated to reflect changes in the MediaDevices API. This includes:

  • navigator.getUserMedianavigator.mediaDevices.getUserMedia. The code structure is slightly different given that the latter returns a promise.
  • Assigning the media stream to a video element directly via the srcObject attribute. This is now required in most modern browsers as the old way of using createObjectURL on the stream and assigning the returned URL to the video element’s src attribute is no longer supported.

In addition, there’s also just some general code cleanup to modernize the code and make it a little easier to read. Some of the language in the post has also been tweaked to make things clearer.

WebGL on a high-DPI display

Dealing with WebGL on a high-DPI display isn’t too difficult, but it does require an understanding of device pixels vs CSS pixels. Elements on a page automatically upscale on a high-DPI display, as dimensions are typically defined with CSS, and therefore defined in units of CSS pixels. The <canvas> element is no exception. However, upscaling a DOM element doesn’t mean that the content within the element will be upscaled or rendered nicely – this is why non-vector content can appear blurry on higher resolutions. With WebGL content, not only will it appear blurry, but the viewport will likely be clipped as well, due to the viewport being incorrectly calculated using CSS pixel dimensions.

With WebGL everything is assumed to be in units of device pixels and there is no automatic conversion from CSS pixels to device pixels. To specify the device pixel dimensions of the <canvas>, we need to set the width and height attributes of the element:

CSS Pixels vs Device Pixels on canvas

I like to compute and set the attributes automatically using window.devicePixelRatio.
In glfx I do the following (passing in _canvasWidthCSSPx, _canvasHeightCSSPx):

// Get devicePixelRatio
glfx.devicePixelRatio = window.devicePixelRatio || 1;

// Set the width,height attributes of the canvas element (in device pixels)
var _canvasWidthDevicePx = _canvasWidthCSSPx * glfx.devicePixelRatio;
var _canvasHeightDevicePx = _canvasHeightCSSPx * glfx.devicePixelRatio;    
_canvas.setAttribute(
"width", _canvasWidthDevicePx);
_canvas.setAttribute(
"height", _canvasHeightDevicePx);

// Set viewport width,height based on dimensions of canvas element        
glfx.gl.viewportWidth = _canvasWidthDevicePx;
glfx.gl.viewportHeight = _canvasHeightDevicePx;        

Reference: HandlingHighDPI

Circular stipple patterns on an HTML5 canvas

In my previous post on stipple patterns, I presented code to draw a few simple stipple patterns based on drawing single pixels at fixed locations. In this post, I’ll present something just a bit more complex: drawing circles to create a circular stipple patten, again writing a shader that makes use of the GraphicsCore and FXController classes.

Shader.circleStippleShader = function (imageData, bufWrite, index, x, y, r, g, b, a, passNum, frameNum, maxFrames)
{
var alpha = 1.0;
var r1 = r / 255.0;
var rF = Math.floor((alpha * r1 + (1.0 - alpha)) * 255.0);

var circleMaxDiam = 12; // circle at every 12th pixel, also defines max diameter of circle,
var circleMaxRadius = circleMaxDiam / 2; // maximum radius of circle

// figure out the x, y indices of the circle we're within
// x,y need to be shifted by the circle radius b/c circleMaxDiam defined the offset of the circle center
// ... e.g. going along the x-axis, we are within the next circle not at x/circleMaxDiam, but at (x+6)/circleMaxDiam
var iX = Math.floor((x + circleMaxRadius) / circleMaxDiam);
var iY = Math.floor((y + circleMaxRadius) / circleMaxDiam);

// multiply the circle indices by the diameter to get the actual coordinates of the circle's center
var targetX = iX * circleMaxDiam;
var targetY = iY * circleMaxDiam;

// calculate squared distance to the circle we are within
var dist = (targetX - x) * (targetX - x) + (targetY - y) * (targetY - y);

if (dist < 25) {
GraphicsCore.setPixel(bufWrite, index, rF, 0, 0, 255);
}
else {
GraphicsCore.setPixel(bufWrite, index, r, g, b, 255);
}

}
Shader.circleStippleShader.numPassesRequired = 1;    

Circle stipple

Conceptually, we define the center of a circle at every 12th pixel (both along the x and y axis). At every pixel (x,y) we figure out which circle we are within, and calculate the distance to the center. If the distance is less than our threshold (25), we change the color of the pixel (use the red channel only).

Stipple patterns on an HTML5 canvas

I wanted to play around a bit with stipple patterns after seeing stippling done with photos on the LinkedIn news feed. However, what I’m going to present is not what LinkedIn does. LinkedIn applies the stipple pattern as a background-image on a DOM element above a <img> element with a (fairly low resolution) JPEG – the stippling may help to alleviate the negative visual impact of the low-resolution image. What I’m going to show is how to do stippling on an HTML5 canvas, which allows for a much greater degree of freedom in terms of what’s possible, but is also slower and requires a modern browser.

I’m going to make use of the GraphicsCore and FXController classes in a previous post, Gaussian blur on an HTML5 canvas. In that post I presented the concept of writing shaders as plug-in to the FXController class to apply different per-pixel effects. What I’m going to present are shaders for a few simple stipple patterns. Applying the shader is simply a matter of passing it into the constructor for the FXController class, e.g.

var theShader = Shader.crossStippleShader;
var fxCtrlr = new FXController(ctxSource, ctxDest, theShader, width, height, 100, 1);
fxCtrlr.init();

Checkerboard Stipple

This shader has the effect of creating a checkerboard pattern.
The source pixel is preserved if (x+y) % 2 == 0, otherwise the pixel’s alpha is reduced to 66.

Shader.checkerboardStippleShader = function (imageData, bufWrite, index, x, y, r, g, b, a, passNum, frameNum, maxFrames)
{                
    
if( (x+y)%2 == 0) {
        GraphicsCore.setPixel(bufWrite, index, r, g, b, 255);
    }
    
else {
        GraphicsCore.setPixel(bufWrite, index, r, g, b, 66);
    }
}
Shader.checkerboardStippleShader.numPassesRequired = 1;    

Checkerboard Stipple

Dot Stipple

This shader blends a white pixel into the source image where x%2 == 0 && y%2 == 0, in effect creating a dotted grid pattern.

The alpha blending code is a straightforward implementation of alpha compositing, but since we’re blending with white (where r=1.0, g=1.0, and b=1.0) the equation is simplified and there is no second color value; we’re just biasing the source color by the alpha value. Also note that this is different than simply changing the alpha of the source pixel (as was done in the Checkerboard Stipple shader), here we’re always blending with white, in the previous shader we’re blending with whatever is the background of the DOM element.

Shader.dotStippleShader = function (imageData, bufWrite, index, x, y, r, g, b, a, passNum, frameNum, maxFrames)
{    
    
var alpha = 0.8;
        
    
var r1 = r / 255.0;
    
var rF = Math.floor((alpha*r1 + (1.0-alpha)) * 255.0);
            
    
var g1 = g / 255.0;
    
var gF = Math.floor((alpha*g1 + (1.0-alpha)) * 255.0);

    
var b1 = b / 255.0;
    
var bF = Math.floor((alpha*b1 + (1.0-alpha)) * 255.0);            
            
    
if( x%2 == 0 && y%2 == 0) {
        GraphicsCore.setPixel(bufWrite, index, rF, gF, bF, 255);
    }
else {
                
        GraphicsCore.setPixel(bufWrite, index, r, g, b, 255);
    }            

}
Shader.dotStippleShader.numPassesRequired = 1;

Dot Stipple

Quincunx Stipple

With this shader we blend in a white pixel at every 4 pixels (x%4 == 0 && y%4 == 0, the target pixel) and also at the 4 orthogonally adjacent pixels around the target, creating a quincunx pattern.

Shader.quincunxStippleShader = function (imageData, bufWrite, index, x, y, r, g, b, a, passNum, frameNum, maxFrames)
{    
    
var alpha = 0.78;
        
    
var r1 = r / 255.0;
    
var rF = Math.floor((alpha*r1 + (1.0-alpha)) * 255.0);
            
    
var g1 = g / 255.0;
    
var gF = Math.floor((alpha*g1 + (1.0-alpha)) * 255.0);

    
var b1 = b / 255.0;
    
var bF = Math.floor((alpha*b1 + (1.0-alpha)) * 255.0);            
            
    
if( (x%4 == 0 && y%4 == 0) ||
        ((x+1)%4 == 0 && y%4 == 0) ||
        ((x-1)%4 == 0 && y%4 == 0) ||
        (x%4 == 0 && (y+1)%4 == 0) ||
        (x%4 == 0 && (y-1)%4 == 0) )
    {
        GraphicsCore.setPixel(bufWrite, index, rF, gF, bF, 255);
    }
    
else
    
{
        GraphicsCore.setPixel(bufWrite, index, r, g, b, 255);
    }            

}
Shader.quincunxStippleShader.numPassesRequired = 1;

Quincunx Stipple

Cross Stipple

Similar to the quincunx stipple, but we blend in a white pixel at every 6 pixels (x%6 == 0 && y%6 == 0, the target pixel), the 4 orthogonally adjacent pixels around the target, and 4 additional pixels extending beyond the orthogonals, creating a cross (“+”) pattern.

Shader.crossStippleShader = function (imageData, bufWrite, index, x, y, r, g, b, a, passNum, frameNum, maxFrames)
{    
    
var alpha = 0.78;
        
    
var r1 = r / 255.0;
    
var rF = Math.floor((alpha*r1 + (1.0-alpha)) * 255.0);
            
    
var g1 = g / 255.0;
    
var gF = Math.floor((alpha*g1 + (1.0-alpha)) * 255.0);

    
var b1 = b / 255.0;
    
var bF = Math.floor((alpha*b1 + (1.0-alpha)) * 255.0);            
            
    
if( (x%6 == 0 && y%6 == 0) ||
        ((x+1)%6 == 0 && y%6 == 0) ||
        ((x-1)%6 == 0 && y%6 == 0) ||
        ((x+2)%6 == 0 && y%6 == 0) ||
        ((x-2)%6 == 0 && y%6 == 0) ||                
        (x%6 == 0 && (y+1)%6 == 0) ||
        (x%6 == 0 && (y-1)%6 == 0) ||
        (x%6 == 0 && (y+2)%6 == 0) ||
        (x%6 == 0 && (y-2)%6 == 0)                 
        )
                
    {
        GraphicsCore.setPixel(bufWrite, index, rF, gF, bF, 255);
    }
    
else
    
{
        GraphicsCore.setPixel(bufWrite, index, r, g, b, 255);
    }            

}
Shader.crossStippleShader.numPassesRequired = 1;    

Cross Stipple

That’s all for now. There’s tons of variations possible with only minor code changes to alter blending, color, and the shape of the stipple patten.

Gaussian blur on an HTML5 canvas

I’m actually going to present more than the actual gaussian blur implementation, also showing how to setup a simple animation controller and lightweight pixel shader system, allowing for defining the final color of a pixel on a per-pixel basis and allowing other effects to easily be plugged into the system. Be warned, this stuff is slow. This is all CPU processing (atop JavaScript no-less), there’s, sadly, no GPU hardware acceleration here. If your thinking about doing this on high-resolution images or writing effects that require a ton of passes over the image, you’re going bring the browser to a crawl, even on a fairly high-end system.

gaussian blur on HTML5 canvas element

I can’t embed JavaScript within this post, so you’ll have to go here to view the result (obviously, you’ll need an HTML 5 capable browser). For those who are curious, the very cool test image used is of a bird of paradise flower by the Agricultural Research Service.

So, first things first, the HTML, which is very simple. There’s 2 canvas element, one will hold the source image and the other will be the destination for the post-processed image. The width and height attributes on the canvas elements are set to the width and height of the image.

<!DOCTYPE html>
<html>
<head>
<title>HTML5 Blur FX</title>

<
script type="text/javascript">
// JS code will go here!
</
script>

</
head>
<body>
<canvas id="cvs-source" width="72" height="50">
</canvas>

<canvas id="cvs-dest" width="72" height="50">
</canvas>
</body>
</html>

Next, load the test image onto the source canvas (cvs-source) and setup the destination canvas (cvs-dest) as a blank image, which will occur when the page is loaded. Ignore the reference to the FXController object for now.

window.onload = function ()
{
var img = new Image();
img.onload =
function ()
{
// setup source
var ctxSource = document.getElementById('cvs-source').getContext('2d');
ctxSource.drawImage(img, 0, 0);

// setup destination
var cvsElement = document.getElementById('cvs-dest');
var ctxDest = cvsElement.getContext('2d');

var width = parseInt(cvsElement.getAttribute("width"));
var height = parseInt(cvsElement.getAttribute("height"));

ctxDest.createImageData(width, height);

var theShader = Shader.gaussBlur;
var fxCtrlr = new FXController(ctxSource, ctxDest, theShader, width, height, 10, 10);
fxCtrlr.init();
}

img.src =
'test3.png';
}

Stepping away from the actual code for a minute, it’s important to note how to actually modify the pixels on a canvas element:

  • Get the 2d context of the element by calling getContext(‘2d’) on the DOM element.
  • Call CanvasRenderingContext2D.getImageData(…) to get a buffer with the pixels in RGBA format.
  • To commit changes to the pixels onto a canvas, call CanvasRenderingContext2D.putImageData(…) with the buffer of modified pixels.
var ctxSource = document.getElementById('cvs-source').getContext('2d');
var imageData = ctxSource.getImageData(0, 0, width, height);


ctxDest.putImageData(bufWrite, 0, 0);

Back to the actual code. One of the very simple and primitive operations needed is to set a pixel to a color:

// GraphicsCore object
var GraphicsCore = {};
GraphicsCore.setPixel =
function (imageData, index, r, g, b, a)
{
imageData.data[index + 0] = r;
imageData.data[index + 1] = g;
imageData.data[index + 2] = b;
imageData.data[index + 3] = a;
}

I didn’t implement a corresponding getPixel() function because, as you’ll see, it’s very clean and easy to get the a pixel directly from the buffer and wasn’t worth invoking a function call.

The FXController object is (for the most part) the animation controller.

// FXController object
function FXController(_ctxSource, _ctxDest, _theShader, _width, _height, _fps, _maxFrames)
{
this.ctxSource = _ctxSource;
this.ctxDest = _ctxDest;
this.theShader = _theShader;
this.width = _width;
this.height = _height;
this.fps = _fps;
this.curFrame = 1; // [1, ...]
this.maxFrames = _maxFrames;
this.numPassesPerFrame = _theShader.numPassesRequired;
this.invervalPtr = null;

this.shaderFunc = function (fxCtrlr, passNum, frameNum, maxFrames)
{
Shader.run(fxCtrlr.ctxSource, fxCtrlr.ctxDest, fxCtrlr.width, fxCtrlr.height, fxCtrlr.theShader, passNum, frameNum, maxFrames);
}

this.init = function ()
{
var fxCtrlr = this;
var runFunc = function () { fxCtrlr.run(fxCtrlr); }

this.invervalPtr = setInterval(runFunc, 1000.0 / this.fps);
}

this.unInit = function()
{
clearInterval(
this.invervalPtr);
this.invervalPtr = null;
}

this.run = function (sender /*FXController*/)
{
for (var pn = 1; pn <= sender.numPassesPerFrame; pn++) {
sender.shaderFunc(sender, pn, sender.curFrame, sender.maxFrames);
}

sender.curFrame++;
if (sender.curFrame > sender.maxFrames) {
sender.unInit();
}
}
}

Most of what going on here is simply holding values which are passed to Shader.run(…). However, a few important things are being setup:

  • FXController.run(…) will be called at a certain number of frames per seconds (this.fps), until this.maxFrames is hit.
  • For each frame, Shader.run(…) will be called for each pass necessary (this.numPassesPerFrame). Certain effects will require more passes than other, for example, the gaussian blur implementation will require 2 passes.

The Shader object, the core of which is within Shader.run(…),

// Shader object
// Note: Shader.<shader_name>.numPassesRequired must be defined
var Shader = {};
Shader.run =
function (ctxSource, ctxDest, width, height, shaderFunc, passNum, frameNum, maxFrames)
{
//
// netscape.security.PrivilegeManager.enablePrivilege("UniversalBrowserRead"); // REMOVE ME BEFORE DEPLOYMENT
//

var bufWrite = ctxDest.getImageData(0, 0, width, height);

var imageData = null;
if (passNum == 1 && frameNum == 1) {
imageData = ctxSource.getImageData(0, 0, width, height);
}
else {
imageData = ctxDest.getImageData(0, 0, width, height);
}

for (var y = 0; y < height; y++) {

for (var x = 0; x < width; x++) {

var index = (x + y * imageData.width) << 2;
shaderFunc(imageData, bufWrite, index, x, y, imageData.data[index + 0], imageData.data[index + 1], imageData.data[index + 2], imageData.data[index + 3], passNum, frameNum, maxFrames);
}
}

ctxDest.putImageData(bufWrite, 0, 0);
}

(The UniversalBrowserRead privilege is necessary to run this locally in Firefox)

Shader.run(…) will setup the source and destination buffers, iterate over every pixel, compute the pixel index, get the pixel color, call shaderFunc(…) with all the necessary params, and finally commit any changes to the destination buffer (bufWrite). Note, the source canvas is only used for the first frame, first pass; in all other cases whatever is rendered on the destination canvas is used. This allows for certain effects (such as the gaussian blur) in which the effect can be progressively applied again and again, in a feedback loop, to produce updated iterations of the effect (in the case of a gaussian blur, the image is blurred more and more).

The code presented so far lays the framework to allow for writing a shader, plugging it into the system, and watching the result. Before, getting to the more complex gaussian blur filter, here’s a much simpler one: a single-pass, per-pixel image fade-in.

// fade in shader
Shader.fadeInShader =
function (imageData, bufWrite, index, x, y, r, g, b, a, passNum, frameNum, maxFrames)
{
var dt = frameNum/maxFrames; // [0, 1]
GraphicsCore.setPixel(bufWrite, index, r, g, b, dt * 255);
}
Shader.fadeInShader.numPassesRequired = 1;

(Shader..numPassesRequired is required for every shader, as FXController will query the value to determine how many times to call Shader.run(…) per frame.)

The shader function allows us to define what the final color of a pixel will be, given a set of input parameters, on a pixel-by-pixel basis, the core of what a pixel shader system is and allowing for a amazing degree of flexibility.

Finally, the gaussian blur shader. I won’t go into too many details here. If you’re interested in how a guassian blur is actually done, this article on gamedev.net is probably the best out there (esp. for transitioning from theory to practice), and the code here is almost a direct translation of what’s up there. Also note that bitshifts are used to do the power-of-2 divisions and multiplications.

// gaussian blur filter
Shader.gaussFact = Array(1, 6, 15, 20, 15, 6, 1);
Shader.gaussSum = 64;
// not used, >> 6 bitshift used in Shader.gaussBlur()
Shader.gaussWidth = 7;

Shader.gaussBlur =
function (imageData, bufWrite, index, x, y, r, g, b, a, passNum, frameNum, maxFrames)
{
if (passNum == 1 && (x <= 0 || x >= imageData.width - 1)) {
GraphicsCore.setPixel(bufWrite, index, r, g, b, a);
return;
}

if (passNum == 2 && (y <= 0 || y >= imageData.height - 1)) {
GraphicsCore.setPixel(bufWrite, index, r, g, b, a);
return;
}

var readBuf = imageData;
var writeBuf = bufWrite;

var sumR = 0;
var sumG = 0;
var sumB = 0;
var sumA = 0;

for (var k = 0; k < Shader.gaussWidth; k++) {

var nx = x;
var ny = y;

if (passNum == 1) { nx = (x - ((Shader.gaussWidth - 1) >> 1) + k); }
else if (passNum == 2) { ny = (y - ((Shader.gaussWidth - 1) >> 1) + k); }
else { }

// wrap around if we're trying to read pixels beyond the edge
if (nx < 0) { nx = readBuf.width + nx; }
if (ny < 0) { ny = readBuf.height + ny; }
if (nx >= readBuf.width) { nx = nx - readBuf.width; }
if (ny >= readBuf.height) { ny = ny - readBuf.height; }

var pxi = (nx + ny * readBuf.width) << 2;
var pxR = readBuf.data[pxi];
var pxG = readBuf.data[pxi + 1];
var pxB = readBuf.data[pxi + 2];
var pxA = readBuf.data[pxi + 3];

// little hack to make alpha=0 pixels look a bit better
// Note, the proper way to handle the alpha channel is to premultiply, blur, "unpremultiply"
if (pxA == 0) {
pxR = 255;
pxG = 255;
pxB = 255;
pxA = 255;
}

sumR += pxR * Shader.gaussFact[k];
sumG += pxG * Shader.gaussFact[k];
sumB += pxB * Shader.gaussFact[k];
sumA += pxA * Shader.gaussFact[k];
}

GraphicsCore.setPixel(writeBuf, index, sumR >> 6, sumG >> 6, sumB >> 6, sumA >> 6);
}
Shader.gaussBlur.numPassesRequired = 2;

The blur is done with a 3×3 convolution filter, over 2 passes. In the first pass, neighboring pixels are sampled and blurred along the x-axis. In the second pass, the same is done along the y-axis.

A few simple conditionals allow for wrapping around and sampling from the other side of the bitmap, if there’s an attempt to sample beyond the edges.

Note the little hack for transparent/translucent pixels; this is not the proper way to do this (and simply makes the error more grey-ish instead of black-ish), but I didn’t want to deal with premultiplying the alpha, so I’ve left it out.

The demo + all code is up @ http://aautar.digital-radiation.com/HTML5-BlurFX/