Posts Tagged ‘html5’

Pushing computation to the front: thumbnail generation

Frontend possibilities

As the APIs brought forward by HTML5 about a decade ago have matured and the devices running web browsers have continued to improve in computational power, looking at what’s possible on the frontend and the ability to bring backend computations to the frontend has been increasingly interesting to me. Such architectures would see each user’s browsers as a worker for certain tasks and could simply backend systems, as those tasks are pushed forward to the client. Using Canvas for image processing tasks is one area that interesting and that I’ve had success with.

For Mural, I did the following Medium-esque image preload effect, the basis of which is generating a tiny (16×16) thumbnail which is loaded with the page. That thumbnail is blurred via CSS filter, and transitions to the full-resolution image once it’s loaded. The thumbnail itself is generated entirely on the frontend when a card is created and saved alongside the card data.

In this post, I’ll run though generating and handling that 16×16 thumbnail. This is fairly straightforward use of the Canvas API, but it does highlight how frontend clients can be utilized for operations typically relegated to server-side systems.

The image processing code presented is encapsulated in the canvas-image-transformer library.

<img> → <canvas>

A precursor for any sort of image processing is getting the image data into a <canvas>. The <img> element and corresponding HTMLImageElement interface don’t provide any sort of pixel-level read/write functionality, whereas the <canvas> element and corresponding HTMLCanvasElement interface does. This transformation is pretty straightforward:

The code is as follows (an interesting thing to note here is that this can all be done without injecting anything into the DOM or rendering anything onto the screen):

const img = new Image(); img.onload = function() { const canvas = document.createElement('canvas'); canvas.width = img.width; canvas.height = img.height; const canvasCtx = canvas.getContext('2d'); canvasCtx.drawImage(img, 0, 0, img.width, img.width); // the image has now been rendered onto canvas } img.src = "https://some-image-url";

Resizing an image

Resizing is trivial, as it can be handled directly via arguments to CanvasRenderingContext2D.drawImage(). Adding in a bit of math to do proportional scaling (i.e. preserve aspect ratio), we can wrap the transformation logic into the following method:

/** * * @param {HTMLImageElement} img * @param {Number} newWidth * @param {Number} newHeight * @param {Boolean} proportionalScale * @returns {Canvas} */ imageToCanvas: function(img, newWidth, newHeight, proportionalScale) { if(proportionalScale) { if(img.width > img.height) { newHeight = newHeight * (img.height / img.width); } else if(img.height > img.width) { newWidth = newWidth * (img.width / img.height); } else {} } var canvas = document.createElement('canvas'); canvas.width = newWidth; canvas.height = newHeight; var canvasCtx = canvas.getContext('2d'); canvasCtx.drawImage(img, 0, 0, newWidth, newHeight); return canvas; }

Getting the transformed image from the canvas

My goto method for getting the data off a canvas and into a more interoperable form is to use the HTMLCanvasElement.toDataURL() method, which allows easily getting the image as a PNG or JPEG. I do have mixed feeling about data-URIs; they’re great for the web, because so much of the web is textually based, but they’re also horribly bloated and inefficient. In any case, I think interoperability and ease-of-use usually wins out (esp. here where we’re dealing with a 16×16 thumbnail and the data-uri is relatively lightweight) and getting a data-uri is generally the best solution.

Using CanvasRenderingContext2D.getImageData() to get the raw pixel from a canvas is also an option but, for a lot of use-cases, you’d likely need to compress and/or package the data in some way to make use of it.

Save the transformed image

With a data-uri, saving the image is pretty straightforward. Send it to the server via some HTTP method (POST, PUT, etc.) and save it. For a 16×16 PNG the data-uri textual representation is small enough that we can put it directly in a relational database and not worry about a conversion to binary.

Alternatives & limitations

The status quo alternative is having this sort of image manipulation logic encapsulated within some backend component (method, microservice, etc.) and, to be fair, such systems work well. There’s also some very concrete benefits:

  • You are aware of and have control over the environment in which the image processing is done, so you’re isolated from browser quirks or issues stemming from a user’s computing environment.
  • You have an easier path for any sort of backfill (e.g. how do you generate thumbnails for images previously uploaded?) or migration needs (e.g. how can you move to a different sized thumbnail?); you can’t just run though rows in a database and make a call to get what you need.

However, something worth looking at is that backend systems and server-side environments are typically not optimized for any sort of graphics workload, as processing is centered around CPU cores. In contrast, the majority of frontend environments have access to a GPU, even fairly cheap phone have some sort of GPU that is better suited for “embarassing parallel”-esque graphics operations, the performance benefits of which you get for free with the Canvas API in all modern browsers.

In Chrome, see the output of chrome://gpu:

chrome settings, canvas hardware acceleration

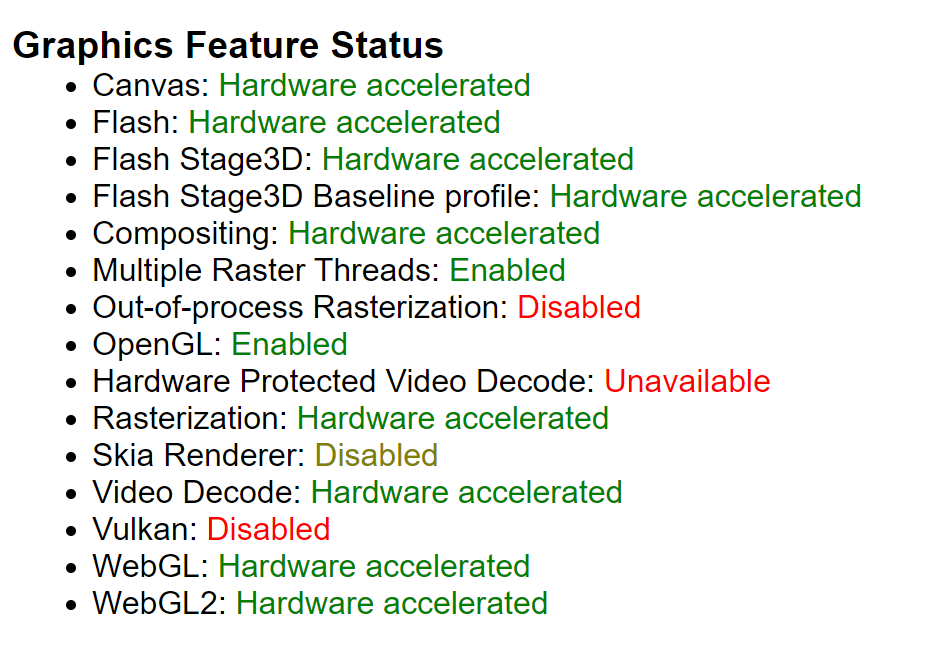
Scale, complexity and cost also come into play. Thinking of frontend clients as computational nodes can change the architecture of systems. The need for server-side resources (hardware, VMs, containers, etc.) is eliminated. Scaling concerns are also, to a large extent, eliminated or radically changed as operations are pushed forward to the client.

Future work

What’s presented here is just scratching the surface of what’s possible with Canvas. WebGL also presents as a ton of possibilities and abstraction layers like gpu.js are really interesting. Overall, it’s exciting to see the web frontend evolve beyond a mechanism for user input and into a layer in which substantive computation can be done.

Notes on web workers

Recently I’ve been working on parallelizing some HTML5 canvas image processing code with web workers and hit a few stumbling blocks, mostly due to some unexpected limits and misunderstandings about workers. Below are some notes I’ve jotted down while working.

  • There’s a limit on the number of web workers being executed, with Firefox I hit a limit of 20.
  • With Firefox, there’s no warning when you hit the limit, your worker simply doesn’t run. There’s no queuing with workers either, so you can’t fire off a worker and expect the browser to schedule it to run when you have less than the maximum number of workers executing.
  • I attempted to implement my own queuing mechanism, but this was a waste of time. You can’t precisely predict when the browser will delete the worker. I tried posting a message from the worker thread to the caller (via postMessage) at the end of the worker onmessage processing function, but this only accurately signals that the processing is done, not that the worker is terminated, and you therefore can’t predict when it’s possible to spawn off another worker.
    EDIT: Experimenting a bit more, I’ve discovered this to be incorrect. To actually terminate the worker, you can use the close method from within the worker, or the terminate method from the caller, so a queuing mechanism is a feasible solution to deal with browser limits on the number of executing web workers.
  • When posting a message from worker to caller (via postMessage), the handler function within the caller seems to be executed within the worker thread.
  • You can’t pass a function to a worker. You pass data between worker and caller by copying the data (serializing/de-serializing an object by structured cloning) or giving ownership of the object to the worker (transferable objects). This allows for a great deal of thread-safety, but in a language like Javascript where functions are first-class citizens, it’s hard not to see the elegance of being able to simply spawn off a worker from a function.
  • Given an upper limit on the number of executing web workers, a spawn-and-forget (or spawn-and-wait) model for concurrency is not practical. A thread pool pattern may be appropriate. In general, each worker should be thought of as a heavy-weight processing engine.
    EDIT:This is perhaps more true not because of browser limits on the number of workers, but the fact that workers were designed with the expectation of them being long-lived, with high performance and memory costs.

All my work was in Firefox, so the points above may not necessarily be true for other browsers.

Circular stipple patterns on an HTML5 canvas

In my previous post on stipple patterns, I presented code to draw a few simple stipple patterns based on drawing single pixels at fixed locations. In this post, I’ll present something just a bit more complex: drawing circles to create a circular stipple patten, again writing a shader that makes use of the GraphicsCore and FXController classes.

Shader.circleStippleShader = function (imageData, bufWrite, index, x, y, r, g, b, a, passNum, frameNum, maxFrames)
{
var alpha = 1.0;
var r1 = r / 255.0;
var rF = Math.floor((alpha * r1 + (1.0 - alpha)) * 255.0);

var circleMaxDiam = 12; // circle at every 12th pixel, also defines max diameter of circle,
var circleMaxRadius = circleMaxDiam / 2; // maximum radius of circle

// figure out the x, y indices of the circle we're within
// x,y need to be shifted by the circle radius b/c circleMaxDiam defined the offset of the circle center
// ... e.g. going along the x-axis, we are within the next circle not at x/circleMaxDiam, but at (x+6)/circleMaxDiam
var iX = Math.floor((x + circleMaxRadius) / circleMaxDiam);
var iY = Math.floor((y + circleMaxRadius) / circleMaxDiam);

// multiply the circle indices by the diameter to get the actual coordinates of the circle's center
var targetX = iX * circleMaxDiam;
var targetY = iY * circleMaxDiam;

// calculate squared distance to the circle we are within
var dist = (targetX - x) * (targetX - x) + (targetY - y) * (targetY - y);

if (dist < 25) {
GraphicsCore.setPixel(bufWrite, index, rF, 0, 0, 255);
}
else {
GraphicsCore.setPixel(bufWrite, index, r, g, b, 255);
}

}
Shader.circleStippleShader.numPassesRequired = 1;    

Circle stipple

Conceptually, we define the center of a circle at every 12th pixel (both along the x and y axis). At every pixel (x,y) we figure out which circle we are within, and calculate the distance to the center. If the distance is less than our threshold (25), we change the color of the pixel (use the red channel only).

Stipple patterns on an HTML5 canvas

I wanted to play around a bit with stipple patterns after seeing stippling done with photos on the LinkedIn news feed. However, what I’m going to present is not what LinkedIn does. LinkedIn applies the stipple pattern as a background-image on a DOM element above a <img> element with a (fairly low resolution) JPEG – the stippling may help to alleviate the negative visual impact of the low-resolution image. What I’m going to show is how to do stippling on an HTML5 canvas, which allows for a much greater degree of freedom in terms of what’s possible, but is also slower and requires a modern browser.

I’m going to make use of the GraphicsCore and FXController classes in a previous post, Gaussian blur on an HTML5 canvas. In that post I presented the concept of writing shaders as plug-in to the FXController class to apply different per-pixel effects. What I’m going to present are shaders for a few simple stipple patterns. Applying the shader is simply a matter of passing it into the constructor for the FXController class, e.g.

var theShader = Shader.crossStippleShader;
var fxCtrlr = new FXController(ctxSource, ctxDest, theShader, width, height, 100, 1);
fxCtrlr.init();

Checkerboard Stipple

This shader has the effect of creating a checkerboard pattern.
The source pixel is preserved if (x+y) % 2 == 0, otherwise the pixel’s alpha is reduced to 66.

Shader.checkerboardStippleShader = function (imageData, bufWrite, index, x, y, r, g, b, a, passNum, frameNum, maxFrames)
{                
    
if( (x+y)%2 == 0) {
        GraphicsCore.setPixel(bufWrite, index, r, g, b, 255);
    }
    
else {
        GraphicsCore.setPixel(bufWrite, index, r, g, b, 66);
    }
}
Shader.checkerboardStippleShader.numPassesRequired = 1;    

Checkerboard Stipple

Dot Stipple

This shader blends a white pixel into the source image where x%2 == 0 && y%2 == 0, in effect creating a dotted grid pattern.

The alpha blending code is a straightforward implementation of alpha compositing, but since we’re blending with white (where r=1.0, g=1.0, and b=1.0) the equation is simplified and there is no second color value; we’re just biasing the source color by the alpha value. Also note that this is different than simply changing the alpha of the source pixel (as was done in the Checkerboard Stipple shader), here we’re always blending with white, in the previous shader we’re blending with whatever is the background of the DOM element.

Shader.dotStippleShader = function (imageData, bufWrite, index, x, y, r, g, b, a, passNum, frameNum, maxFrames)
{    
    
var alpha = 0.8;
        
    
var r1 = r / 255.0;
    
var rF = Math.floor((alpha*r1 + (1.0-alpha)) * 255.0);
            
    
var g1 = g / 255.0;
    
var gF = Math.floor((alpha*g1 + (1.0-alpha)) * 255.0);

    
var b1 = b / 255.0;
    
var bF = Math.floor((alpha*b1 + (1.0-alpha)) * 255.0);            
            
    
if( x%2 == 0 && y%2 == 0) {
        GraphicsCore.setPixel(bufWrite, index, rF, gF, bF, 255);
    }
else {
                
        GraphicsCore.setPixel(bufWrite, index, r, g, b, 255);
    }            

}
Shader.dotStippleShader.numPassesRequired = 1;

Dot Stipple

Quincunx Stipple

With this shader we blend in a white pixel at every 4 pixels (x%4 == 0 && y%4 == 0, the target pixel) and also at the 4 orthogonally adjacent pixels around the target, creating a quincunx pattern.

Shader.quincunxStippleShader = function (imageData, bufWrite, index, x, y, r, g, b, a, passNum, frameNum, maxFrames)
{    
    
var alpha = 0.78;
        
    
var r1 = r / 255.0;
    
var rF = Math.floor((alpha*r1 + (1.0-alpha)) * 255.0);
            
    
var g1 = g / 255.0;
    
var gF = Math.floor((alpha*g1 + (1.0-alpha)) * 255.0);

    
var b1 = b / 255.0;
    
var bF = Math.floor((alpha*b1 + (1.0-alpha)) * 255.0);            
            
    
if( (x%4 == 0 && y%4 == 0) ||
        ((x+1)%4 == 0 && y%4 == 0) ||
        ((x-1)%4 == 0 && y%4 == 0) ||
        (x%4 == 0 && (y+1)%4 == 0) ||
        (x%4 == 0 && (y-1)%4 == 0) )
    {
        GraphicsCore.setPixel(bufWrite, index, rF, gF, bF, 255);
    }
    
else
    
{
        GraphicsCore.setPixel(bufWrite, index, r, g, b, 255);
    }            

}
Shader.quincunxStippleShader.numPassesRequired = 1;

Quincunx Stipple

Cross Stipple

Similar to the quincunx stipple, but we blend in a white pixel at every 6 pixels (x%6 == 0 && y%6 == 0, the target pixel), the 4 orthogonally adjacent pixels around the target, and 4 additional pixels extending beyond the orthogonals, creating a cross (“+”) pattern.

Shader.crossStippleShader = function (imageData, bufWrite, index, x, y, r, g, b, a, passNum, frameNum, maxFrames)
{    
    
var alpha = 0.78;
        
    
var r1 = r / 255.0;
    
var rF = Math.floor((alpha*r1 + (1.0-alpha)) * 255.0);
            
    
var g1 = g / 255.0;
    
var gF = Math.floor((alpha*g1 + (1.0-alpha)) * 255.0);

    
var b1 = b / 255.0;
    
var bF = Math.floor((alpha*b1 + (1.0-alpha)) * 255.0);            
            
    
if( (x%6 == 0 && y%6 == 0) ||
        ((x+1)%6 == 0 && y%6 == 0) ||
        ((x-1)%6 == 0 && y%6 == 0) ||
        ((x+2)%6 == 0 && y%6 == 0) ||
        ((x-2)%6 == 0 && y%6 == 0) ||                
        (x%6 == 0 && (y+1)%6 == 0) ||
        (x%6 == 0 && (y-1)%6 == 0) ||
        (x%6 == 0 && (y+2)%6 == 0) ||
        (x%6 == 0 && (y-2)%6 == 0)                 
        )
                
    {
        GraphicsCore.setPixel(bufWrite, index, rF, gF, bF, 255);
    }
    
else
    
{
        GraphicsCore.setPixel(bufWrite, index, r, g, b, 255);
    }            

}
Shader.crossStippleShader.numPassesRequired = 1;    

Cross Stipple

That’s all for now. There’s tons of variations possible with only minor code changes to alter blending, color, and the shape of the stipple patten.

Native vs. HTML5 hybrid

Facebook recently released a new version of its iOS app in order to fix a number of issues with the previous releases. The Facebook app has been notorious for being slow, buggy, and simply lackluster overall. The problem touted by many was the fact that it was not a native iOS app in that it relied on UIWebView containers to display content; this post brings such speculation front and center. However, I’m not sure I agree that the blame lies with UIWebView. The problems with the Facebook app, as far as I could tell, centered around lag in loading content, or or simply not loading content due to connection timeouts. Two comments in the post, I think, point out the real issues:

This article is ridiculous. Not caching data is [the] fault of the developers, not Uiwebview. And seriously, blaming the slowness on HTML? What does the format of the data have to do with anything? There is no reason their dev cycle isn’t compatible with a decent iOS app. iOS development at Facebook is not a priority. Period. That is the only reason the app sucks. It sucks because they wrote a shitty app. Not because of Uiwebview. Not because they use HTML. Because they wrote a shitty app.

Late to the conversation here but Robert Jacobson makes an excellent point: your criticisms are specific to the implementation of the FB app and not the concept of hybrid HTML5 apps. You specifically point out inefficient and inconsistent web service calls that cause many of the problems. Even a native app will be at the mercy of a poorly written web service. I appreciate all the research you’ve done for this article but it is disappointing that it is getting referenced elsewhere on the web for an example of why HTML hybrid apps are bad. You’ve got a good critique of the Facebook iOS app implementation here. This does not even come close to a fair analysis of HTML5 hybrid mobile applications as an implementation strategy.

The last quote brings up an important point, many are now soured by the idea of a HTML5 hybrid mobile application, which is unfortunate because it’s a architecture that would work well for many developers and alleviates the burden (at least to some degree) of supporting multiple mobile platforms.

Looking ahead, I’d bet on HTML5 and web technologies in general. You’ll never get native performance, but as mobile devices become more powerful the tradeoff, platform flexibility and ease-of-development in exchange for lower performance, will become a non-issue for all but the most intensive applications (e.g. games). I toyed around with PhoneGap (before it was bought by Adobe and split off into PhoneGap and Apache Cordova) last year and was pretty happy with the results. I did have a number of frustrations, but those weren’t due to performance, but to bugs and rendering issues in a number of HTML5 mobile frameworks (jQuery Mobile, jQTouch) and webkit mobile itself (support for position:fixed; not available in iOS 4 at the time, supported in iOS 5 which had just hit the market); I’m not pessimistic here, these are things that will improve (or have already improved) as mobile software development matures.

Elegant <img> presentation

While it’s easy to decry Flash and espouse the merits of HTML5, it’s worth taking a look at some of the positive elements found on many Flash sites and seeing what can be brought over to the HTML side. One very obvious aspect is the presentation of images. Flash sites almost never render an image in the way that an <img> tag is rendered by the browser. Flash sites will (typically) elegantly animate or fade an image in/out whereas the default browser behavior for HTML is to progressively render the image as it is received (sometimes images are 2D interlaced for a slightly better effect). Even worse, many HTML sites leave width and height as attributes to be determined dynamically for the <img> tag, resulting in page content shifting around as images are loaded.

Better image presentation is certainly possible with HTML + Javascript, and there are tons of beautiful JS image galleries on the web, but outside of such galleries most developers don’t attempt anything beyond the typical <img> presentation.

So, I did a little experiment with 2 goals in mind:

  • Elegant presentation of images with HTML + JS
  • Very simple markup, one iota above what’s necessary for a typical <img> tag

I’m pretty happy with the results.

elegant img loading

View the demo
(disable your browser cache so that loading latency is accurately taken into account)

Here’s what I did:

1. Make the <img> elements.

e.g.

<img
data-src="http://aautar.digital-radiation.com/elegant-img-loading/p1.jpg"
src="data:image/png;base64,iVBORw0KGgoAAAANSUhEUgAAAAEAAAABCAYAAAAfFcSJAAAABGdBTUEAAK/INwWK6QAAABl0RVh0U29mdHdhcmUAQWRvYmUgSW1hZ2VSZWFkeXHJZTwAAAAQSURBVHjaYvj//z8DQIABAAj8Av7bok0WAAAAAElFTkSuQmCC"
width="200"
height="150"
alt="photo" />

Things to note:

  • The data-src attribute is an HTML 5 custom data attribute. It specifies the URL of the image to be loaded.
  • The src attribute uses the data URI scheme to load and set the initial image displayed in the img element. Leaving the src attribute blank is not desirable as it will collapse the img element and only show the alt tag (the same behavior occurs initially if a URL to an image is specified). Specifying a data URI allows the image to be loaded as part of the document itself. The data URI shown above is for a 1×1, transparent PNG. A GIF preloader would probably be a good idea here.
  • The width and height attributes are specified. This is not strictly necessary, but in keeping with the theme of elegance, this prevent other content on the page from shifting after images are loaded.

2. Write the Javascript code

<script src="jquery-1.6.2.min.js" type="text/javascript"></script>
<
script type="text/javascript">

window.onload = function ()
{
$(
'img').each(function ()
{
var imgElem = $(this);
var src = imgElem.attr('data-src');

var img = new Image();
img.src = src;
img.onload =
function ()
{

imgElem.fadeTo(
'fast', 0.0001, function ()
{
imgElem.attr(
'src', src);
imgElem.fadeTo(
'slow', 1)
});

}

});
}

</script>

For simplicity, jQuery is used.

After the page is loaded, the data-src attribute of every <img> element is read. The image, specified by the data-src attribute, is loaded via a Javascript Image object and, once loaded (Image.onload event fires):

  • The <img> element is faded out (actually faded to an alpha of 0.0001 because a total fadeOut to 0 will effectively remove the element from the document rendering).
  • The src attribute is changed to the the URL of the loaded image.
  • The <img> element is faded in.

The important bit is changing the src attribute; the effect itself, whether it’s fading, sliding, etc. is not terribly important.

Gaussian blur on an HTML5 canvas

I’m actually going to present more than the actual gaussian blur implementation, also showing how to setup a simple animation controller and lightweight pixel shader system, allowing for defining the final color of a pixel on a per-pixel basis and allowing other effects to easily be plugged into the system. Be warned, this stuff is slow. This is all CPU processing (atop JavaScript no-less), there’s, sadly, no GPU hardware acceleration here. If your thinking about doing this on high-resolution images or writing effects that require a ton of passes over the image, you’re going bring the browser to a crawl, even on a fairly high-end system.

gaussian blur on HTML5 canvas element

I can’t embed JavaScript within this post, so you’ll have to go here to view the result (obviously, you’ll need an HTML 5 capable browser). For those who are curious, the very cool test image used is of a bird of paradise flower by the Agricultural Research Service.

So, first things first, the HTML, which is very simple. There’s 2 canvas element, one will hold the source image and the other will be the destination for the post-processed image. The width and height attributes on the canvas elements are set to the width and height of the image.

<!DOCTYPE html>
<html>
<head>
<title>HTML5 Blur FX</title>

<
script type="text/javascript">
// JS code will go here!
</
script>

</
head>
<body>
<canvas id="cvs-source" width="72" height="50">
</canvas>

<canvas id="cvs-dest" width="72" height="50">
</canvas>
</body>
</html>

Next, load the test image onto the source canvas (cvs-source) and setup the destination canvas (cvs-dest) as a blank image, which will occur when the page is loaded. Ignore the reference to the FXController object for now.

window.onload = function ()
{
var img = new Image();
img.onload =
function ()
{
// setup source
var ctxSource = document.getElementById('cvs-source').getContext('2d');
ctxSource.drawImage(img, 0, 0);

// setup destination
var cvsElement = document.getElementById('cvs-dest');
var ctxDest = cvsElement.getContext('2d');

var width = parseInt(cvsElement.getAttribute("width"));
var height = parseInt(cvsElement.getAttribute("height"));

ctxDest.createImageData(width, height);

var theShader = Shader.gaussBlur;
var fxCtrlr = new FXController(ctxSource, ctxDest, theShader, width, height, 10, 10);
fxCtrlr.init();
}

img.src =
'test3.png';
}

Stepping away from the actual code for a minute, it’s important to note how to actually modify the pixels on a canvas element:

  • Get the 2d context of the element by calling getContext(‘2d’) on the DOM element.
  • Call CanvasRenderingContext2D.getImageData(…) to get a buffer with the pixels in RGBA format.
  • To commit changes to the pixels onto a canvas, call CanvasRenderingContext2D.putImageData(…) with the buffer of modified pixels.
var ctxSource = document.getElementById('cvs-source').getContext('2d');
var imageData = ctxSource.getImageData(0, 0, width, height);


ctxDest.putImageData(bufWrite, 0, 0);

Back to the actual code. One of the very simple and primitive operations needed is to set a pixel to a color:

// GraphicsCore object
var GraphicsCore = {};
GraphicsCore.setPixel =
function (imageData, index, r, g, b, a)
{
imageData.data[index + 0] = r;
imageData.data[index + 1] = g;
imageData.data[index + 2] = b;
imageData.data[index + 3] = a;
}

I didn’t implement a corresponding getPixel() function because, as you’ll see, it’s very clean and easy to get the a pixel directly from the buffer and wasn’t worth invoking a function call.

The FXController object is (for the most part) the animation controller.

// FXController object
function FXController(_ctxSource, _ctxDest, _theShader, _width, _height, _fps, _maxFrames)
{
this.ctxSource = _ctxSource;
this.ctxDest = _ctxDest;
this.theShader = _theShader;
this.width = _width;
this.height = _height;
this.fps = _fps;
this.curFrame = 1; // [1, ...]
this.maxFrames = _maxFrames;
this.numPassesPerFrame = _theShader.numPassesRequired;
this.invervalPtr = null;

this.shaderFunc = function (fxCtrlr, passNum, frameNum, maxFrames)
{
Shader.run(fxCtrlr.ctxSource, fxCtrlr.ctxDest, fxCtrlr.width, fxCtrlr.height, fxCtrlr.theShader, passNum, frameNum, maxFrames);
}

this.init = function ()
{
var fxCtrlr = this;
var runFunc = function () { fxCtrlr.run(fxCtrlr); }

this.invervalPtr = setInterval(runFunc, 1000.0 / this.fps);
}

this.unInit = function()
{
clearInterval(
this.invervalPtr);
this.invervalPtr = null;
}

this.run = function (sender /*FXController*/)
{
for (var pn = 1; pn <= sender.numPassesPerFrame; pn++) {
sender.shaderFunc(sender, pn, sender.curFrame, sender.maxFrames);
}

sender.curFrame++;
if (sender.curFrame > sender.maxFrames) {
sender.unInit();
}
}
}

Most of what going on here is simply holding values which are passed to Shader.run(…). However, a few important things are being setup:

  • FXController.run(…) will be called at a certain number of frames per seconds (this.fps), until this.maxFrames is hit.
  • For each frame, Shader.run(…) will be called for each pass necessary (this.numPassesPerFrame). Certain effects will require more passes than other, for example, the gaussian blur implementation will require 2 passes.

The Shader object, the core of which is within Shader.run(…),

// Shader object
// Note: Shader.<shader_name>.numPassesRequired must be defined
var Shader = {};
Shader.run =
function (ctxSource, ctxDest, width, height, shaderFunc, passNum, frameNum, maxFrames)
{
//
// netscape.security.PrivilegeManager.enablePrivilege("UniversalBrowserRead"); // REMOVE ME BEFORE DEPLOYMENT
//

var bufWrite = ctxDest.getImageData(0, 0, width, height);

var imageData = null;
if (passNum == 1 && frameNum == 1) {
imageData = ctxSource.getImageData(0, 0, width, height);
}
else {
imageData = ctxDest.getImageData(0, 0, width, height);
}

for (var y = 0; y < height; y++) {

for (var x = 0; x < width; x++) {

var index = (x + y * imageData.width) << 2;
shaderFunc(imageData, bufWrite, index, x, y, imageData.data[index + 0], imageData.data[index + 1], imageData.data[index + 2], imageData.data[index + 3], passNum, frameNum, maxFrames);
}
}

ctxDest.putImageData(bufWrite, 0, 0);
}

(The UniversalBrowserRead privilege is necessary to run this locally in Firefox)

Shader.run(…) will setup the source and destination buffers, iterate over every pixel, compute the pixel index, get the pixel color, call shaderFunc(…) with all the necessary params, and finally commit any changes to the destination buffer (bufWrite). Note, the source canvas is only used for the first frame, first pass; in all other cases whatever is rendered on the destination canvas is used. This allows for certain effects (such as the gaussian blur) in which the effect can be progressively applied again and again, in a feedback loop, to produce updated iterations of the effect (in the case of a gaussian blur, the image is blurred more and more).

The code presented so far lays the framework to allow for writing a shader, plugging it into the system, and watching the result. Before, getting to the more complex gaussian blur filter, here’s a much simpler one: a single-pass, per-pixel image fade-in.

// fade in shader
Shader.fadeInShader =
function (imageData, bufWrite, index, x, y, r, g, b, a, passNum, frameNum, maxFrames)
{
var dt = frameNum/maxFrames; // [0, 1]
GraphicsCore.setPixel(bufWrite, index, r, g, b, dt * 255);
}
Shader.fadeInShader.numPassesRequired = 1;

(Shader..numPassesRequired is required for every shader, as FXController will query the value to determine how many times to call Shader.run(…) per frame.)

The shader function allows us to define what the final color of a pixel will be, given a set of input parameters, on a pixel-by-pixel basis, the core of what a pixel shader system is and allowing for a amazing degree of flexibility.

Finally, the gaussian blur shader. I won’t go into too many details here. If you’re interested in how a guassian blur is actually done, this article on gamedev.net is probably the best out there (esp. for transitioning from theory to practice), and the code here is almost a direct translation of what’s up there. Also note that bitshifts are used to do the power-of-2 divisions and multiplications.

// gaussian blur filter
Shader.gaussFact = Array(1, 6, 15, 20, 15, 6, 1);
Shader.gaussSum = 64;
// not used, >> 6 bitshift used in Shader.gaussBlur()
Shader.gaussWidth = 7;

Shader.gaussBlur =
function (imageData, bufWrite, index, x, y, r, g, b, a, passNum, frameNum, maxFrames)
{
if (passNum == 1 && (x <= 0 || x >= imageData.width - 1)) {
GraphicsCore.setPixel(bufWrite, index, r, g, b, a);
return;
}

if (passNum == 2 && (y <= 0 || y >= imageData.height - 1)) {
GraphicsCore.setPixel(bufWrite, index, r, g, b, a);
return;
}

var readBuf = imageData;
var writeBuf = bufWrite;

var sumR = 0;
var sumG = 0;
var sumB = 0;
var sumA = 0;

for (var k = 0; k < Shader.gaussWidth; k++) {

var nx = x;
var ny = y;

if (passNum == 1) { nx = (x - ((Shader.gaussWidth - 1) >> 1) + k); }
else if (passNum == 2) { ny = (y - ((Shader.gaussWidth - 1) >> 1) + k); }
else { }

// wrap around if we're trying to read pixels beyond the edge
if (nx < 0) { nx = readBuf.width + nx; }
if (ny < 0) { ny = readBuf.height + ny; }
if (nx >= readBuf.width) { nx = nx - readBuf.width; }
if (ny >= readBuf.height) { ny = ny - readBuf.height; }

var pxi = (nx + ny * readBuf.width) << 2;
var pxR = readBuf.data[pxi];
var pxG = readBuf.data[pxi + 1];
var pxB = readBuf.data[pxi + 2];
var pxA = readBuf.data[pxi + 3];

// little hack to make alpha=0 pixels look a bit better
// Note, the proper way to handle the alpha channel is to premultiply, blur, "unpremultiply"
if (pxA == 0) {
pxR = 255;
pxG = 255;
pxB = 255;
pxA = 255;
}

sumR += pxR * Shader.gaussFact[k];
sumG += pxG * Shader.gaussFact[k];
sumB += pxB * Shader.gaussFact[k];
sumA += pxA * Shader.gaussFact[k];
}

GraphicsCore.setPixel(writeBuf, index, sumR >> 6, sumG >> 6, sumB >> 6, sumA >> 6);
}
Shader.gaussBlur.numPassesRequired = 2;

The blur is done with a 3×3 convolution filter, over 2 passes. In the first pass, neighboring pixels are sampled and blurred along the x-axis. In the second pass, the same is done along the y-axis.

A few simple conditionals allow for wrapping around and sampling from the other side of the bitmap, if there’s an attempt to sample beyond the edges.

Note the little hack for transparent/translucent pixels; this is not the proper way to do this (and simply makes the error more grey-ish instead of black-ish), but I didn’t want to deal with premultiplying the alpha, so I’ve left it out.

The demo + all code is up @ http://aautar.digital-radiation.com/HTML5-BlurFX/