Posts Tagged ‘frontend’

Pushing computation to the front: client-side compression

Client → Server Compression

Content from a web server being automatically gzipped (via apache, nginx, etc.) and transferred to the browser isn’t anything new, but there’s really nothing in the way of compression when going in the other direction (i.e. transferring content from the client to the server). This is not too surprising, as most client payloads are small bits of textual content and/or binary content that is already well compressed (e.g. JPEG images), where there’s little gain from compression and you’re likely to just waste CPU cycles doing it. That said, when your frontend client is a space for content creation, you’re potentially going to run into cases where you’re sending a lot of uncompressed data to the server.

Use-case: ScratchGraph Export

ScratchGraph has an export feature that essentially renders the page (minus UI components) as a string of HTML. This string packaged along with some metadata and sent to the server, which sends it to a service running puppeteer, that renders the HTML string to either an image or a PDF. The overall process looks something like this:

ScratchGraph Export Flow

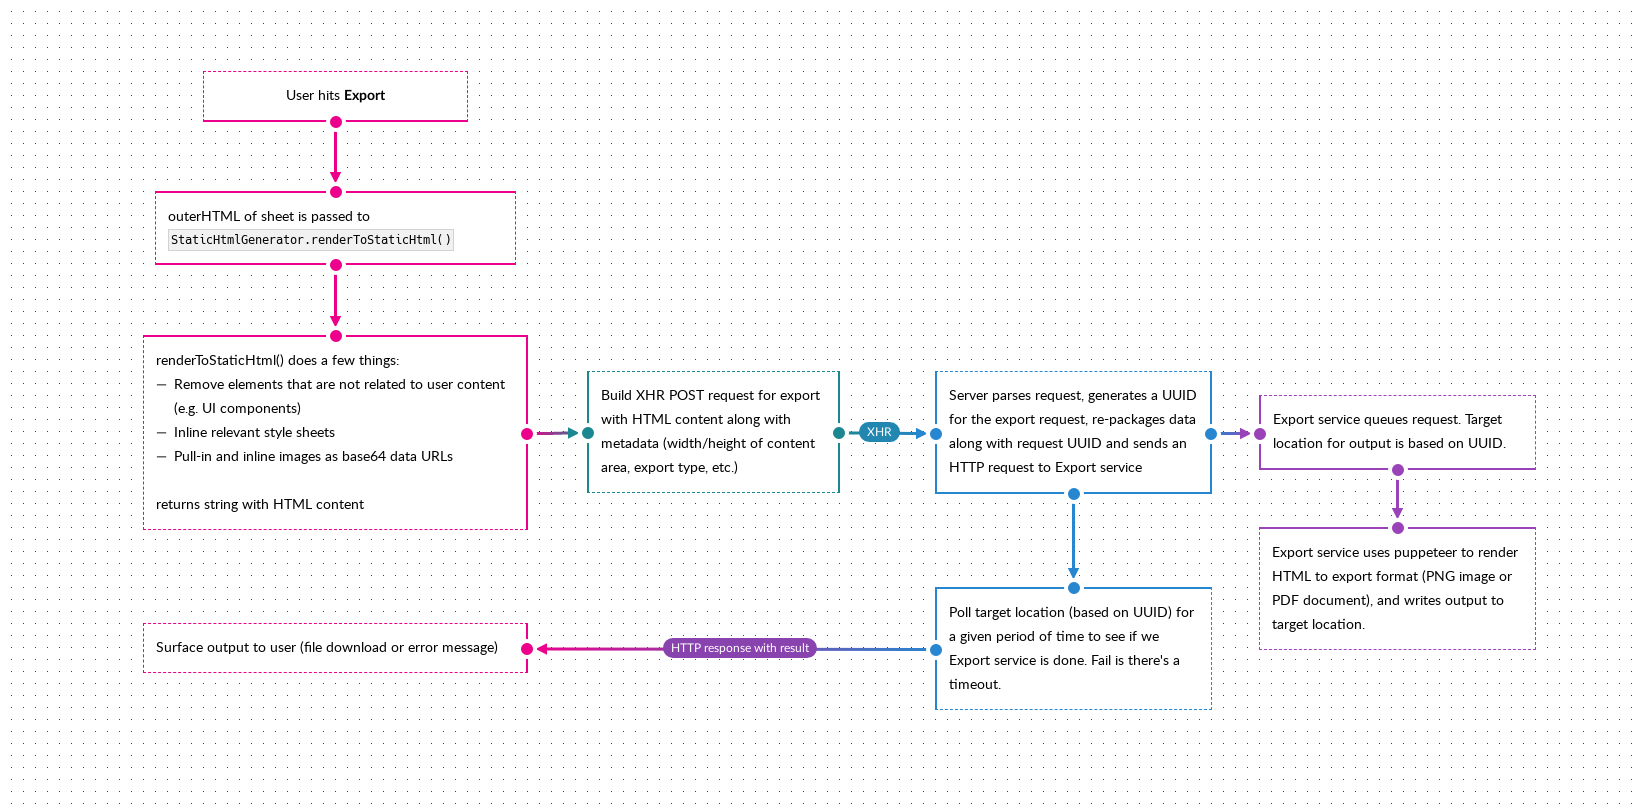
The HTML string being sent to the server is relatively large, a couple of MBs, due to:

  • The CSS styles (particularly due to external resources being pulled in and inlined as base64 URLs)
  • The user simply having lots of content

To be fair, it’s usually the former rather than the latter, and optimizing to avoid the inlining of resources (the intent of which was to try and do exports entirely in the browser) would have a greater impact in reducing the amount of data being transferred to the server. However, for the purposes of this blog post (and also because it leads to a more complex discussion on how the application architecture can/should evolve and what this feature looks like in the future), we’re going to sidestep that discussion and focus on what benefits data compression may offer.

Compression with pako

I was more than ready to implement a compression algorithm, but was happy to discover pako, which does zlib compression. Compressing (i.e. deflating) with pako is very simple, below I encode the HTML string to UTF8 via TextEncoder.encode() (this is because I want UTF8, this isn’t a requirement of pako), which returns a Uint8Array, then use that as the input for pako.deflate(), which also returns a Uint8Array.

const staticHtmlUtf8Arr = (new TextEncoder()).encode(html); const compressedStaticHtmlUtf8Arr = pako.deflate(staticHtmlUtf8Arr);

Here’s what that looks like in practice, exporting the diagram shown above:

ScratchGraph Export, with pako compression, results

That’s fairly significant, as the data size has been reduced by 1,237,266 bytes (42.77%)!

The final bit for the frontend is sending this to the server. I use a FormData object for the XHR call and, for the compressed data, I put append it as a Blob:

formData.append( "compressedStaticHtml", new Blob([compressedStaticHtmlUtf8Arr], {type: 'application/zlib'}), "compressedStaticHtml" );

Handling the compressed data server-side with PHP

PHP support zlib compression/decompression via the zlib module. The only additional logic needed server-side is calling gzuncompress() to decompressed the compressed data.

$staticHtml = gzuncompress(file_get_contents($compressedStaticHtmlFile->getFilePath()));

Note that $compressedStaticHtmlFile is an object representing a file pulled from the request (note that FormData will append a Blob in the same manner as a file, so server-side, you’re dealing with the data as a file). The File.getFilePath() method here is simply returning the path for the uploaded file.

Limitations

Compressing and decompressing data will cost CPU cycles and, for zlib and most algorithms, this will scale with the size of the data. So considerations around what the client-side system looks like and the size of the data need to be taken into account. In addition, compression within a browser’s main thread can lead to UI events, reflow, and repaint being blocked (i.e. the page becomes unresponsive). If the compression time is significant, performing it within a web worker instead would be a better path.

Pushing computation to the front: thumbnail generation

Frontend possibilities

As the APIs brought forward by HTML5 about a decade ago have matured and the devices running web browsers have continued to improve in computational power, looking at what’s possible on the frontend and the ability to bring backend computations to the frontend has been increasingly interesting to me. Such architectures would see each user’s browsers as a worker for certain tasks and could simply backend systems, as those tasks are pushed forward to the client. Using Canvas for image processing tasks is one area that interesting and that I’ve had success with.

For Mural, I did the following Medium-esque image preload effect, the basis of which is generating a tiny (16×16) thumbnail which is loaded with the page. That thumbnail is blurred via CSS filter, and transitions to the full-resolution image once it’s loaded. The thumbnail itself is generated entirely on the frontend when a card is created and saved alongside the card data.

In this post, I’ll run though generating and handling that 16×16 thumbnail. This is fairly straightforward use of the Canvas API, but it does highlight how frontend clients can be utilized for operations typically relegated to server-side systems.

The image processing code presented is encapsulated in the canvas-image-transformer library.

<img> → <canvas>

A precursor for any sort of image processing is getting the image data into a <canvas>. The <img> element and corresponding HTMLImageElement interface don’t provide any sort of pixel-level read/write functionality, whereas the <canvas> element and corresponding HTMLCanvasElement interface does. This transformation is pretty straightforward:

The code is as follows (an interesting thing to note here is that this can all be done without injecting anything into the DOM or rendering anything onto the screen):

const img = new Image(); img.onload = function() { const canvas = document.createElement('canvas'); canvas.width = img.width; canvas.height = img.height; const canvasCtx = canvas.getContext('2d'); canvasCtx.drawImage(img, 0, 0, img.width, img.width); // the image has now been rendered onto canvas } img.src = "https://some-image-url";

Resizing an image

Resizing is trivial, as it can be handled directly via arguments to CanvasRenderingContext2D.drawImage(). Adding in a bit of math to do proportional scaling (i.e. preserve aspect ratio), we can wrap the transformation logic into the following method:

/** * * @param {HTMLImageElement} img * @param {Number} newWidth * @param {Number} newHeight * @param {Boolean} proportionalScale * @returns {Canvas} */ imageToCanvas: function(img, newWidth, newHeight, proportionalScale) { if(proportionalScale) { if(img.width > img.height) { newHeight = newHeight * (img.height / img.width); } else if(img.height > img.width) { newWidth = newWidth * (img.width / img.height); } else {} } var canvas = document.createElement('canvas'); canvas.width = newWidth; canvas.height = newHeight; var canvasCtx = canvas.getContext('2d'); canvasCtx.drawImage(img, 0, 0, newWidth, newHeight); return canvas; }

Getting the transformed image from the canvas

My goto method for getting the data off a canvas and into a more interoperable form is to use the HTMLCanvasElement.toDataURL() method, which allows easily getting the image as a PNG or JPEG. I do have mixed feeling about data-URIs; they’re great for the web, because so much of the web is textually based, but they’re also horribly bloated and inefficient. In any case, I think interoperability and ease-of-use usually wins out (esp. here where we’re dealing with a 16×16 thumbnail and the data-uri is relatively lightweight) and getting a data-uri is generally the best solution.

Using CanvasRenderingContext2D.getImageData() to get the raw pixel from a canvas is also an option but, for a lot of use-cases, you’d likely need to compress and/or package the data in some way to make use of it.

Save the transformed image

With a data-uri, saving the image is pretty straightforward. Send it to the server via some HTTP method (POST, PUT, etc.) and save it. For a 16×16 PNG the data-uri textual representation is small enough that we can put it directly in a relational database and not worry about a conversion to binary.

Alternatives & limitations

The status quo alternative is having this sort of image manipulation logic encapsulated within some backend component (method, microservice, etc.) and, to be fair, such systems work well. There’s also some very concrete benefits:

  • You are aware of and have control over the environment in which the image processing is done, so you’re isolated from browser quirks or issues stemming from a user’s computing environment.
  • You have an easier path for any sort of backfill (e.g. how do you generate thumbnails for images previously uploaded?) or migration needs (e.g. how can you move to a different sized thumbnail?); you can’t just run though rows in a database and make a call to get what you need.

However, something worth looking at is that backend systems and server-side environments are typically not optimized for any sort of graphics workload, as processing is centered around CPU cores. In contrast, the majority of frontend environments have access to a GPU, even fairly cheap phone have some sort of GPU that is better suited for “embarassing parallel”-esque graphics operations, the performance benefits of which you get for free with the Canvas API in all modern browsers.

In Chrome, see the output of chrome://gpu:

chrome settings, canvas hardware acceleration

Scale, complexity and cost also come into play. Thinking of frontend clients as computational nodes can change the architecture of systems. The need for server-side resources (hardware, VMs, containers, etc.) is eliminated. Scaling concerns are also, to a large extent, eliminated or radically changed as operations are pushed forward to the client.

Future work

What’s presented here is just scratching the surface of what’s possible with Canvas. WebGL also presents as a ton of possibilities and abstraction layers like gpu.js are really interesting. Overall, it’s exciting to see the web frontend evolve beyond a mechanism for user input and into a layer in which substantive computation can be done.

Real-time image processing on the web

A while ago I began playing around with grabbing a video stream from a webcam and seeing what I could do with the captured data. Capturing the video stream using the navigator.getUserMedia() navigator.mediaDevices.getUserMedia() method was straightforward, but directly reading and writing the image data of the video stream isn’t possible. That said, the stream data can be put onto a canvas using CanvasRenderingContext2D.drawImage(), giving you the ability to manipulate the pixel data.

const videoElem = document.querySelector('video'); // Request video stream navigator.mediaDevices.getUserMedia({video: true, audio: false}) .then(function(_videoStream) { // Render video stream on <video> element videoElem.srcObject =_videoStream; }) .catch(function(err) { console.log(`getUserMedia error: ${err}`); } ); const videoElem = document.querySelector('video'); const canvas = document.querySelector('canvas'); const ctx = canvas.getContext('2d'); // put snapshot from video stream into canvas ctx.drawImage(videoElem, 0, 0);

You can read and write to the <canvas> element, so hiding the <video> element with the source data and just showing the <canvas> element seems logical, but the CanvasRenderingContext2D.drawImage() call is expensive; looking at the copied stream on the <canvas> element there is, very noticeable, visual lag. Another reason to avoid this option is that the frequency at which you render (e.g. 30 FPS), isn’t necessarily the frequency at which you’d want to grab and process image data (e.g. 10 FPS). The disassociation allows you to keep the video playback smooth, for a better user experience, but more effectively utilize CPU cycles for image processing. At least in my experience so far, a small delay in visual feedback from image processing is acceptable and looks perfectly fine intermixed with the higher-frequency video stream.

So the best options all seem to involve showing the <video> element with the webcam stream and placing visual feedback on top of the video in some way. A few ideas:

  • Write pixel data to another canvas and render it on top of the <video> element
  • Render SVG elements on top of the <video> element
  • Render DOM elements (absolutely positioned) on top of the <video> element

The third option is an ugly solution, but it’s fast to code and thus allows for quick prototyping. The demo and code below shows a quick demo I slapped together using <div> elements as markers for hotspots, in this case bright spots, within the video.

Here’s the code for the above demo:

<!DOCTYPE html> <html> <head> <title>Webcam Cap</title> <meta charset="UTF-8"> <meta name="viewport" content="width=device-width, initial-scale=1.0"> <style type="text/css"> * { margin:0; padding:0; border:none; overflow:hidden; } </style> </head> <body> <div> <video style="width:640px; height:480px;" width="640" height="480" autoplay></video> <canvas style="display:none; width:640px; height:480px;" width="640" height="480"></canvas> </div> <div class="ia-markers"></div> <script type="text/javascript"> const videoElem = document.querySelector('video'); const canvas = document.querySelector('canvas'); const ctx = canvas.getContext('2d'); var snapshotIntv = null; const width = 640; const height = 480; // Request video stream navigator.mediaDevices.getUserMedia({video: true, audio: false}) .then(function(_videoStream) { // Render video stream on <video> element videoElem.srcObject =_videoStream; // Take a snapshot of the video stream 10ms snapshotIntv = setInterval(function() { processSnapshot(_videoStream); }, 100); }) .catch(function(err) { console.log(`getUserMedia error: ${err}`); } ); // Take a snapshot from the video stream function processSnapshot() { // put snapshot from video stream into canvas ctx.drawImage(videoElem, 0, 0); // Clear old snapshot markers var markerSetParent = (document.getElementsByClassName('ia-markers'))[0]; markerSetParent.innerHTML = ''; // Array to store hotzone points var hotzones = []; // Process pixels var imageData = ctx.getImageData(0, 0, width, height); for (var y = 0; y < height; y+=16) { for (var x = 0; x < width; x+=16) { var index = (x + y * imageData.width) << 2; var r = imageData.data[index + 0]; var g = imageData.data[index + 1]; var b = imageData.data[index + 2]; if(r > 200 && g > 200 && b > 200) { hotzones.push([x,y]); } } } // Add new hotzone elements to DOM for(var i=0; i<hotzones.length; i++) { var x = hotzones[i][0]; var y = hotzones[i][1]; var markerDivElem = document.createElement("div"); markerDivElem.setAttribute('style', 'position:absolute; width:16px; height:16px; border-radius:8px; background:#0f0; opacity:0.25; left:' + x + 'px; top:' + y + 'px'); markerDivElem.className = 'ia-hotzone-marker'; markerSetParent.appendChild(markerDivElem); } } </script> </body> </html>

Edit (8/1/2020): The code has been updated to reflect changes in the MediaDevices API. This includes:

  • navigator.getUserMedianavigator.mediaDevices.getUserMedia. The code structure is slightly different given that the latter returns a promise.
  • Assigning the media stream to a video element directly via the srcObject attribute. This is now required in most modern browsers as the old way of using createObjectURL on the stream and assigning the returned URL to the video element’s src attribute is no longer supported.

In addition, there’s also just some general code cleanup to modernize the code and make it a little easier to read. Some of the language in the post has also been tweaked to make things clearer.