Pushing computation to the front: video snapshots

Video and the Canvas API

The Canvas API is surprising versatile. The image parameter of the CanvasRenderingContext2D.drawImage() method will accept images from a number of different sources including an HTMLVideoElement. I touched on this a bit in a previous post about processing the data from video streams, however HTMLVideoElement can also handle loading and rendering video files, with all modern browsers capable of tackling the non-trivial tasks of decoding and rendering H.264 MP4 or VP8/VP9 WebM content (and, of course, you get all the benefits of the client’s GPU hardware that the browser takes advantage of). This opens up the possibility of capturing frames from video files which can be used for preview images, poster images, or substituting in an image when video playback isn’t possible (e.g. for a print layout, which is the issue I’ve run into with ScratchGraph).

Setting up the HTMLVideoElement

This is fairly standard, here we’ll load an H.264 MP4 with the filename “test.mp4”:

const video = document.createElement('video'); const videoSource = document.createElement('source'); videoSource.setAttribute('type', 'video/mp4'); videoSource.setAttribute('src', 'test.mp4'); video.appendChild(videoSource);

For reference, here’s the test video:

Next, we want to seek to a point in the video where we want to capture the frame and also bind to an event that’ll tell us when we’re able to read the frame data from the HTMLVideoElement. The seeked event works well. The other potentially viable option is the loadeddata event, but I ran into some issues here, which I’ll describe later.

video.addEventListener('seeked', function(e) { // capture the video frame at the point seeked to... }); // seek to 2s video.currentTime = 2;

Render the frame onto a canvas

The Canvas API makes this really easy and the process mirrors what’s described in the post on thumbnail generation:

/** * * @param {HTMLVideoElement} video * @param {Number} newWidth * @param {Number} newHeight * @param {Boolean} proportionalScale * @returns {Canvas} */ videoFrameToCanvas: function(video, newWidth, newHeight, proportionalScale) { if(proportionalScale) { if(video.videoWidth > video.videoHeight) { newHeight = newHeight * (video.videoHeight / video.videoWidth); } else if(video.height > video.videoWidth) { newWidth = newWidth * (video.videoWidth / video.videoHeight); } else {} } const canvas = document.createElement('canvas'); canvas.width = newWidth; canvas.height = newHeight; const canvasCtx = canvas.getContext('2d'); canvasCtx.drawImage(video, 0, 0, newWidth, newHeight); return canvas; }

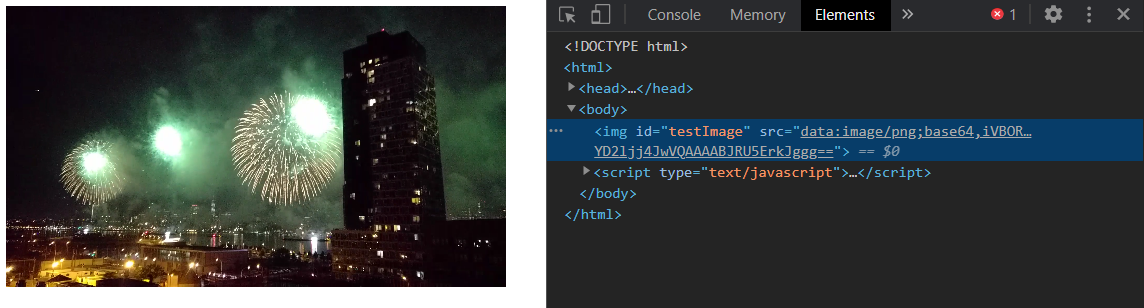
I added this method to the canvas-image-transformer library; referencing the method we can now flesh out the seeked event handler. For this test, we’ll also render out what’s on the canvas to an <img> element in the document to see what’s been captured.

video.addEventListener('seeked', function(e) { // capture the video frame at the point seeked to const frameOnCanvas = CanvasImageTransformer.videoFrameToCanvas(video, 500, 500, true); document.getElementById('testImage').src = frameOnCanvas.toDataURL(); });

frameOnCanvas is a canvas with the captured frame, and here’s what it looks like transformed & rendered into an <img> element:

canvas-image-transformer-test-video-frame-capture

Issues

  • Something not immediately obvious is that the seeked event is not fired if video.currentTime = 0 (i.e. you want to seek to the first frame of a video). However, you can use a very small time value (e.g. video.currentTime = 0.000000001), which will typically seek to the first frame in most cases. That said, it is a hacky/non-elegant solution.
  • There are cross-browser issues with the loadeddata event. In Firefox, you will only get a frame capture if you don’t seek. If you do attempt to seek, you’ll get a empty frame and the canvas will have a transparent image. Conversely, in Chrome (and other Webkit-based browsers), you will only get a frame if you do seek. The standard states that the event should be fired when “the user agent can render the media data at the current playback position for the first time” which seem to indicate an implementation flaw in both browsers.
  • The test video was taken on my phone and the frames themselves are upsided-down, this is typical with smartphone videos as it’s expected that playback will take into account metadata indicating orientation. In Firefox, this isn’t taken into account when using CanvasRenderingContext2D.drawImage() with HTMLVideoElement, so you get an upsided-down image on the canvas.

Alternatives & limitations

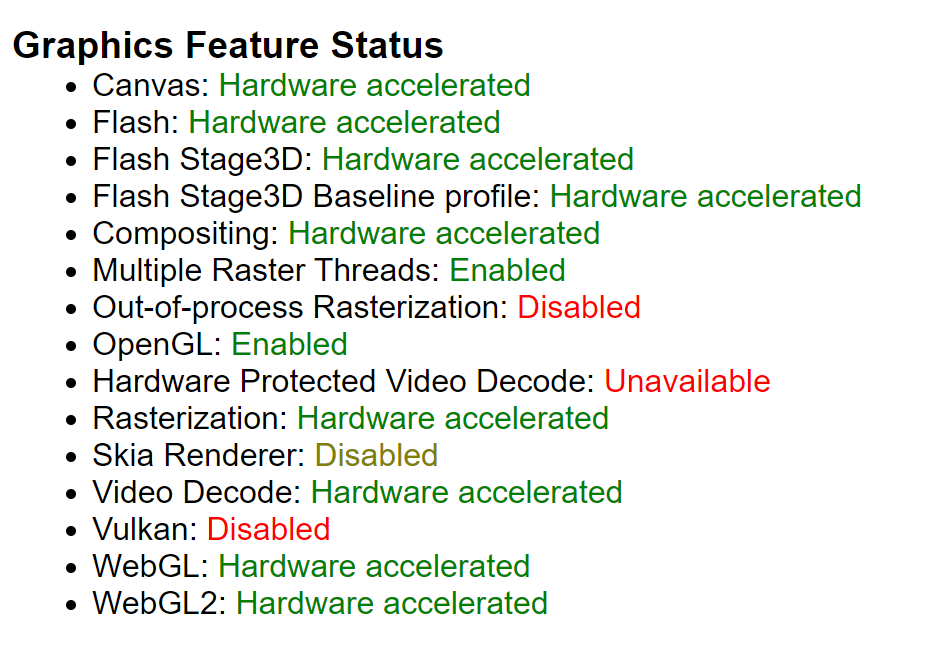
I couldn’t think of a ton of options for decoding H.264 or VP8/VP9. If you’re looking to create something yourself, a server-side service invoking FFmpeg seems like the best option. I played around with Puppeteer, but Puppeteer comes with Chromium, which lacks the audio and video support you get out-of-the box with Chrome. Although, installing and using Chrome server-side with Puppeteer has potential.

There are also third-party services which can handle video decoding and transcoding, and those are solid server-side options.

As with thumbnail generation, here again we’re looking at workloads that have potential to be moved to the frontend, where you have hardware better suited for graphics work and the possibility of reducing backend complexity. On the other hand, the same limitations comes into play, as you have less control over the execution environment and no clear path for backfill or migration needs.


Pushing computation to the front: thumbnail generation

Frontend possibilities

As the APIs brought forward by HTML5 about a decade ago have matured and the devices running web browsers have continued to improve in computational power, looking at what’s possible on the frontend and the ability to bring backend computations to the frontend has been increasingly interesting to me. Such architectures would see each user’s browsers as a worker for certain tasks and could simply backend systems, as those tasks are pushed forward to the client. Using Canvas for image processing tasks is one area that interesting and that I’ve had success with.

For Mural, I did the following Medium-esque image preload effect, the basis of which is generating a tiny (16×16) thumbnail which is loaded with the page. That thumbnail is blurred via CSS filter, and transitions to the full-resolution image once it’s loaded. The thumbnail itself is generated entirely on the frontend when a card is created and saved alongside the card data.

In this post, I’ll run though generating and handling that 16×16 thumbnail. This is fairly straightforward use of the Canvas API, but it does highlight how frontend clients can be utilized for operations typically relegated to server-side systems.

The image processing code presented is encapsulated in the canvas-image-transformer library.

<img> → <canvas>

A precursor for any sort of image processing is getting the image data into a <canvas>. The <img> element and corresponding HTMLImageElement interface don’t provide any sort of pixel-level read/write functionality, whereas the <canvas> element and corresponding HTMLCanvasElement interface does. This transformation is pretty straightforward:

The code is as follows (an interesting thing to note here is that this can all be done without injecting anything into the DOM or rendering anything onto the screen):

const img = new Image(); img.onload = function() { const canvas = document.createElement('canvas'); canvas.width = img.width; canvas.height = img.height; const canvasCtx = canvas.getContext('2d'); canvasCtx.drawImage(img, 0, 0, img.width, img.width); // the image has now been rendered onto canvas } img.src = "https://some-image-url";

Resizing an image

Resizing is trivial, as it can be handled directly via arguments to CanvasRenderingContext2D.drawImage(). Adding in a bit of math to do proportional scaling (i.e. preserve aspect ratio), we can wrap the transformation logic into the following method:

/** * * @param {HTMLImageElement} img * @param {Number} newWidth * @param {Number} newHeight * @param {Boolean} proportionalScale * @returns {Canvas} */ imageToCanvas: function(img, newWidth, newHeight, proportionalScale) { if(proportionalScale) { if(img.width > img.height) { newHeight = newHeight * (img.height / img.width); } else if(img.height > img.width) { newWidth = newWidth * (img.width / img.height); } else {} } var canvas = document.createElement('canvas'); canvas.width = newWidth; canvas.height = newHeight; var canvasCtx = canvas.getContext('2d'); canvasCtx.drawImage(img, 0, 0, newWidth, newHeight); return canvas; }

Getting the transformed image from the canvas

My goto method for getting the data off a canvas and into a more interoperable form is to use the HTMLCanvasElement.toDataURL() method, which allows easily getting the image as a PNG or JPEG. I do have mixed feeling about data-URIs; they’re great for the web, because so much of the web is textually based, but they’re also horribly bloated and inefficient. In any case, I think interoperability and ease-of-use usually wins out (esp. here where we’re dealing with a 16×16 thumbnail and the data-uri is relatively lightweight) and getting a data-uri is generally the best solution.

Using CanvasRenderingContext2D.getImageData() to get the raw pixel from a canvas is also an option but, for a lot of use-cases, you’d likely need to compress and/or package the data in some way to make use of it.

Save the transformed image

With a data-uri, saving the image is pretty straightforward. Send it to the server via some HTTP method (POST, PUT, etc.) and save it. For a 16×16 PNG the data-uri textual representation is small enough that we can put it directly in a relational database and not worry about a conversion to binary.

Alternatives & limitations

The status quo alternative is having this sort of image manipulation logic encapsulated within some backend component (method, microservice, etc.) and, to be fair, such systems work well. There’s also some very concrete benefits:

  • You are aware of and have control over the environment in which the image processing is done, so you’re isolated from browser quirks or issues stemming from a user’s computing environment.
  • You have an easier path for any sort of backfill (e.g. how do you generate thumbnails for images previously uploaded?) or migration needs (e.g. how can you move to a different sized thumbnail?); you can’t just run though rows in a database and make a call to get what you need.

However, something worth looking at is that backend systems and server-side environments are typically not optimized for any sort of graphics workload, as processing is centered around CPU cores. In contrast, the majority of frontend environments have access to a GPU, even fairly cheap phone have some sort of GPU that is better suited for “embarassing parallel”-esque graphics operations, the performance benefits of which you get for free with the Canvas API in all modern browsers.

In Chrome, see the output of chrome://gpu:

chrome settings, canvas hardware acceleration

Scale, complexity and cost also come into play. Thinking of frontend clients as computational nodes can change the architecture of systems. The need for server-side resources (hardware, VMs, containers, etc.) is eliminated. Scaling concerns are also, to a large extent, eliminated or radically changed as operations are pushed forward to the client.

Future work

What’s presented here is just scratching the surface of what’s possible with Canvas. WebGL also presents as a ton of possibilities and abstraction layers like gpu.js are really interesting. Overall, it’s exciting to see the web frontend evolve beyond a mechanism for user input and into a layer in which substantive computation can be done.


Embedding content with oEmbed

History

Embedding external content has been a feature of the web since the introduction of the iframes ages ago. However, embedding as a business strategy didn’t seem to be a thing until sometime around the late 2000s or the early 2010s, as social networking became big business, blogging became really popular, and there was concern over walled gardens. In this environment, embedding became a component for growth, and it was no doubt successful for now behemoths like Youtube and Twitter (another component was adding social networking to sites, à la Google+ or Dunder Mifflin Infinity). Almost any site dealing in content had an embed feature or an embedded “widget.” Even Grovo, where I worked, was on this train as well with the Grovo Widget, though I was not involved in its development. It some cases this made sense and provided utility, in many others it was just copying what seemed to be working for others in ecosystem without regard for product or overall business strategy.

It seems like around this time oEmbed was drafted and Embedly was founded.

oEmbed

My view on how embeds were done was based on what you see in most UIs: you get a embed code (which is a snippet of HTML, likely encapsulated within an iframe), you paste that into a page, and the browser does the rest.

I learned about oEmbed working on Mural. oEmbed is an interesting protocol which allows consumers to request data representing what a resource should look like in an embedded context, given the URL of that resource. The overall flow looks something like this:

Figuring out what the oEmbed endpoint is involves looking at a <link> element from the resource’s HTML page. Unfortunately this does mean you have the overhead and complexity of downloading and parsing an HTML document to get the endpoint. An alternative is pulling from the list of providers in the oEmbed repo and looking at the oEmbed endpoints and allowed URL schemes for resources.

In either case, the result for the end-user is that by simply providing the URL for a resource, the appropriate content for an embed can be provided. Here’s what this looks like in Squarespace:

Embedly

Unfortunately, the video above is a lie. While everything described around oEmbed would allow for a flow like that, Squarespace (and a surprising number of other popular sites, like Medium) outsource handling of oEmbed to Embedly.

Embedly seems to do a few other things, but primarily it seems to proxy oEmbed content. What’s the value-add? According to Embedly:

We take care of every step of the process: retrieving information about a URL, checking it against malware registries, extracting content, making additional API calls to providers that support them, parsing RSS feeds, and performing validation. We save you time so that you can focus on making your app great.

The only aspect there I find compelling for the price tag is “checking it against malware registries,” but there’s little info on what level of protection they’re actually providing there.

I dealt with Embedly directly when working on Mural and it was a frustrating experience. First, note that if you’re not registered as an Embedly provider, sites that proxy through Embedly will return incorrect oEmbed data. On Squarespace, I noticed the Embedly response would have a type of “link” and not provide any of the data to do an HTML embed (so what’s shown in the video above will not happen, and it will appear as if the resource is not embeddable). Registering as a provider involves filling out a form with some endpoint information and example URLs, easy enough, but I had to wait weeks with no responses or status updates. For a request put in on Jan. 31, 2018, the Embedly integration was not done until Apr. 9th, 2018. A terrible experience overall and surprising for a company that is (a) owned by Medium and (b) seems to be a critical dependency for so many sites.

The short of it is, if as a provider, users can’t embed your content on a site, see if you need to register as an Embedly provider. If you do, good luck.

The Future

The excitement and prominence around blogging seems to have died down and this seems to have corresponded with the excitement around embedding content diminishing as well. That said, I think being able to embed content is still, and will continue to be, a powerful mechanism on the web. Even with its flaws oEmbed works nicely in this landscape. I can’t say the same for Embedly.


Serving mjs files with nginx

In my previous post on ES modules, I mentioned adopting the mjs file extension for modules files. Unfortunately, there’s no entry for the mjs extension in nginx’s default mime.types file, meaning it’ll be served as application/octet-stream instead of application/javascript. The MIME type for mjs files can be set by explicitly including mime.types in a server, http, or location block & adding a types block with the MIME type and file extension:

server { include mime.types; types { application/javascript mjs; } ... }


Writing and testing ES modules

The toolchain

ES modules are one of the more exciting additions to the Javascript language. Effectively being able to break-off and modularize has continually led to better code and development practices in my experience. For server-side Javascript, Node and its associated module system took hold, but there was nothing comparable for browsers. However, Node-based toolchains to produce frontend code also became a thing, doing rollup, transpilation, minification, etc. This wasn’t necessarily a bad thing, and came with some noted benefits such as better support for unit testing scaffolds and integration into CI pipelines, but it also set a stage for increasingly complex toolchains and an ecosystem whereby frontend components were Node-based server-side components first, and transformed into frontend components after. The latter, in turn, led to a state where you were always working with a toolchain (it wasn’t just for CI or producing optimized distributables) as there was no path to directly load these components in a browser, and I’d argue also led to a state where components were being composed with an increasing and ridiculous number of dependencies, as the burden of resolving and flattening dependencies fell to to the toolchain.

ES modules aren’t any sort of silver bullet here, but it does show a future where some of this complexity can be rolled back, the toolchain only needs to handle and be invoked for specific cases, and there is less impedance in working with frontend code. We’re not there yet, but I’m hopeful and as such I’ve adopted ES modules in projects where I’ve been able to.

A look at GraphPaper

GraphPaper was the first project where I committed to ES modules for the codebase. At the time, support for ES modules was limited in both Node and browsers (typically incomplete support and put behind a feature flag), so for both development work and producing distributables, I used rollup.js + Babel to produce an IIFE module. This worked well, though it’s a pain to do a build every for every code change I want to see in the browser. I also remember this being pretty easy to setup initially, but the package.json became more convoluted with Babel 6, when everything was split into smaller packages (I understand the rationale, but the developer experience is horrible and pushes the burden of understanding various babel components to consumers).

Structuring the module

Structuring was fairly simple. Everything that was meant to be accessible by consumers was declared in a single file (GraphPaper.js), declared via export statements (i.e. it was just a file with a bunch of export * from … statements). This file also served as the input for rollup.js:

{ input: 'src/GraphPaper.js', output: { format: 'iife', file: 'dist/graphpaper.min.js', name: 'GraphPaper', sourcemap: true }, plugins: [ babel(babelConfig), ], }

In a modern browser, it would be possible to import the GraphPaper ES module directly, like so:

<script type="module"> import * as GraphPaper from '../src/GraphPaper.js'; ... </script>

However, the way dependent web workers are built and encapsulated makes this impossible (explained here).

Another problem, but one that’s fixable, is that I wrote import and export statements without file extensions. For browsers, this leads to an issue as the browser will just request what’s declared in the statement and not append any file extension (so a statement like import { LineSet } from './LineSet'; results in a request to the server for ./LineSet, not ./LineSet.js, as the file is named. Moving forward, the recommendation to use the .mjs extension and explicitly specifying the extension in import statements seems to be a good idea; in addition to addressing the issue with browser requests, when working in Node .mjs files will automatically be treated as ES modules.

Pushing aside the web worker issue, we can see a future where rollup.js isn’t necessary, or at least not necessary for producing browser-compatible (e.g. IIFE) modules. It’s role can be limited to concatenation and orchestrating optimizations (e.g. minification) for distributables. Similarly, for Babel, it’s role can be reduced or eliminated. As support for newer ES features (particularly those in ES6 and ES7) continues to improve across systems (browsers, Node, etc.), and users adopt these systems, transpilation won’t be as necessary. The exception is the case where developers want to use the very latest ES features, but I think we’re quickly approaching a point of diminishing returns here, especially relative to the cost of toolchain complexity.

Testing with jasmine-es6, moving to Ava

For testing, I found jasmine-es6 to be one of the simpler ways to test ES modules at the time. Ava existed, but I remember running into issues getting it working. I remember also toying with Jest at some point and also running into issues. In the end, jasmine-es6 worked well, I never had issues importing and writing tests for a module. Here’s a sample test from the codebase:

import { Point } from '../src/Point' import { Line } from '../src/Line' import { LineSet } from '../src/LineSet' describe("LineSet constructor", function() { it("creates LineSet from Float64Array coordinates", function() { const typedArray = Float64Array.from([1,2,3,4,5,6,7,8]); const ls = new LineSet(typedArray); const lineSetArray = ls.toArray(); expect(ls.count()).toBe(2); expect(lineSetArray[0].isEqual(new Line(new Point(1, 2), new Point(3, 4)))).toBe(true); expect(lineSetArray[1].isEqual(new Line(new Point(5, 6), new Point(7, 8)))).toBe(true); }); });

jasmine-es6 has and continues to work really well despite being deprecated. I’ll likely adopt and reformat the tests to Ava at some point the future. I’ve played around with it again recently and it was a much smoother experience, it’s also better supported and I like the simpler syntax around tests more-so than the Jasmine syntax. I’m looking to do this when Node has stable support for ES modules, as this would mean not worrying about pulling in and configuring Babel for running tests (though it’ll likely still be around for rollup.js).

Takeaways

Overall, it’s been fairly smooth working with ES modules and it looks like things will only improve in the future. Equally exciting is the potential reduction in toolchain complexity that comes with better support for ES modules.

  • Support for ES modules continues to improve across libraries, browsers, and Node
  • It’s probably a good idea to use the .mjs file extension
  • Rollup.js is still needed for now to make browser-compatible (e.g. IIFE) modules, but will likely take on a more limited role in the future (concatenation & minification)
  • Better support for ES6 and ES7 features across the board will mean that Babel, and transpilation in general, won’t be as necessary


Installing ODBC Driver 17 for SQL Server on Debian

For a project at work I went through a bit of struggle getting the Microsoft ODBC Driver 17 for SQL Server installed on a barebones Debian system (this was for a Docker container, no SSH, no package manager). Here’s what I discovered and did to finally get it working.

Dependencies

These are the base dependencies to be able to invoke the driver:

  • libltdl7
  • libodbc1
  • odbcinst
  • odbcinst1debian2
  • locales-all

The locales-all package is strictly necessary, but some locale configuration is necessary or you’ll run into the error locale::facet::_S_create_c_locale name not valid when trying to run the sqlcmd utility. This article provides a bit more detail.

ODBC Configuration

After installing dependencies, config the driver by appending the config details to /etc/odbcinst.ini:

[ODBC Driver 17 for SQL Server] Description=Microsoft ODBC Driver 17 for SQL Server Driver=/opt/microsoft/msodbcsql17/lib64/libmsodbcsql-17.5.so.2.1 UsageCount=1

OpenSSL Issue

The final issue I ran into was super cryptic, when trying to connect to a MSSQL instance I ran into the following error:

SQLSTATE[08001]: [Microsoft][ODBC Driver 17 for SQL Server]TCP Provider: Error code 0x2746

The issue is described GitHub issue. In short this is a compatibility issue with the driver and OpenSSL + Debian 10, which has disabled SHA1 for signatures. The fix involves editing /etc/ssl/openssl.cnf and changing the last line from CipherString = DEFAULT@SECLEVEL=2 to CipherString = DEFAULT@SECLEVEL=1. Of course consider if doing this is a security risk in your environment and for your use-case.

A connection!

With the above done, I was able to successfully connect to the MSSQL instance using sqlcmd. I was hoping at this point things would “just work” with pyodbc, but that wasn’t the case (the connection would simply hang when attempting to connect.. no timeouts, no errors). So at this point, I’m considering whether it’s still worth it to try and use this driver or stick with the existing (FreeTDS).


Finding, fetching, and rendering favicons with puppeteer

I’ve been working a bit with fetching favicons and noted some of the complexity I encountered:

  • The original way to adding favicons to a site, placing /favicon.ico file in the root directory, is alive and well; browsers will make an HTTP GET request to try and fetch this file.
  • Within the HTML document, <link rel="icon" is the correct way to specify the icon. However, a link tag with <link rel="shortcut icon" is also valid and acceptable, but “shortcut” is redundant and has no meaning (of course, if you’re trying to parse or query the DOM, it’s a case you need to consider).
  • Like other web content, the path in a <link> tag can an absolute URL, with may or may not declare a protocol, or a relative URL.
  • While there is really good support for PNG favicons, ICO files are still common, even on popular sites (as of writing this Github, Twitter, and Gmail, all use ICO favicons).
  • When not using ICO files, they is usually multiple <link> tags, with different values for the sizes attribute, in order to declare different resolutions of the same icon (ICO is a container format, so all the different resolution icons are packaged together).
  • The correct MIME type for ICO files is image/vnd.microsoft.icon, but the non-standard image/x-icon is much more common.
  • Despite the popularity of ICOs and PNGs, there’s a bunch of other formats with varying degrees of support across browsers: GIF (animated/non-animated), JPEG, APNG, SVG. Of particular note is SVG, as it’s the only non-bitmap format on this list, and is increasing being supported.

The goal was to generate simple site previews for ScratchGraph, like this:

ScratchGraph Site Preview

Finding the favicon URL was one concern. My other concern was rendering the icon to a common format, while this isn’t technically necessary, it does lower the complexity in the event that I wanted to do something with the icon, other than just rendering within the browser.

Finding the favicon URL

I wrote the following code to try and find the URL of the “best” favicon using Puppeteer (Page is the puppeteer Page class):

/** * * @param {Page} page * @param {String} pageUrl * @returns {Promise<String>} */ const findBestFaviconURL = async function(page, pageUrl) { const rootUrl = (new URL(pageUrl)).protocol + "//" + (new URL(pageUrl)).host; const selectorsToTry = [ `link[rel="icon"]`, `link[rel="shortcut icon"]` ]; let faviconUrlFromDocument = null; for(let i=0; i<selectorsToTry.length; i++) { const href = await getDOMElementHRef(page, selectorsToTry[i]); if(typeof href === 'undefined' || href === null || href.length === 0) { continue; } faviconUrlFromDocument = href; break; } if(faviconUrlFromDocument === null) { // No favicon link found in document, best URL is likley favicon.ico at root return rootUrl + "/favicon.ico"; } if(faviconUrlFromDocument.substr(0, 4) === "http" || faviconUrlFromDocument.substr(0, 2) === "//") { // absolute url return faviconUrlFromDocument; } else if(faviconUrlFromDocument.substr(0, 1) === '/') { // favicon relative to root return (rootUrl + faviconUrlFromDocument); } else { // favicon relative to current (pageUrl) URL return (pageUrl + "/" + faviconUrlFromDocument); } };

This will try to get a favicon URL via:

  • Try to get the icon URL referenced in the first link[rel="icon"] tag
  • Try to get the icon URL referenced in the first link[rel="icon shortcut"] tag
  • Assume that if we don’t find an icon URL in the document, there’s a favicon.ico relative to the site’s root URL

Getting different sizes of the icon or trying to get a specific size is not supported. Also, for URLs pulled from the document via link[rel=… tags, there’s some additional code to see if URL is absolute, relative to the site/document root, or relative to the current URL and, if necessary, construct and return an absolute URL.

The getDOMElementHRef function to query the href attribute is as follows:

/** * * @param {Page} page * @param {String} query * @returns {String} */ const getDOMElementHRef = async function(page, query) { return await page.evaluate((q) => { const elem = document.querySelector(q); if(elem) { return (elem.getAttribute('href') || ''); } else { return ""; } }, query); };

Fetching & rendering to PNG

Puppeteer really shines at being able to load and render the favicon, and providing the mechanisms to save it out as a screenshot. You could attempt to read the favicon image data directly, but there is significant complexity here given the number of different image formats you may encounter.

Rendering the favicon is relatively straightfoward:

  • Render the favicon onto the page by having the Page goto the favicon URL
  • Query the img element on the page
  • Make the Page’s document.body background transparent (to capture any transparency in the icon when we take the screenshot)
  • Take a screenshot of that img element, such that a binary PNG is rendered

Here is the code to render the favicon onto the page:

/** * * @param {Page} page * @param {String} pageUrl * @returns {ElementHandle|null} */ const renderFavicon = async function(page, pageUrl) { let faviconUrl = await findBestFaviconURL(page, pageUrl); try { console.info(`R${reqId}: Loading favicon from ${faviconUrl}`); await page.goto(faviconUrl, {"waitUntil" : "networkidle0"}); } catch(err) { console.error(`R${reqId}: failed to get favicon`); } const renderedFaviconElement = await page.$('img') || await page.$('svg'); return renderedFaviconElement; };

Finally, here’s the snippet to render the favicon to a PNG:

if(renderedFaviconElement) { const renderedFaviconElementTagName = await (await renderedFaviconElement.getProperty('tagName')).jsonValue(); if(renderedFaviconElementTagName === 'IMG') { await page.evaluate(() => document.body.style.background = 'transparent'); } const faviconPngBinary = await renderedFaviconElement.screenshot( { "type":"png", "encoding": "binary", "omitBackground": true } ); }

EDIT 4/7/2020: Updated code snippets to correctly handle SVG favicons. With SVGs, an <svg> element will be rendered on the page (instead of an <img> element). Also, there is no <body> element, as the SVG is rendered directly and not embedded within an HTML document, and hence no need to set the document’s body background to transparent.

EDIT 1/10/2022: Fix source code snippets to reflect that pageUrl is the variable with the URL of the page, not src.


SVG filters and invisible paths

The setup

Let’s look at a few paths:

  • We have the arrow thingy (M100 100 L330 453 L349 349 L527 349 L100 100)
  • The horizontal line (M50 50 L200 50)
  • The vertical line (M125 10 L125 50)

There’s some CSS to style the paths:

path { fill: none; stroke-width: 3px; stroke: url('#gradient'); }

There’s also some code for the linear gradient, but that’s not relevant here.

A blur filter

A simple SVG gaussian blur filter can be done as follows:

<defs> <filter id="blur"> <feGaussianBlur in="SourceGraphic" stdDeviation="2" /> </filter> </defs>

Applying that filter to the paths (via filter:url(#blur) CSS rule), we get the following:

So, that kinda works, but the horizontal and vertical paths are now invisible!

Update (9/14/2024): It looks like this is a non-issue is recent version of Firefox, as the horizontal and vertical paths are visible. However, the paths are still invisible in Chrome.

A problem with filterUnits

The issue surfaces due to the value of the filterUnits attribute on the filter element is set to objectBoundingBox (which is also the default when a value is not specified). From the SVG spec:

Keyword objectBoundingBox should not be used when the geometry of the applicable element has no width or no height, such as the case of a horizontal or vertical line, even when the line has actual thickness when viewed due to having a non-zero stroke width since stroke width is ignored for bounding box calculations. When the geometry of the applicable element has no width or height and objectBoundingBox is specified, then the given effect (e.g., a gradient or a filter) will be ignored.

objectBoundingBox simply means that the x, y, width, height attributes on the filter are relative to the bounding box of the element referencing the filter, so it’s confusing why this should be an issue at all. In any case, it’s of course problematic for paths which have no width and height.

The solution

The solution is simply to change the filterUnits attribute to userSpaceOnUse. If you make use of the x, y, width, height attributes on the element, they will also need to be updated, as these attributes will now represent the coordinate system in which the element referencing the filter is (as opposed to the bounding box of that element).

<defs> <filter id="blur" filterUnits="userSpaceOnUse"> <feGaussianBlur in="SourceGraphic" stdDeviation="2" /> </filter> </defs>

A simple fix but this is an annoying issue and I see no clear reason as to why filterUnits="objectBoundingBox" should be problematic for elements without a defined width and height.


Writing to the Bitfenix ICON display with Rust (part 1, writing images)

Bitfenix ICON

I love the Bitfenix Pandora case and used it for my desktop PC build a few years ago. One interesting aspect about this case is that it has an attached LCD on the front, the Bitfenix ICON display; I’ve never done anything with the display (I just left the default logo on it), but recently I discovered the source code was available and it was possible to programmatically write to the display, and became interested in how this is done and what I could do with the display.

Instead of using the code provided by Bitfenix, I used the modified source produced by Rizvi R. I fired up Visual C++, dealt with downloading and pointing the compiler + linker to necessary libraries, I hit a stumbling block with libjpeg, but stripped out the JPEG support and was able to get something up and running. The code loads an image, resizes it to fit the display, reduces the color depth to match the display, and then writes to the display using HIDAPI (which is really cool and something I didn’t realize existed). The code was ok, but I decided to see if I could modularize it further and rewrite it in Rust (avoiding some of the less modern things in C++ world, like package management) as a learning exercise.

The Display

The ICON display is far from any sort of high quality panel, but it’s adequate for something put on a case. I haven’t come across official specs, but here’s what I’ve been able to gather:

  • Resolution of 240×320
  • 16-bit color, 5-6-5 format (5 bits for red, 6 bits for green, 5 bits for blue)
  • Super slow refresh rate, like over 1 second (so not suitable for any sort of animation)

Rust Dependencies

We’ll make use of 2 Rust packages, png and hidapi via cargo:

[dependencies] png = "0.15.3" hidapi = "1.1.0"

Loading PNG images & converting to 16bpp

We can load a PNG image and get a pixel buffer as follows:

fn load_png_image(filepath: &str) -> Vec<u8> { let decoder = png::Decoder::new(File::open(filepath).unwrap()); let (info, mut reader) = decoder.read_info().unwrap(); // Allocate the output buffer. let mut buf = vec![0; info.buffer_size()]; reader.next_frame(&mut buf).unwrap(); buf }

This will work well for 24bpp images and return a buffer with R, G, and B components, 8 bits each. As the ICON is a 5-6-5 16bpp display, we’ll need to reduce the color depth by chopping off bits with some bit shift operations (for more details on what’s happening here, this is a good resource):

fn reduce_image_to_16bit_color(image_buf: &[u8]) -> Vec<u8> { let mut result: Vec<u8> = Vec::with_capacity(240 * 320 * 2); for i in (0..image_buf.len()).step_by(3) { let b: u16 = ((image_buf[i + 2] as u16) >> 3) & 0x001F; let g: u16 = (((image_buf[i + 1] as u16) >> 2) << 5) & 0x07E0; let r: u16 = (((image_buf[i] as u16) >> 3) << 11) & 0xF800; let rgb: u16 = r | g | b; result.push( ((rgb >> 8) & 0x00FF) as u8 ); result.push( (rgb & 0x00FF) as u8 ); } result }

We can now load an image and reduce the color depth as follows:

// Image needs to be 240x320 (24bpp, no alpha channel) let src_image = load_png_image("assets/1.png"); let reduced_color_img = reduce_image_to_16bit_color(&src_image);

Open the ICON device

Using the HIDAPI, we can open the device with it’s vendor ID (0x1fc9) and product ID (0x100b):

let hid = HidApi::new().unwrap(); let bitfenix_icon_device = hid.open(0x1fc9, 0x100b).unwrap();

I thought it might be useful to query and surface product and manufacturer info of the device as follows:

let device_manuf_string = bitfenix_icon_device.get_manufacturer_string().unwrap().unwrap(); let device_prod_string = bitfenix_icon_device.get_product_string().unwrap().unwrap(); println!("{}: {}", device_manuf_string.as_str(), device_prod_string.as_str());

However, this isn’t terribly insightful. We get a product string equal to “NXP Semiconductors” manufacturer string equal to “LPC11Uxx HID”, which is the microcontroller used on the device.

Writing to the display

With the pixel buffer and an open device, we can now write a new image to the display, in a 3 step process:

  • Clear the display
  • Write the buffer to the display
  • Refresh the display

I’m somewhat confused as to why the display needs to be cleared, but if I skip this step I end up with weird overdraw of pixels on top of the existing image. In any case, clearing the display is simple enough and involves writing a 6 byte code to the display:

fn clear_display(bitfenix_icon_device: &HidDevice) { let erase_flash_code: [u8; 6] = [0x0, 0x1, 0xde, 0xad, 0xbe, 0xef]; bitfenix_icon_device.write(&erase_flash_code).unwrap(); }

Writing the buffer to the display involves copying up to 64 bytes at a time to the display, this is a max of 61 bytes from the pixel buffer + a 3 byte header (indicating the operation and number of bytes being written):

fn write_image_to_display(bitfenix_icon_device: &HidDevice, image_buf: &[u8]) { let num_image_bytes_per_write = 61; /* +3 bytes for the header, note that the device only accepts writes in 64 bytes chunks */ let num_writes = ((image_buf.len() as f64 / num_image_bytes_per_write as f64).ceil()) as usize; for i in 0..num_writes { let start = i * num_image_bytes_per_write; let mut length = num_image_bytes_per_write; if i == (num_writes-1) { length = image_buf.len() - ((num_writes - 1) * num_image_bytes_per_write); } let mut image_data_with_header: Vec<u8> = Vec::with_capacity(length + 3); image_data_with_header.push(0x0); image_data_with_header.push(0x2); image_data_with_header.push(length as u8); for image_byte_idx in start..start+length { image_data_with_header.push(image_buf[image_byte_idx]); } bitfenix_icon_device.write(&image_data_with_header).unwrap(); } }

Refreshing the display requires writing a 2 bytes code to the display:

fn refresh_display(bitfenix_icon_device: &HidDevice) { let refresh_code: [u8; 2] = [0x0, 0x3]; bitfenix_icon_device.write(&refresh_code).unwrap(); }

Pulling it all together we have a few straightforward function calls:

println!("Writing new image..."); clear_display(&bitfenix_icon_device); // needs to be done or you end up with weird overwriting on top of exiting image write_image_to_display(&bitfenix_icon_device, &reduced_color_img); println!("Refreshing display..."); refresh_display(&bitfenix_icon_device);
Bitfenix ICON image

Code and future work

I have the above code up on GitHub. This was fun and a great learning experience. Next, I think it would be interesting to see if the display could be utilized to reflect information about the computer, maybe showing CPU usage or internet connection status. There could be some utility in providing such metrics to the user and it would give the display a purpose beyond that of a digital case badge.


setInterval with 0ms delays within Web Workers

The 4ms minimum

Due to browser restrictions, you typically can’t have a setInterval call where the delay is set to 0, from MDN:

In modern browsers, setTimeout()/setInterval() calls are throttled to a minimum of once every 4 ms when successive calls are triggered due to callback nesting (where the nesting level is at least a certain depth), or after certain number of successive intervals.

I confirmed this by testing with the following code in Chrome and Firefox windows:

setInterval(() => { console.log(`now is ${Date.now()}`); }, 0);

In Firefox 72:

Firefox window setInterval with 0ms delay

In Chrome 79:

Chrome window setInterval with 0ms delay

The delay isn’t exact, but you can see that it typically comes out to around 4ms, as expected. However, things are a little different with web workers.

The delay with web workers

To see the timing behavior within a web worker, I used the following code for the worker:

const printNow = function() { console.log(`now is ${Date.now()}`); }; setInterval(printNow, 0); onmessage = function(_req) { };

… and created it via const worker = new Worker('worker.js');.

In Chrome, there’s no surprises, the behavior in the worker was similar to what it was in the window:

Chrome window setInterval with 0ms delay

Things get interesting in Firefox:

Firefox window setInterval with 0ms delay

Firefox starts grouping the log messages (the blue bubbles), as we get multiple calls to the function within the same millisecond. Firefox’s UI becomes unresponsive (which is weird and I didn’t expect as this is on an i7-4790K with 8 logical processors and there’s little interaction between the worker and the parent window), and there’s a very noticeable spike in CPU usage.

Takeaway

setInterval() needs a delay and you shouldn’t depend on the browser to set something reasonable. It would be nice if setInterval(.., 0) would tell the browser to execute as fast as reasonably possible, adjusting for UI responsiveness, power consumption, etc. but that’s clearly not happening here and as such it’s dangerous to have a call like this which may render the user’s browser unresponsive.