Avishkar Autar · Jul 16 2016 · Graphics and Rendering
I’ve been experimenting a bit with convex hull constructions and below I’ll explain how to do a brute-force construction of a hull.
It’s worth noting up-front that the brute-force method is slow, O(n3) worst case complexity. So why bother? I think there are a few compelling reasons:
- The brute-force method expresses the fundamental solution, which gives you the basic building blocks and understanding to approach more complex solutions
- It’s faster to implement
- It’s still a viable solution when n is small, and n is usually small.
What is a convex hull?
You can find a formal definition on Wikipedia. Informally, and specific to computational geometry, the convex hull is a convex polygon in which all points are either vertices of said polygon or enclosed within the polygon.
Brute-force construction
- Iterate over every pair of points (p,q)
- If all the other points are to the right (or left, depending on implementation) of the line formed by (p,q), the segment (p,q) is part of our result set (i.e. it’s part of the convex hull)
Here’s the top-level code that handles the iteration and construction of resulting line segments:
/**
 * Compute convex hull
 */
var computeConvexHull = function() {
    console.log("--- ");

    for(var i=0; i<points.length; i++) {
        for(var j=0; j<points.length; j++) {
            if(i === j) {
                continue;
            }

            var ptI = points[i];
            var ptJ = points[j];

            // Do all other points lie within the half-plane to the right
            var allPointsOnTheRight = true;
            for(var k=0; k<points.length; k++) {
                if(k === i || k === j) {
                    continue;
                }

                var d = whichSideOfLine(ptI, ptJ, points[k]);
                if(d < 0) {
                    allPointsOnTheRight = false;
                    break;
                }
            }

            if(allPointsOnTheRight) {
                console.log("segment " + i + " to " + j);
                var pointAScreen = cartToScreen(ptI, getDocumentWidth(), getDocumentHeight());
                var pointBScreen = cartToScreen(ptJ, getDocumentWidth(), getDocumentHeight());
                drawLineSegment(pointAScreen, pointBScreen);
            }

        }
    }
};
The “secret sauce” is the whichSideOfLine() method:
/**
 * Determine which side of a line a given point is on
 */
var whichSideOfLine = function(lineEndptA, lineEndptB, ptSubject) {
    return (ptSubject.x - lineEndptA.x) * (lineEndptB.y - lineEndptA.y) - (ptSubject.y - lineEndptA.y) * (lineEndptB.x - lineEndptA.x);
};
This is a bit of linear algebra derived from the general equation for a line.
The result represents the side of a line a point is one, based on the sign of the result. We can check if the point is on the left or on the right, it doesn’t matter as long as there is consistency and the same check is done for all points.
How it looks
I made a few diagrams to show the first few steps in the algorithm, as segments constituting the convex hull are found. The shaded area represents our success case, where all other points are to the right of the line formed by the points under consideration. Not shown are the failure cases (i.e. one or more points are on the left of the line formed by the points under consideration).


Code and Demo
You can play around with constructing a hull below by double-clicking to add vertices.
You can find the code on GitHub.
Avishkar Autar · Jun 24 2016 · Languages
There’s a lot written around static vs dynamic types. More and more, I’ve tended to favor static typing; I like compile-time checks and static analysis, I like the strong contracts established between caller and callee, I like the readability of knowing what a function expects and returns from looking at its signature, and I like the refactoring capabilities that IDEs can bring forward from being able to trace references at compile-time. Even with my bias, I’ve never worked on a codebase that’s lived for 10 years, and I found The Long-Term Problem With Dynamically Typed Languages to be an interesting perspective.
Unit testing to prove correctness:
…relying on a giant test suite and test infrastructure to prove the correctness of renaming a function or adding a parameter, in practice, is a significant coefficient of friction on the software’s ability to evolve over time.
Broken windows:
Not improving core APIs results in a kind of broken windows effect. When APIs are confusing or vague, people tend not to notice other confusing or vague APIs, and it slows everyone down in the long term.
Thus, instead of easily refactoring the legacy APIs, people think “I’ll just make a new one and migrate the code over!” And now you have two hard-to-change APIs. And then three. And the cycle continues. Additionally, this cycle is fed by architect types who know or think they know a better way to do things, but can’t be bothered to update the old systems.
Cost of change:
…a type system flattens the cost of change curve. Small API or performance improvements that otherwise wouldn’t be worth it suddenly are, because the compiler can quickly tell you all the places that need to be updated.
Data flow and mental understanding
…the most important component of understanding software is grasping data flow. Programs exist to transform data, and understanding how that’s done is paramount. Types accelerate the process of building a mental understanding of the program, especially when lightweight types such as CustomerId (vs. Int) are used.
Cost of change is interesting, as the flexibility of dynamically-typed languages is usually viewed as beneficial and yielding shorter development times.
Avishkar Autar · Jun 8 2016 · Random
I wrote a little desktop application to capture short videos and turn them into GIFs. I call it Reel. It’s still rough around the edges but you can grab an early version of it below.
Reel 0.1 (Windows Install)
I’ll have a Linux/Ubuntu version soon. Maybe an OS X version… I have to jump through a few extra hoops here as Apple still refuses to allow OS X to be virtualized.
Aside from its utility, this was also an experiment piecing together some technologies I’ve written about here before: XUL + XPCOM + SocketBridge, video capture using web tech and, in general, using web technologies for desktop applications.
Avishkar Autar · Jun 5 2016 · Linux
I was playing around a bit with Desktop Entry files which provide a nice facade for hiding the execution details of a desktop application. However, a somewhat odd limitation is that relative paths are not supported. At least for the Exec key, I found a nice solution which makes use of bash and the %k field code allowed for the Exec value.
[Desktop Entry]
Version=1.0
Name=Run
Comment=Runner Test Application
Exec=bash -c 'cd $(dirname %k) && ./runner-linux-x86_64/dist/bin/run --app application.ini'
Path=
Icon=/usr/share/icons/hicolor/scalable/status/application-running.svg
Terminal=false
Type=Application
Categories=Utility;Application;Development;
The code above presumes that the application to run is at runner-linux-x86_64/dist/bin/run, relative to the location of the .desktop file.
Avishkar Autar · May 29 2016 · Web Technologies
Client-side timeouts on XHR requests isn’t something I’ve ever thought a whole lot about. The default is no timeout and in most cases, where you’re kicking off an XHR request in response to a user interaction, you probably won’t ever notice an issue. That said, I ran into a case with ScratchGraph on Chrome where not having a timeout specified, along with some client-side network errors, left the application in a state where it was unable to send any more XHR requests.
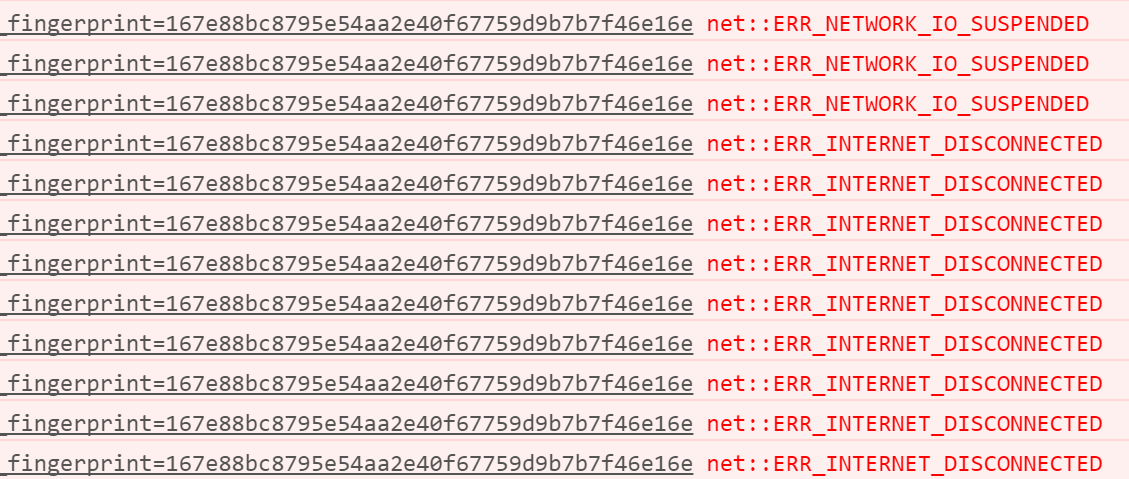
ScratchGraph continuously polls its server for new data and every so often I would notice that the XHR calls would stop, with the application left in a broken state, unable to make any AJAX calls. This typically (but not always) occurred when the machine woke up from being put to sleep and in the console there would be a few error messages, typically a number of ERR_NETWORK_IO_SUSPENDED and ERR_INTERNET_DISCONNECTED errors. Testing within my development environment, it was impossible to reproduce. Finally, I came across this StackOverflow post that pointed out that not having a timeout specified on the XHR calls would result in these errors.
I’m still not exactly sure of the interplay between Chrome, the XHR requests, and the network state that results in this situation, but since adding a timeout, I’ve yet to notice this behavior again. It’s also worth noting that it’s very simple to add a timeout on an XHR request:
var xhr = new XMLHttpRequest();
xhr.open('GET', '/hello', true);
xhr.timeout = 500; // time in milliseconds
Avishkar Autar · May 14 2016 · Random
A simple way to log to both stdout and a file (using a pipe and tee):
Avishkar Autar · Feb 27 2016 · Databases
I had a hard time pulling together all the steps needed to import a PostgreSQL database using Ansible. Here’s the Ansible YAML blocks used to import the seed database for Lexiio.
1. Install PostgreSQL
- name: Install Postgres
  apt: name={{ item }} update_cache=yes cache_valid_time=3600 state=present
  sudo: yes
  with_items:
  - postgresql
  - postgresql-contrib
  - libpq-dev
  - python-psycopg2
    tags: packages
2. Create the database (lexiiodb), UTF-8 for encoding and collation
- name: Create lexiiodb database
  sudo_user: postgres
  postgresql_db: name=lexiiodb encoding='UTF-8' lc_collate='en_US.UTF-8' lc_ctype='en_US.UTF-8' state=present
3. Create a role that will be granted access to the database (password is a variable read from some secret source)
- name: Create lexiio role for database
  sudo_user: postgres
  postgresql_user: db=lexiiodb user=lexiio password="{{ password }}" priv=ALL state=present
4. Start the PostgreSQL service
- name: Start the Postgresql service
  sudo: yes
  service:
    name: postgresql
    state: started
    enabled: true
5. Import data into the database (using psql to pull in data from /home/lexiiodb.dump.sql)
- name: Importing lexiiodb data
  sudo_user: postgres
  shell: psql lexiiodb < /home/lexiiodb.dump.sql
6. For the role created, grant permissions on all schemas in the DB
- name: Grant usage of schema to lexiio role
  sudo_user: postgres
  postgresql_privs: database=lexiiodb state=present privs=USAGE type=schema roles=lexiio objs=dictionary
7. For the role created, grant permissions on all tables in the DB
- name: Grant table permissions for lexiio role
  sudo_user: postgres
  postgresql_privs: database=lexiiodb schema=dictionary state=present privs=SELECT,INSERT,UPDATE type=table roles=lexiio grant_option=no objs=ALL_IN_SCHEMA
8. For the role created, grant permissions on all sequences in the DB
- name: Grant sequence permissions for lexiio role
  sudo_user: postgres
  postgresql_privs: database=lexiiodb schema=dictionary state=present privs=USAGE type=sequence roles=lexiio grant_option=no objs=ALL_IN_SCHEMA
Avishkar Autar · Feb 20 2016 · Random
As I started looking to add more functionality to Lexiio, I realized the Wiktionary definitions database dump I was using wasn’t going to cut it; specifically, I needed a normalized schema, or I’d have data duplication all over the place. I started normalizing in MySQL, but whether it was MySQL or MySQL Workbench, I kept running into character encoding issues. Using a simple INSERT-SELECT, in MySQL 5.7, to transfer words from the existing table to a new table resulted losing characters:
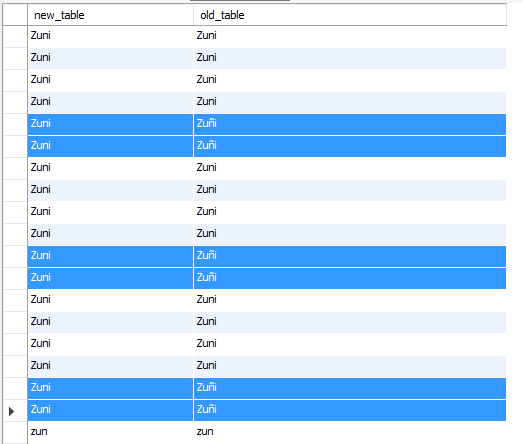
I dumped the data into PostgreSQL, didn’t encounter the issue, and just kept working from there.
The normalized schema can be downloaded here: LexiioDB normalized
(released under the Creative Commons Attribution-ShareAlike License)

The unknown_words and unknown_to_similar_words tables is specific to Lexiio and serve as a place to store unknown words entered by the user and close/similar matches to known words (via the Levenshtein distance).
Avishkar Autar · Dec 30 2015 · Graphics and Rendering
Pushed an update to glfx to allow for post-process shading. When a post-process shader is defined, the scene is rendered to a screen-space quad (the size of the viewport), and that quad is then rendered to the viewport with the post-process shader applied.
The shader is loaded (asynchronously) like any other:
glfx.shaders.load('screenspace.fs', "frag-shader-screenspace", glfx.gl.FRAGMENT_SHADER);
Once loaded, we create the shader program, and get locations for whatever variables are used. The vertex shader isn’t anything special, it just transforms a vertex by the model-view and projection matrices, and passes along the texture coordinates.
glfx.whenAssetsLoaded(function() {

    var postProcessShaderProgram = glfx.shaders.createProgram([glfx.shaders.buffer['vert-shader-basic'], glfx.shaders.buffer['frag-shader-screenspace']],
                                            function(_shprog) {

                                                // Setup variables for shader program
                                                _shprog.vertexPositionAttribute = glfx.gl.getAttribLocation(_shprog, "aVertexPosition");
                                                _shprog.pMatrixUniform = glfx.gl.getUniformLocation(_shprog, "uPMatrix");
                                                _shprog.mvMatrixUniform = glfx.gl.getUniformLocation(_shprog, "uMVMatrix");
                                                _shprog.textureCoordAttribute = glfx.gl.getAttribLocation(_shprog, "aTextureCoord");

                                                _shprog.uPeriod = glfx.gl.getUniformLocation(_shprog, "uPeriod");
                                                _shprog.uSceneWidth = glfx.gl.getUniformLocation(_shprog, "uSceneWidth");
                                                _shprog.uSceneHeight = glfx.gl.getUniformLocation(_shprog, "uSceneHeight");

                                                glfx.gl.enableVertexAttribArray(_shprog.vertexPositionAttribute);
                                                glfx.gl.enableVertexAttribArray(_shprog.textureCoordAttribute);

                                            });

...
We then tell glfx to apply our post-process shader program:
glfx.scene.setPostProcessShaderProgram(postProcessShaderProgram);
This call will result in different rendering path, which renders the scene to a texture, applies that texture to a screen-space quad, and renders the quad with the post-process shader.
Here is the shader for screenspace.fs, used in the demo shown above:
precision mediump float;

uniform float uPeriod;
uniform float uSceneWidth;
uniform float uSceneHeight;
uniform sampler2D uSampler;
varying vec2 vTextureCoord;

void main(void) {

    vec4 sum = vec4( 0. );
    float blurSampleOffsetScale = 2.8;
    float px = (1.0 / uSceneWidth) * blurSampleOffsetScale;
    float py = (1.0 / uSceneHeight) * blurSampleOffsetScale;

    vec4 src = texture2D( uSampler, ( vTextureCoord ) );

    sum += texture2D( uSampler, ( vTextureCoord + vec2(-px, 0) ) );
    sum += texture2D( uSampler, ( vTextureCoord + vec2(-px, -py) ) );
    sum += texture2D( uSampler, ( vTextureCoord + vec2(0, -py) ) );
    sum += texture2D( uSampler, ( vTextureCoord + vec2(px, -py) ) );
    sum += texture2D( uSampler, ( vTextureCoord + vec2(px, 0) ) );
    sum += texture2D( uSampler, ( vTextureCoord + vec2(px, py) ) );
    sum += texture2D( uSampler, ( vTextureCoord + vec2(0, py) ) );
    sum += texture2D( uSampler, ( vTextureCoord + vec2(-px, py) ) );
    sum += src;

    sum = sum / 9.0;

    gl_FragColor =  src + (sum * 2.5 * uPeriod);

}
Note that it requires a few uniforms to be supplied to it, we use the glfx.scene.onPostProcessPreDraw() callback to setup the variables (before the post-processed scene is drawn):
var timeAcc = 0;
glfx.scene.onPostProcessPreDraw = function(tdelta) {

    timeAcc += tdelta;
    var timeScaled = timeAcc * 0.00107;

    if(timeScaled > 2.0*Math.PI) {
        timeScaled = 0;
        timeAcc = 0;
    }

    var period = Math.cos(timeScaled);
    glfx.gl.uniform1f(postProcessShaderProgram.uPeriod, period + 1.0);

    glfx.gl.uniform1f(postProcessShaderProgram.uSceneWidth, glfx.gl.viewportWidth);
    glfx.gl.uniform1f(postProcessShaderProgram.uSceneHeight, glfx.gl.viewportHeight);
};
What we’re doing is using the scene rendering time deltas to generate a periodic/sinusoidal wave. This results in the pulsing brightness/fading effect of the scene. The brightness effect itself is done by adding the source pixel to a blurred + brightened version of itself. The blurring allows for the soft fade in and fade out.
Avishkar Autar · Dec 13 2015 · Random
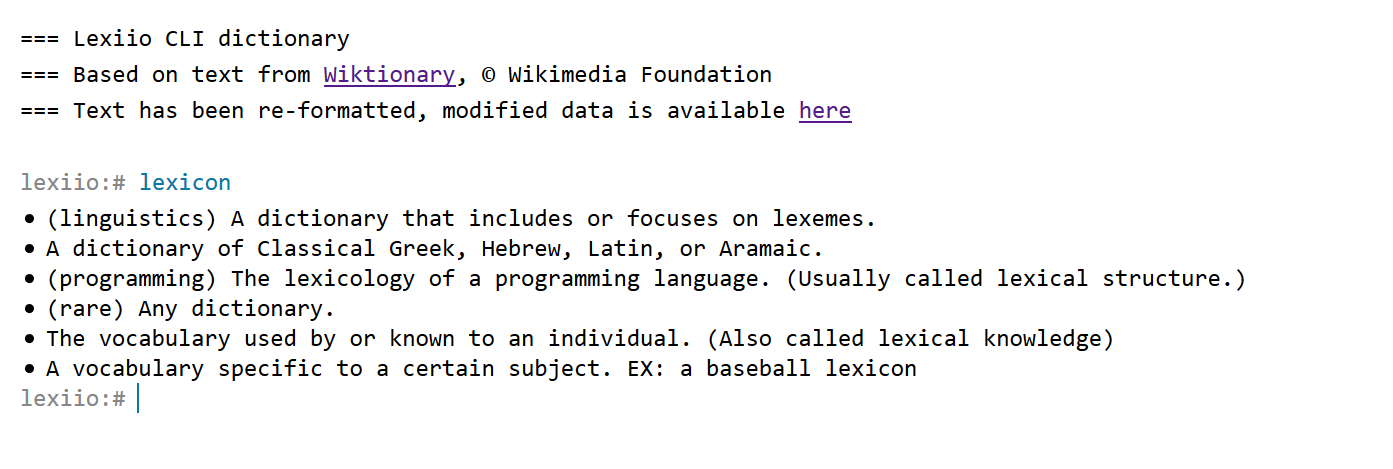
Another little experiment of mine: Lexiio, a web-based CLI dictionary.
A few takeaways:
- Part of the reason for building this was that I wanted to actually make use of the Wiktionary data set snapshot in a real project. The data set is pretty comprehensive, and easy to parse and work with.
- This was also a learning exercise for Golang. There’s nothing complex here but, so far, working with Go has been enjoyable. I like that I’m building a native application, types are enforced, and the HTTP server included as part of the standard library is incredibly easy to setup and work with.
- I wanted to experiment a bit with what a web-based CLI would look and feel like. For something like a dictionary, where user interaction revolves around textual input/output, a command-line interface seems to work really well.