Archive for the ‘Web Technologies’ Category

Writing and testing ES modules

The toolchain

ES modules are one of the more exciting additions to the Javascript language. Effectively being able to break-off and modularize has continually led to better code and development practices in my experience. For server-side Javascript, Node and its associated module system took hold, but there was nothing comparable for browsers. However, Node-based toolchains to produce frontend code also became a thing, doing rollup, transpilation, minification, etc. This wasn’t necessarily a bad thing, and came with some noted benefits such as better support for unit testing scaffolds and integration into CI pipelines, but it also set a stage for increasingly complex toolchains and an ecosystem whereby frontend components were Node-based server-side components first, and transformed into frontend components after. The latter, in turn, led to a state where you were always working with a toolchain (it wasn’t just for CI or producing optimized distributables) as there was no path to directly load these components in a browser, and I’d argue also led to a state where components were being composed with an increasing and ridiculous number of dependencies, as the burden of resolving and flattening dependencies fell to to the toolchain.

ES modules aren’t any sort of silver bullet here, but it does show a future where some of this complexity can be rolled back, the toolchain only needs to handle and be invoked for specific cases, and there is less impedance in working with frontend code. We’re not there yet, but I’m hopeful and as such I’ve adopted ES modules in projects where I’ve been able to.

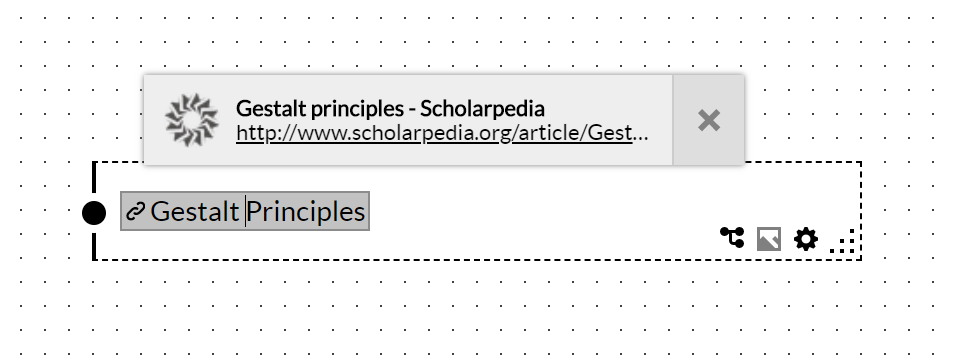
A look at GraphPaper

GraphPaper was the first project where I committed to ES modules for the codebase. At the time, support for ES modules was limited in both Node and browsers (typically incomplete support and put behind a feature flag), so for both development work and producing distributables, I used rollup.js + Babel to produce an IIFE module. This worked well, though it’s a pain to do a build every for every code change I want to see in the browser. I also remember this being pretty easy to setup initially, but the package.json became more convoluted with Babel 6, when everything was split into smaller packages (I understand the rationale, but the developer experience is horrible and pushes the burden of understanding various babel components to consumers).

Structuring the module

Structuring was fairly simple. Everything that was meant to be accessible by consumers was declared in a single file (GraphPaper.js), declared via export statements (i.e. it was just a file with a bunch of export * from … statements). This file also served as the input for rollup.js:

{ input: 'src/GraphPaper.js', output: { format: 'iife', file: 'dist/graphpaper.min.js', name: 'GraphPaper', sourcemap: true }, plugins: [ babel(babelConfig), ], }

In a modern browser, it would be possible to import the GraphPaper ES module directly, like so:

<script type="module"> import * as GraphPaper from '../src/GraphPaper.js'; ... </script>

However, the way dependent web workers are built and encapsulated makes this impossible (explained here).

Another problem, but one that’s fixable, is that I wrote import and export statements without file extensions. For browsers, this leads to an issue as the browser will just request what’s declared in the statement and not append any file extension (so a statement like import { LineSet } from './LineSet'; results in a request to the server for ./LineSet, not ./LineSet.js, as the file is named. Moving forward, the recommendation to use the .mjs extension and explicitly specifying the extension in import statements seems to be a good idea; in addition to addressing the issue with browser requests, when working in Node .mjs files will automatically be treated as ES modules.

Pushing aside the web worker issue, we can see a future where rollup.js isn’t necessary, or at least not necessary for producing browser-compatible (e.g. IIFE) modules. It’s role can be limited to concatenation and orchestrating optimizations (e.g. minification) for distributables. Similarly, for Babel, it’s role can be reduced or eliminated. As support for newer ES features (particularly those in ES6 and ES7) continues to improve across systems (browsers, Node, etc.), and users adopt these systems, transpilation won’t be as necessary. The exception is the case where developers want to use the very latest ES features, but I think we’re quickly approaching a point of diminishing returns here, especially relative to the cost of toolchain complexity.

Testing with jasmine-es6, moving to Ava

For testing, I found jasmine-es6 to be one of the simpler ways to test ES modules at the time. Ava existed, but I remember running into issues getting it working. I remember also toying with Jest at some point and also running into issues. In the end, jasmine-es6 worked well, I never had issues importing and writing tests for a module. Here’s a sample test from the codebase:

import { Point } from '../src/Point' import { Line } from '../src/Line' import { LineSet } from '../src/LineSet' describe("LineSet constructor", function() { it("creates LineSet from Float64Array coordinates", function() { const typedArray = Float64Array.from([1,2,3,4,5,6,7,8]); const ls = new LineSet(typedArray); const lineSetArray = ls.toArray(); expect(ls.count()).toBe(2); expect(lineSetArray[0].isEqual(new Line(new Point(1, 2), new Point(3, 4)))).toBe(true); expect(lineSetArray[1].isEqual(new Line(new Point(5, 6), new Point(7, 8)))).toBe(true); }); });

jasmine-es6 has and continues to work really well despite being deprecated. I’ll likely adopt and reformat the tests to Ava at some point the future. I’ve played around with it again recently and it was a much smoother experience, it’s also better supported and I like the simpler syntax around tests more-so than the Jasmine syntax. I’m looking to do this when Node has stable support for ES modules, as this would mean not worrying about pulling in and configuring Babel for running tests (though it’ll likely still be around for rollup.js).

Takeaways

Overall, it’s been fairly smooth working with ES modules and it looks like things will only improve in the future. Equally exciting is the potential reduction in toolchain complexity that comes with better support for ES modules.

  • Support for ES modules continues to improve across libraries, browsers, and Node
  • It’s probably a good idea to use the .mjs file extension
  • Rollup.js is still needed for now to make browser-compatible (e.g. IIFE) modules, but will likely take on a more limited role in the future (concatenation & minification)
  • Better support for ES6 and ES7 features across the board will mean that Babel, and transpilation in general, won’t be as necessary

Finding, fetching, and rendering favicons with puppeteer

I’ve been working a bit with fetching favicons and noted some of the complexity I encountered:

  • The original way to adding favicons to a site, placing /favicon.ico file in the root directory, is alive and well; browsers will make an HTTP GET request to try and fetch this file.
  • Within the HTML document, <link rel="icon" is the correct way to specify the icon. However, a link tag with <link rel="shortcut icon" is also valid and acceptable, but “shortcut” is redundant and has no meaning (of course, if you’re trying to parse or query the DOM, it’s a case you need to consider).
  • Like other web content, the path in a <link> tag can an absolute URL, with may or may not declare a protocol, or a relative URL.
  • While there is really good support for PNG favicons, ICO files are still common, even on popular sites (as of writing this Github, Twitter, and Gmail, all use ICO favicons).
  • When not using ICO files, they is usually multiple <link> tags, with different values for the sizes attribute, in order to declare different resolutions of the same icon (ICO is a container format, so all the different resolution icons are packaged together).
  • The correct MIME type for ICO files is image/vnd.microsoft.icon, but the non-standard image/x-icon is much more common.
  • Despite the popularity of ICOs and PNGs, there’s a bunch of other formats with varying degrees of support across browsers: GIF (animated/non-animated), JPEG, APNG, SVG. Of particular note is SVG, as it’s the only non-bitmap format on this list, and is increasing being supported.

The goal was to generate simple site previews for ScratchGraph, like this:

ScratchGraph Site Preview

Finding the favicon URL was one concern. My other concern was rendering the icon to a common format, while this isn’t technically necessary, it does lower the complexity in the event that I wanted to do something with the icon, other than just rendering within the browser.

Finding the favicon URL

I wrote the following code to try and find the URL of the “best” favicon using Puppeteer (Page is the puppeteer Page class):

/** * * @param {Page} page * @param {String} pageUrl * @returns {Promise<String>} */ const findBestFaviconURL = async function(page, pageUrl) { const rootUrl = (new URL(pageUrl)).protocol + "//" + (new URL(pageUrl)).host; const selectorsToTry = [ `link[rel="icon"]`, `link[rel="shortcut icon"]` ]; let faviconUrlFromDocument = null; for(let i=0; i<selectorsToTry.length; i++) { const href = await getDOMElementHRef(page, selectorsToTry[i]); if(typeof href === 'undefined' || href === null || href.length === 0) { continue; } faviconUrlFromDocument = href; break; } if(faviconUrlFromDocument === null) { // No favicon link found in document, best URL is likley favicon.ico at root return rootUrl + "/favicon.ico"; } if(faviconUrlFromDocument.substr(0, 4) === "http" || faviconUrlFromDocument.substr(0, 2) === "//") { // absolute url return faviconUrlFromDocument; } else if(faviconUrlFromDocument.substr(0, 1) === '/') { // favicon relative to root return (rootUrl + faviconUrlFromDocument); } else { // favicon relative to current (pageUrl) URL return (pageUrl + "/" + faviconUrlFromDocument); } };

This will try to get a favicon URL via:

  • Try to get the icon URL referenced in the first link[rel="icon"] tag
  • Try to get the icon URL referenced in the first link[rel="icon shortcut"] tag
  • Assume that if we don’t find an icon URL in the document, there’s a favicon.ico relative to the site’s root URL

Getting different sizes of the icon or trying to get a specific size is not supported. Also, for URLs pulled from the document via link[rel=… tags, there’s some additional code to see if URL is absolute, relative to the site/document root, or relative to the current URL and, if necessary, construct and return an absolute URL.

The getDOMElementHRef function to query the href attribute is as follows:

/** * * @param {Page} page * @param {String} query * @returns {String} */ const getDOMElementHRef = async function(page, query) { return await page.evaluate((q) => { const elem = document.querySelector(q); if(elem) { return (elem.getAttribute('href') || ''); } else { return ""; } }, query); };

Fetching & rendering to PNG

Puppeteer really shines at being able to load and render the favicon, and providing the mechanisms to save it out as a screenshot. You could attempt to read the favicon image data directly, but there is significant complexity here given the number of different image formats you may encounter.

Rendering the favicon is relatively straightfoward:

  • Render the favicon onto the page by having the Page goto the favicon URL
  • Query the img element on the page
  • Make the Page’s document.body background transparent (to capture any transparency in the icon when we take the screenshot)
  • Take a screenshot of that img element, such that a binary PNG is rendered

Here is the code to render the favicon onto the page:

/** * * @param {Page} page * @param {String} pageUrl * @returns {ElementHandle|null} */ const renderFavicon = async function(page, pageUrl) { let faviconUrl = await findBestFaviconURL(page, pageUrl); try { console.info(`R${reqId}: Loading favicon from ${faviconUrl}`); await page.goto(faviconUrl, {"waitUntil" : "networkidle0"}); } catch(err) { console.error(`R${reqId}: failed to get favicon`); } const renderedFaviconElement = await page.$('img') || await page.$('svg'); return renderedFaviconElement; };

Finally, here’s the snippet to render the favicon to a PNG:

if(renderedFaviconElement) { const renderedFaviconElementTagName = await (await renderedFaviconElement.getProperty('tagName')).jsonValue(); if(renderedFaviconElementTagName === 'IMG') { await page.evaluate(() => document.body.style.background = 'transparent'); } const faviconPngBinary = await renderedFaviconElement.screenshot( { "type":"png", "encoding": "binary", "omitBackground": true } ); }

EDIT 4/7/2020: Updated code snippets to correctly handle SVG favicons. With SVGs, an <svg> element will be rendered on the page (instead of an <img> element). Also, there is no <body> element, as the SVG is rendered directly and not embedded within an HTML document, and hence no need to set the document’s body background to transparent.

EDIT 1/10/2022: Fix source code snippets to reflect that pageUrl is the variable with the URL of the page, not src.

SVG filters and invisible paths

The setup

Let’s look at a few paths:

  • We have the arrow thingy (M100 100 L330 453 L349 349 L527 349 L100 100)
  • The horizontal line (M50 50 L200 50)
  • The vertical line (M125 10 L125 50)

There’s some CSS to style the paths:

path { fill: none; stroke-width: 3px; stroke: url('#gradient'); }

There’s also some code for the linear gradient, but that’s not relevant here.

A blur filter

A simple SVG gaussian blur filter can be done as follows:

<defs> <filter id="blur"> <feGaussianBlur in="SourceGraphic" stdDeviation="2" /> </filter> </defs>

Applying that filter to the paths (via filter:url(#blur) CSS rule), we get the following:

So, that kinda works, but the horizontal and vertical paths are now invisible!

Update (9/14/2024): It looks like this is a non-issue is recent version of Firefox, as the horizontal and vertical paths are visible. However, the paths are still invisible in Chrome.

A problem with filterUnits

The issue surfaces due to the value of the filterUnits attribute on the filter element is set to objectBoundingBox (which is also the default when a value is not specified). From the SVG spec:

Keyword objectBoundingBox should not be used when the geometry of the applicable element has no width or no height, such as the case of a horizontal or vertical line, even when the line has actual thickness when viewed due to having a non-zero stroke width since stroke width is ignored for bounding box calculations. When the geometry of the applicable element has no width or height and objectBoundingBox is specified, then the given effect (e.g., a gradient or a filter) will be ignored.

objectBoundingBox simply means that the x, y, width, height attributes on the filter are relative to the bounding box of the element referencing the filter, so it’s confusing why this should be an issue at all. In any case, it’s of course problematic for paths which have no width and height.

The solution

The solution is simply to change the filterUnits attribute to userSpaceOnUse. If you make use of the x, y, width, height attributes on the element, they will also need to be updated, as these attributes will now represent the coordinate system in which the element referencing the filter is (as opposed to the bounding box of that element).

<defs> <filter id="blur" filterUnits="userSpaceOnUse"> <feGaussianBlur in="SourceGraphic" stdDeviation="2" /> </filter> </defs>

A simple fix but this is an annoying issue and I see no clear reason as to why filterUnits="objectBoundingBox" should be problematic for elements without a defined width and height.

setInterval with 0ms delays within Web Workers

The 4ms minimum

Due to browser restrictions, you typically can’t have a setInterval call where the delay is set to 0, from MDN:

In modern browsers, setTimeout()/setInterval() calls are throttled to a minimum of once every 4 ms when successive calls are triggered due to callback nesting (where the nesting level is at least a certain depth), or after certain number of successive intervals.

I confirmed this by testing with the following code in Chrome and Firefox windows:

setInterval(() => { console.log(`now is ${Date.now()}`); }, 0);

In Firefox 72:

Firefox window setInterval with 0ms delay

In Chrome 79:

Chrome window setInterval with 0ms delay

The delay isn’t exact, but you can see that it typically comes out to around 4ms, as expected. However, things are a little different with web workers.

The delay with web workers

To see the timing behavior within a web worker, I used the following code for the worker:

const printNow = function() { console.log(`now is ${Date.now()}`); }; setInterval(printNow, 0); onmessage = function(_req) { };

… and created it via const worker = new Worker('worker.js');.

In Chrome, there’s no surprises, the behavior in the worker was similar to what it was in the window:

Chrome window setInterval with 0ms delay

Things get interesting in Firefox:

Firefox window setInterval with 0ms delay

Firefox starts grouping the log messages (the blue bubbles), as we get multiple calls to the function within the same millisecond. Firefox’s UI becomes unresponsive (which is weird and I didn’t expect as this is on an i7-4790K with 8 logical processors and there’s little interaction between the worker and the parent window), and there’s a very noticeable spike in CPU usage.

Takeaway

setInterval() needs a delay and you shouldn’t depend on the browser to set something reasonable. It would be nice if setInterval(.., 0) would tell the browser to execute as fast as reasonably possible, adjusting for UI responsiveness, power consumption, etc. but that’s clearly not happening here and as such it’s dangerous to have a call like this which may render the user’s browser unresponsive.

Prioritizing Web Worker Requests

Web workers handle incoming request messages via a function declared on the onmessage property of the worker. A, perhaps not so obvious, behavior here is that incoming requests are queued. If you’re doing something intensive within the worker (or the CPU is taxed b/c of other processes) the queuing behavior becomes more obvious, as you need to wait longer for a response from the worker due to the fact that previous requests need to be picked up and handled first. Here’s a simple worker that does some heavy lifting (at least for Chrome 79 on an i7-4790K):

const highLoadWork = function() { let x = 1000; for(let i=0; i<99999999; i++) { if(i % 2 === 0) { x += 1000; } else { x = Math.sqrt(x); } } return `hello, x=${x}`; }; onmessage = function(_req) { const requestNum = _req.data.requestNum; const workResult = highLoadWork(); postMessage( { "response": `responding to request ${requestNum}` } ); };

… and here’s what happens after making 12 requests to it in a loop:

I can’t say that this is a bad thing, this is generally sensible and what you’d expect to happen. That said, there are workloads where you may want to prioritize things differently. GraphPaper was one such case for me. Workers are handling things based on user interactions, the last request represents the current state of the world and is typically the only request that matters (any others from before can be thrown away). Unfortunately, this is no mechanism to interact with or re-prioritize messages in this underlying queue. However, you can offload the requests to a queue that the worker manages internally by itself. The onmessage() function simply puts the request data in a queue and we can use setInterval() to continuously call a function that pulls and processes requests from this queue. Here’s what the modified worker code looks like, where the latest request is prioritized (and previous ones are thrown away):

const highLoadWork = function() { let x = 1000; for(let i=0; i<99999999; i++) { if(i % 2 === 0) { x += 1000; } else { x = Math.sqrt(x); } } return `hello, x=${x}`; }; const requestQueue = []; const processRequestQueue = function() { if(requestQueue.length === 0) { return; } const lastRequest = requestQueue.pop(); requestQueue.length = 0; const requestNum = lastRequest.requestNum; const workResult = highLoadWork(); postMessage( { "response": `responding to request ${requestNum}` } ); }; setInterval(processRequestQueue, 4); onmessage = function(_req) { requestQueue.push(_req.data); };

… and here’s what happens after making 12 requests to it in a loop:

(sometimes, there are also cases where only request 12 was processed)

So this works pretty well, but there there are a few things to be aware of. The time it takes to post a message to the worker, is somewhere between 0ms – 1ms, plus the cost of copying any data that needs to be transferred to the worker. The setInterval() minimum is not really 0ms; the browser sets a reasonable minimum which you can probably expect to be between 4ms – 10ms, and this is in addition to the cost of posting the message to the worker (The code was updated to explicitly specify a 4ms delay, setInterval with a 0ms delay isn’t a good idea). What this means in practice is that there is additional latency before we begin processing a request, but compared to a scenario where we have to factor in waiting on all prior requests to finish processing (which is the point of doing this to begin with), I expect this method to win out in performance.

Finally, here’s a look at a GraphPaper stress test and how prioritizing the last request to the connector routing worker (which is responsible for generating the path between the 2 nodes) allows for a faster/less-laggy update:

No prioritization

Prioritize last request, eliminate prior

Encapsulating Web Workers

Constructing Web Workers

There’s generally 2 ways to construct a Web Worker…

Passing a URL to the Javascript file:

const myWorker = new Worker('worker.js');

Or, creating a URL with the Javascript code (as a string). This is done by creating a Blob from the string and passing the Blob to URL.createObjectURL:

const myWorker = new Worker( URL.createObjectURL(new Blob([...], {type: 'application/javascript'})) );

In Practice

With GraphPaper, I’ve used the former approach for the longest while, depending on the caller to construct and inject the worker into GraphPaper.Canvas:

const canvas = new GraphPaper.Canvas( document.getElementById('paper'), // div to use window, // parent window new Worker('../dist/connector-routing-worker.min.js') // required worker for connector routing );

This technically works but, in practice, there’s 2 issues here:

  • There’s usually a few hoops to go through for the caller to actually get the worker Javascript file in a location that is accessible by the web server. This could mean manually moving the file, additional configuration, additional tooling, etc.
  • GraphPaper.Canvas is responsible for dealing with whether a worker is used or not, which worker, how many workers are used, etc. These aren’t concerns that should bubble up to the caller. You could make a case that caller should have the flexibility to swap in a worker of their choice (a strategy pattern), that’s a fair point, but I’d argue that the strategy here is what the worker is executing not the worker itself and I haven’t figured out a good interface for what that looks like.

So, I worked to figure out how to construct the worker within GraphPaper.Canvas using URL.createObjectURL(), and this is where things got trickier. The GraphPaper codebase is ES6 and uses ES6 modules, I use rollup with babel to produce distribution files the primary ones being minified IIFE bundles (IIFE because browser support for ES6 modules is still very much lacking). One of these bundles is the code for the worker (dist/connector-routing-worker.js), which I’d need to:

  • Encapsulate it into a string that can be referenced within the source
  • Create a Blob from the string
  • Create a URL from the Blob using URL.createObjectURL()
  • Pass the URL to the Worker constructor, new Worker(url)

The latter steps are straightforward function calls, but the first is not clear cut.

Repackaging with Rollup

After producing the “distribution” code for the worker, what I needed was to encapsulate it into a string like this (the “worker-string-wrap”):

const workerStringWrap = ` const ConnectorRoutingWorkerJsString = \` ${workerCode} \`; export { ConnectorRoutingWorkerJsString }` ;

Writing that out to a file, I could then easily import it as just another ES6 module (and use the string to create a URL for the worker), then build and produce the distribution file for GraphPaper.

I first tried doing this with a nodejs script, but creating a rollup plugin proved a more elegant solution. Rollup plugins are aren’t too difficult to create but I did find the documentation a bit convoluted. Simply, rollup will execute certain functions (hooks) at appropriate points during the build process. The hook needed in this scenario is writeBundle, which can be used to get the code of the produced bundle and do something with it (in this case, write it out to a file).

// rollup-plugin-stringify-worker.js const fs = require('fs'); const stringifyWorkerPlugin = function (options) { return { name: 'stringifyWorkerPlugin', writeBundle(bundle) { console.log(`Creating stringified worker...`); // Note: options.srcBundleName and options.dest are expected args from the rollup config const workerCode = bundle[options.srcBundleName].code; const workerStringWrap = `const ConnectorRoutingWorkerJsString = \`${workerCode}\`; export { ConnectorRoutingWorkerJsString }`; fs.writeFile(options.dest, workerStringWrap, function(err) { // ... }); } }; }; export default stringifyWorkerPlugin;

The plugin is setup within a rollup config file:

import stringifyWorker from './build/rollup-plugin-stringify-worker'; // ... { input: 'src/Workers/ConnectorRoutingWorker.js', output: { format: 'iife', file: 'dist/workers/connector-routing-worker.min.js', name: 'ConnectorRoutingWorker', sourcemap: false, }, plugins: [ babel(babelConfig), stringifyWorker( { "srcBundleName": "connector-routing-worker.min.js", "dest": "src/Workers/ConnectorRoutingWorker.string.js" } ) ], }, // ...

Note that addtional config blocks for components that use ConnectorRoutingWorker.string.js (e.g. the GraphPaper distribution files), need to be placed after the block shown above.

The overall process looks like this:

Creating the Worker

The worker can now be created within the codebase as follows:

import {ConnectorRoutingWorkerJsString} from './Workers/ConnectorRoutingWorker.string'; // ... const workerUrl = URL.createObjectURL(new Blob([ ConnectorRoutingWorkerJsString ])); const connectorRoutingWorker = new Worker(workerUrl); // ...

The Future

Looking ahead, I don’t really see a good solution here. Better support for ES6 modules in the browser would be a step in the right direction, but what is really needed is a way to declare a web worker as a module and the ability to import and construct a Worker with that module.

Rendering HTML to images with SVG foreignObject

Motivation

For applications that allow users to create visual content, being able to generate images of their work can be important in a number of scenarios: preview/opengraph images, allowing users to display content elsewhere, etc. This popped up as a need for ScratchGraph and led me to research a few possible solutions. Using the SVG <foreignObject> element was one of the more interesting solutions I came across, as all rendering and image creation is done client-side.

<foreignObject> to Image

<foreignObject> is a somewhat strange element. Essentially, it allows you to load and render arbitrary HTML content within SVG. This in and of itself isn’t helpful for generating an image, but we can take advantage of two other aspects of modern browsers to make this a reality:

  • SVG markup can be dynamically loaded into an Image by transforming the markup into a data URL
  • Data URL length limits are no longer a concern. We no longer have the kilobyte-scale limits we were dealing with a few years ago

Sketching it out, the process looks something like this (contentHtml is a string with the HTML content we want to render):

The code for this is pretty straightforward:

// build SVG string
const svg = `
<svg xmlns='http://www.w3.org/2000/svg' width='
${width}' height='${height}'>
<foreignObject x='0' y='0' width='
${width}' height='${height}'>
${contentHtml}
</foreignObject>
</svg>`
;

// convert SVG to data-uri
const dataUri = `data:image/svg+xml;base64,${window.btoa(svg)}`;

Here I’m assuming contentHtml is valid and can be trusted. If that’s not the case, you’ll likely need some pre-processing steps before sticking it into a string like this.

The code above works, to a degree; there’s a few key limitations to be aware of:

  • Cross-origin images served without CORS headers won’t load within <foreignObject>
  • Styles declared via stylesheets do not pass through to the contents of <foreignObject>
  • External resources (images, fonts, etc.) won’t be in the generated Image, as the browser doesn’t wait for these resources to be loaded before rendering out the image

The cross-origin issue may be annoying and unexpected (as the browser does load these images), but it’s a valid security measure and CORS provides the mechanism around it.

Handling stylesheets and external resources are more important concerns, and addressing them allows for a much more robust process.

Handling stylesheets

This isn’t anything too fancy, here are the steps involved:

  • Copy all the style rules, from all the stylesheets, in the parent document
  • Wrap all those rules in a <style> tag
  • Prepend that string to the contentHtml string

The code for this precursor step looks something like this:

const styleSheets = document.styleSheets;
let cssStyles = "";
let urlsFoundInCss = [];

for (let i=0; i<styleSheets.length; i++) {
for(let j=0; j<styleSheets[i].cssRules.length; j++) {
const cssRuleStr = styleSheets[i].cssRules[j].cssText;
cssStyles += cssRuleStr;
}
}

const styleElem = document.createElement("style");
styleElem.innerHTML = cssStyles;
const styleElemString = new XMLSerializer().serializeToString(styleElem);

...

contentHtml = styleElemString + contentHtml;

...

Handling external resources

My solution here is somewhat curd, but it’s functional.

  • Find url values in the CSS code or src attribute values in the HTML code
  • Make XHR requests to get these resources
  • Encode the resources as Base64 and construct data URLs
  • Replace the original URLs (in the CSS url or HTML src) with the new base64 data URLs

The following shows how this is done for the HTML markup (the process is only slightly different for CSS).

const escapeRegExp = function(string) {
return string.replace(/[.*+?^${}()|[\]\\]/g, '\\$&'); // $& means the whole matched string
};

let urlsFoundInHtml = getImageUrlsFromFromHtml(contentHtml);
const fetchedResources = await getMultipleResourcesAsBase64(urlsFoundInHtml);
for(let i=0; i<fetchedResources.length; i++) {
const r = fetchedResources[i];
contentHtml = contentHtml.replace(
new RegExp(escapeRegExp(r.resourceUrl),"g"), r.resourceBase64);
}

The getImageUrlsFromFromHtml() and parseValue() methods that extract the value of src attributes from elements:

/**
*
*
@param {String} str
*
@param {Number} startIndex
*
@param {String} prefixToken
*
@param {String[]} suffixTokens
*
*
@returns {String|null}
*/
const parseValue = function(str, startIndex, prefixToken, suffixTokens) {
const idx = str.indexOf(prefixToken, startIndex);
if(idx === -1) {
return null;
}

let val = '';
for(let i=idx+prefixToken.length; i<str.length; i++) {
if(suffixTokens.indexOf(str[i]) !== -1) {
break;
}

val += str[i];
}

return {
"foundAtIndex": idx,
"value": val
}
};

/**
*
*
@param {String} str
*
@returns {String}
*/
const removeQuotes = function(str) {
return str.replace(/["']/g, "");
};

/**
*
*
@param {String} html
*
@returns {String[]}
*/
const getImageUrlsFromFromHtml = function(html) {
const urlsFound = [];
let searchStartIndex = 0;

while(true) {
const url = parseValue(html, searchStartIndex, 'src=', [' ', '>', '\t']);
if(url === null) {
break;
}

searchStartIndex = url.foundAtIndex + url.value.length;
urlsFound.push(removeQuotes(url.value));
}

return urlsFound;
};

The getMultipleResourcesAsBase64() and getResourceAsBase64() methods responsible for fetching resources:

/**
*
*
@param {String} url
*
@returns {Promise}
*/
const getResourceAsBase64 = function(url) {
return new Promise(function(resolve, reject) {
const xhr = new XMLHttpRequest();
xhr.open(
"GET", url);
xhr.responseType =
'blob';

xhr.onreadystatechange =
async function() {
if(xhr.readyState === 4 && xhr.status === 200) {
const resBase64 = await binaryStringToBase64(xhr.response);
resolve(
{
"resourceUrl": url,
"resourceBase64": resBase64
}
);
}
};

xhr.send(
null);
});
};

/**
*
*
@param {String[]} urls
*
@returns {Promise}
*/
const getMultipleResourcesAsBase64 = function(urls) {
const promises = [];
for(let i=0; i<urls.length; i++) {
promises.push( getResourceAsBase64(urls[i]) );
}
return Promise.all(promises);
};

More code

The code for this experiment is up on Github. Most functionality is encapsulated with the ForeignHtmlRenderer method, which contains the code shown in this post.

Other Approaches

  • Similar (same?) approach with dom-to-image
    This library also uses the <foreignObject> element and an approach similar to what I described in this post. I played around with it briefly and remember running to a few issues, but I didn’t keep the test code around and don’t remember what the errors were.
  • Server-side/headless rendering with puppeteer
    This seems to be the defacto solution and, honestly, it’s a pretty good solution. It’s not too difficult to get it up and running as a service, though there will be an infrastructure cost. Also, I’d be willing to bet this is what services like URL2PNG use on their backend.
  • Client-side rendering with html2canvas
    This is a really cool project that will actually parse the DOM tree + CSS and render the page (it’s a rendering engine done in client-side javascript). Unfortunately, only a subset of CSS is supported and SVG is not supported.

Performance visibility with HTTP Server-Timing

Visibility into the performance of backend components can be invaluable when it comes to spotting and understanding service degradation, debugging failures, and knowing if and where optimization is needed. There’s a host of collection agents, aggregators, and visualization tools to handle metrics, but just breaking down and looking at what happens during an HTTP request can offer a lot of insight into how components are performing. This is why I’m pretty excited about the the HTTP Server-Timing header, it works well as a lightweight mechanism to surface performance metrics, especially now that it’s read and graphed by Chrome Devtools (and, perhaps sometime soon, by Firefox Devtools as well).

An HTTP response with the Server-Timing header

The following code snippet shows an Illuminate/Http/Response from a controller that PUTs an image into an Amazon S3 bucket.

return response()
    ->json(
        [],
        StatusCode::STATUS_OK,
        [
            'Server-Timing' => 's3-io;desc="Image upload to S3";dur=' . calculateTimeToPut(),
        ]
    );

Let’s assume the calculateTimeToPut() function returns 5500 (i.e. 5500 milliseconds to PUT the image onto S3), and the response header looks something like this:

HTTP Server-Timing header parts

Each metric is a group composed of 3 pieces, with each piece delimited by a semicolon:

  • Metric Name (required)
  • Metric Description
  • Metric Value

Multiple metrics can be surfaced by separating each group with a comma.

return response()
    ->json(
        [],
        StatusCode::STATUS_OK,
        [
            'Server-Timing' => 
                's3-io;desc="Image upload to S3";dur=' . calculateTimeToPut() . 
                ',' . 
                'db-io;desc="DB update of entity";dur=' . calculateTimeToUpdate()
        ]
    );

(The above code is a bit simplistic, you’d likely want to better way to store and group metrics, then do a final transformation to construct the Server-Timing string when it’s time to send the HTTP response)

Surfacing in DevTools

Surfacing metrics in an HTTP response is not something terribly complex and I’m sure most could devise other ways to do it, but one reason Server-Timing is a bit more attractive vs a custom solution is the out-of-the-box support within Chrome DevTools.

HTTP Server-Timing in Chrome DevTools

Firefox Devtools will likely follow suit (hopefully?) in the near future.

The PerformanceServerTiming interface

Server-Timing metrics can also be surfaced via the PerformanceServerTiming interface, from MDN:

In addition to having Server-Timing header metrics appear in the developer tools of the browser, the PerformanceServerTiming interface enables tools to automatically collect and process metrics from JavaScript.

This opens up some interesting possibilities as it enables collecting metrics via a frontend script (as is already done for a lot of product metrics via services like Google Analytics), rather than a backend collector mechanism. While not ground-breaking, the standardization around PerformanceServerTiming may allow for greater adoption and acceptance of this collection pattern.

Encoding MP4s in the browser

Is this possible?

Given that it’s relatively easy to access a camera and capture frames within a browser, I began wondering it there was a way to encode frames and create a video within the browser as well. I can see a few benefits to doing this, perhaps the biggest being that you can move some very computationally expensive work to front-end, avoiding the need to setup and scale a process to do this server-side.

I searched a bit and first came across Whammy as a potential solution, which take a number of WebP images and creates a WebM video. However, only Chrome will let you easily get data from a canvas element as image/webp (see HTMLCanvasElement.toDataURL docs). The non-easy way is to read the pixel values from the canvas element and encode them as WebP. However, I also couldn’t find any existing JS modules that did this (only a few NodeJS wrappers for the server-side cwebp application) and writing an encoder was a much bigger project that I didn’t want to undertake.

The other option I came across, and used, was ffmpeg.js. This is a really interesting project, it’s a port of ffmpeg via Emscripten to JS code which can be run in browsers that support WebAssembly.

Grabbing frames

My previous post on real-time image processing covers how to setup the video stream, take a snapshot, and render it to a canvas element. To work with ffmpeg.js, you’ll additionally need the frame’s pixels from the canvas element as a JPEG image, represented as bytes in a Uint8Array. This can be done as follows:

var dataUri = canvas.toDataURL("image/jpeg", 1);
var jpegBytes = convertDataURIToBinary(dataUri);

convertDataURIToBinary() is the following method, which will take the data-uri representation of the JPEG data and transform it into a Uint8Array:

function convertDataURIToBinary(dataURI) {
var base64 = dataURI.substring(23);
var raw = window.atob(base64);
var rawLength = raw.length;

var array = new Uint8Array(new ArrayBuffer(rawLength));
for (i = 0; i < rawLength; i++) {
array[i] = raw.charCodeAt(i);
}
return array;
};

FYI, this is just a slight modification of a method I found in this gist.

Note that I did not use PNG images due to an issue in the current version of ffmpeg.js (v3.1.9001).

Working with ffmpeg.js

ffmpeg.js comes with a Web Worker wrapper (ffmpeg-worker-mp4.js), which is really nice as you can run “ffmpeg –whatever” by just posting a message to the worker, and get the status/result via messages posted backed to the caller via Worker.onmessage.

var worker = new Worker("node_modules/ffmpeg.js/ffmpeg-worker-mp4.js");
worker.onmessage =
function (e) {
var msg = e.data;

switch (msg.type) {
case "ready":
console.log(
'mp4 worker ready');
break;
case "stdout":
console.log(msg.data);
break;
case "stderr":
console.log(msg.data);
break;

case "done":
var blob = new Blob([msg.data.MEMFS[0].data], {
type:
"video/mp4"
});

// ...
break;

case "exit":
console.log(
"Process exited with code " + msg.data);
break;
}
};

Input and output of files is handled by MEMFS (one of the virtual file systems supported by Emscripten). On the “done” message from ffmpeg.js, you can access the output files via the msg.data.MEMFS array (shown above). Input files are specified via an array in the call to worker.postMessage (shown below).

worker.postMessage(
{
type:
"run",
TOTAL_MEMORY: 268435456,
MEMFS: [
{
name:
"input.jpeg",
data: jpegBytes
}
],
arguments: [
"-r", "60", "-i", "input.jpeg", "-aspect", "16/9", "-c:v", "libx264", "-crf", "1", "-vf", "scale=1280:720", "-pix_fmt", "yuv420p", "-vb", "20M", "out.mp4"]
}
);

Limitations

With a bunch of frames captured from the video stream, I began pushing them through ffmpeg.js to encode a H.264 MP4 at 720p, and things started to blow up. There were 2 big issues:

  • Video encoding is no doubt a memory intensive operation, but even for a few dozen frames I could never give ffmpeg.js enough. I tried playing around with the TOTAL_MEMORY prop in the worker.postMessage call, but if it’s too low ffmpeg.js runs out of memory and if it’s too high ffmpeg.js fails to allocate memory.
  • Browser support issues. Support issues aren’t surprising here given that WebAssembly is still experimental. The short of it is: things work well in Chrome and Firefox on desktop. For Edge or Chrome on a mobile device, things work for a while before the browser crashes. For iOS there is no support.

Hacking something together

The browser issues were intractable, but support on Chrome and Firefox was good enough more me, and I felt I could work around the memory limitations. Lowering the memory footprint was a matter of either:

  • Reducing the resolution of each frame
  • Reducing the number of frames

I opted for the latter. My plan was to make a small web application to allow someone to easily capture and create time-lapse videos, so I had ffmpeg.js encode just 1 frame to a H.264 MP4, send that MP4 to the server, and then use ffmpeg’s concat demuxer on the server-side to progressively concatenate each individual MP4 file into a single MP4 video. What this enables is for the more costly encoding work to the done client-side and the cheaper concatenation work to be done server-side.

Time Stream was the end result.

Here’s a time-lapse video created using an old laptop and a webcam taped onto my balcony:

This sort of hybrid solution works well. Overall, I’m happy with the results, but would love the eliminate the server-side ffmpeg dependency outright, so I’m looking forward to seeing Web Assembly support expand and improve across browsers.

More generally, it’s interesting to push these types of computationally intensive tasks to the front-end, and I think it presents some interesting possibilities for architecting and scaling web applications.

Timeout your XHR requests

Client-side timeouts on XHR requests isn’t something I’ve ever thought a whole lot about. The default is no timeout and in most cases, where you’re kicking off an XHR request in response to a user interaction, you probably won’t ever notice an issue. That said, I ran into a case with ScratchGraph on Chrome where not having a timeout specified, along with some client-side network errors, left the application in a state where it was unable to send any more XHR requests.

ScratchGraph continuously polls its server for new data and every so often I would notice that the XHR calls would stop, with the application left in a broken state, unable to make any AJAX calls. This typically (but not always) occurred when the machine woke up from being put to sleep and in the console there would be a few error messages, typically a number of ERR_NETWORK_IO_SUSPENDED and ERR_INTERNET_DISCONNECTED errors. Testing within my development environment, it was impossible to reproduce. Finally, I came across this StackOverflow post that pointed out that not having a timeout specified on the XHR calls would result in these errors.

I’m still not exactly sure of the interplay between Chrome, the XHR requests, and the network state that results in this situation, but since adding a timeout, I’ve yet to notice this behavior again. It’s also worth noting that it’s very simple to add a timeout on an XHR request:

var xhr = new XMLHttpRequest();
xhr.open(
'GET', '/hello', true);
xhr.timeout = 500;
// time in milliseconds