Avishkar Autar · Apr 4 2013 · Web Technologies
Recently I’ve been working on parallelizing some HTML5 canvas image processing code with web workers and hit a few stumbling blocks, mostly due to some unexpected limits and misunderstandings about workers. Below are some notes I’ve jotted down while working.
- There’s a limit on the number of web workers being executed, with Firefox I hit a limit of 20.
- With Firefox, there’s no warning when you hit the limit, your worker simply doesn’t run. There’s no queuing with workers either, so you can’t fire off a worker and expect the browser to schedule it to run when you have less than the maximum number of workers executing.
- I attempted to implement my own queuing mechanism, but this was a waste of time. You can’t precisely predict when the browser will delete the worker. I tried posting a message from the worker thread to the caller (via postMessage) at the end of the worker onmessage processing function, but this only accurately signals that the processing is done, not that the worker is terminated,
and you therefore can’t predict when it’s possible to spawn off another worker.
EDIT: Experimenting a bit more, I’ve discovered this to be incorrect. To actually terminate the worker, you can use the close method from within the worker, or the terminate method from the caller, so a queuing mechanism is a feasible solution to deal with browser limits on the number of executing web workers.
- When posting a message from worker to caller (via postMessage), the handler function within the caller seems to be executed within the worker thread.
- You can’t pass a function to a worker. You pass data between worker and caller by copying the data (serializing/de-serializing an object by structured cloning) or giving ownership of the object to the worker (transferable objects). This allows for a great deal of thread-safety, but in a language like Javascript where functions are first-class citizens, it’s hard not to see the elegance of being able to simply spawn off a worker from a function.
- Given an upper limit on the number of executing web workers, a spawn-and-forget (or spawn-and-wait) model for concurrency is not practical. A thread pool pattern may be appropriate. In general, each worker should be thought of as a heavy-weight processing engine.
EDIT:This is perhaps more true not because of browser limits on the number of workers, but the fact that workers were designed with the expectation of them being long-lived, with high performance and memory costs.
All my work was in Firefox, so the points above may not necessarily be true for other browsers.
Avishkar Autar · Feb 21 2013 · Databases
One of the more interesting things I’ve learned about recently, that’s proven itself incredibly useful, is the pivot table. A pivot table turns rows into columns. This may seem odd, but the utility of this transformation becomes apparent when you have data that can’t be modeled precisely by a set of attributes because there are attributes which apply to some pieces of data and not others. The typical solution to this problem is simply to have additional columns, allowing for NULL values or defining an appropriate default value (e.g. empty string). However, with a large number of attributes or with user-defined attributes, this solution becomes unattractive, and constructing a pivot table is preferable.
Here I’ll present an example of constructing a pivot table for a schema in which a number of optional attributes, stored as key-value pairs, are attributed to entities. Here’s an ER diagram of the simple schema used in this example:
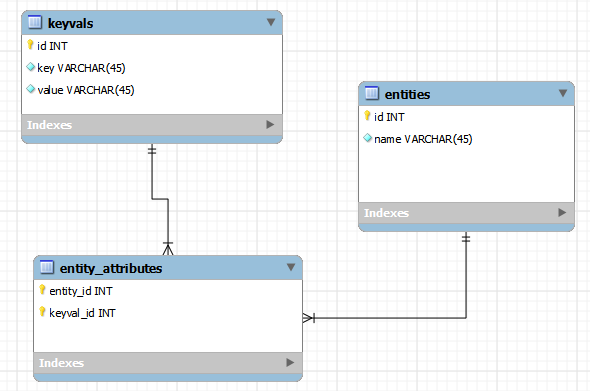
- entities holds a list of entities (companies, users, etc.), with name being the only attribute required for all entities.
- keyvals hold a list of key-value pairs to associate with entities.
- entity_attributes maps keyvals to entities.
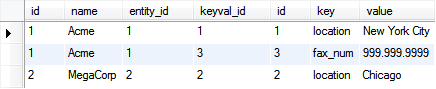
An SQL query to grab all entities and all associated keyvals would look something like this:
SELECT *
FROM entities
LEFT JOIN entity_attributes ea ON ea.entity_id=entities.id
LEFT JOIN keyvals kv ON kv.id = ea.keyval_id
WHERE 1;
… this would return every entity LEFT JOINed with any associated keyval:
We can turn each entry in the key column (keyvals.key) into its own column, with rows having the corresponding entry from the value column (keyvals.value), using a simple conditional statement and alias as shown below:
SELECT entities.*,
       IF(kv.key='location', kv.value, '') AS location,
       IF(kv.key='fax_num', kv.value, '') AS fax_num
FROM entities
LEFT JOIN entity_attributes ea ON ea.entity_id=entities.id
LEFT JOIN keyvals kv ON kv.id = ea.keyval_id
WHERE 1;
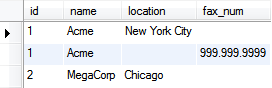
The keys, location and fax_num, are now represented as columns. For entities with 2+ associated keyvals, we still have multiple rows for each entity, but the data is such that each row only holds a single value entry (keyvals.value) for a single key (keyvals.key), under the respective column. To get a single row per entity, we GROUP BY the entity and take the MAX of each key column.
SELECT entities.*,
       MAX(IF(kv.key='location', kv.value, '')) AS location,
       MAX(IF(kv.key='fax_num', kv.value, '')) AS fax_num
FROM entities
LEFT JOIN entity_attributes ea ON ea.entity_id=entities.id
LEFT JOIN keyvals kv ON kv.id = ea.keyval_id
WHERE 1
GROUP BY entities.id;
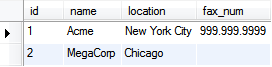
The result is a pivot table.
Avishkar Autar · Feb 17 2013 · Web Design
One of my more popular articles on this blog has been my jQuery toggle button article. However, my thinking has changed a lot since writing that post and, approaching the problem now, I’d likely do things differently. There were a few key flaws in my approach:
- Using an additional image for the border. border-radius was still new at the time, but even so I think it would have been better to develop for the bleeding edge, and then deal with fallback for older tech.
- Using jQuery animate. While I like Javascript as a control mechanism for animations, Javascript-based animations are another matter entirely. CSS3 transitions and transformations are a much better solution, they’re easier to handle and performance is, almost always, much better. Again, this was because I was avoiding the bleeding edge and focusing too much on backward compatibility, as transition and transform were still very new at the time.
- Not making it a jQuery plugin. There was so much of a dependency on jQuery for selection, modifying the DOM, etc. that wrapping everything in a jQuery plugin made sense. My thinking was always that by not being bound too closely to jQuery, you can always just rip-out the jQuery bits and have a slim, pure JS component. However, there are 2 problems with this idea:
- it’s not always that easy to rip-out jQuery, and doing so usually means re-creating much of the abstraction and utility functions offered by jQuery
- plugin or not, you can still end up coupling heavily with jQuery
- Widgetizing the HTML/CSS. The flaw here is writing out HTML and inline CSS from a Javascript string to create the button, which is usually not a good idea. It’s usually better to leave markup and styling in the document, where they can be readily manipulated or re-style. This is in line with my rant about Enyo (and widget frameworks in general), where I mentioned that widgets lead to a significant loss of flexibility. There is a case to be made for a toggle button widget, as it enables you to automatically replace checkboxes with toggle buttons without modifying any HTML but, in the general, I don’t think it’s worth it.
Below is an updated toggle button accompanied by the code that creates it. As in my previous post, the button itself is a single image, applied as a background-image to an anchor tag, and state transitions are done by shifting the background-position of the element.
Live Demo
HTML
<!-- toggle button markup -->
<a id="btn-toggle" class="btn-toggle" href="#">
    <input name="yesno" type="checkbox" checked="checked" />
</a>
CSS
/* toggle button style, styled for initial state (off) */
a.btn-toggle { margin:0; padding:0; display:block; border-radius:32px; background:url(base.png) -57px 0px no-repeat transparent; width:98px; height:64px; }

/* toggle button active state (on) */
a.btn-toggle.active { background-position:-7px 0px; border-color:#40A1EC; }

/* hide the underlying input checkbox of the toggle button  */
a.btn-toggle input { display:none; }
Javascript
// jQuery plugin for toggle button
(function( $ ){

    $.fn.makeToggleButton = function() {

    this.each(function() {

            var elem = $(this);

            // get the state of the underlying input checkbox
            elem.val = function() {
                return elem.find('input').is(':checked');
            }

            // function to toggle button state
            elem.toggle = function() {

                var chkbx = elem.find('input');
                if (!chkbx.is(':checked')) { // not check, switch on

                    elem.addClass('active');
                    chkbx.attr('checked', true);
                }
                else {

                    elem.removeClass('active');
                    chkbx.attr('checked', false);
                }
            }

            // click handler
            elem.click(function(e) {
                elem.toggle();
                e.preventDefault();
            });

            // adjust state to initial value of input checkbox
            if(elem.find('input').is(':checked'))
            {
                elem.addClass('active');
            }

            // setTimeout to prevent transition upon setting initial state to active
            setTimeout(function() {
                elem.css('transition', 'background-position 0.4s');
                elem.css('-webkit-transition', 'background-position 0.4s');
                elem.css('-moz-transition', 'background-position 0.4s');
                elem.css('-o-transition', 'background-position 0.4s');
                elem.css('-ms-transition', 'background-position 0.4s');
            }, 50 );

        });


    return this;

    };
})( jQuery );


// make toggle button when document is ready
$(document).ready(function() {
    $('#btn-toggle').makeToggleButton();
});
Avishkar Autar · Jan 15 2013 · Random
I snapped a photo of my C for Dummies books on a visit to my parents place (my apartment is tiny, so a lot of my old books are there). C was the first programming language I took a serious interest in learning. I knew a bit about code prior as I had toyed around with QBASIC and Visual Basic, but I was interested in video games and computer graphics, for which neither of those languages were well suited.
I spend maybe a month consuming these 2 books when I was about 16, going back-and-forth between the pages and MS Edit + DJGPP to write and compile code. When it all clicked (and there really was that moment of clarity as everything went from looking cryptic and indiscernible, to elegant and natural) it was incredibly exciting.
These books were a great introduction to the C language, and programming in general, and Dan Gookin deserves a lot of credit; technical writing is hard, even more-so when your audience is the absolute beginner.

Avishkar Autar · Dec 15 2012 · Win32 Platform
I’ve always considered the Windows Registry to be a pretty awful piece of technology and a terrible way to store system and application settings. That said, if you’re doing Windows development, you’re probably going to have to touch it at some point. I was digging through some old C++ code, and came across some code to get the current version of Flash installed on the system (I can’t remember why I need to do this at all), which I think serves a good example of how to query the registry.
#include <iostream>
#include <windows.h>

int main()
{
    LONG ret;
    HKEY result;

    // open the key "HKEY_LOCAL_MACHINE\SOFTWARE\Macromedia\FlashPlayerPlugin"
    ret = RegOpenKeyExW(HKEY_LOCAL_MACHINE, L"SOFTWARE\\Macromedia\\FlashPlayerPlugin", 0, KEY_QUERY_VALUE, &result);
    if(ret != ERROR_SUCCESS)
        return 1;

    // allocate 64 wide chars to hold value
    DWORD dataLen = 64;
    wchar_t* data = new wchar_t[dataLen];

    // query the value of "Version" for the key we opened
    ret = RegQueryValueExW(result, L"Version", NULL, NULL, (LPBYTE)data, &dataLen);
    RegCloseKey(result);
    if(ret != ERROR_SUCCESS)
        return 2;

    // put the value in a wide string and output it
    std::wstring versionStr(data);
    std::wcout << versionStr.c_str();

    // memory cleanup
    delete [] data;

    return 0;
}
The code required some modification as the name name of the key and value has since changed (FlashPlayerPlugin was previously FlashPlayer, Version was previous CurrentVersion).
Avishkar Autar · Dec 1 2012 · Random
Vedas by Nicholas Alan Cope and Dustin Edward Arnold

From their blog:
Vedas is an ongoing project broadly based on the theme ‘knowledge’. Specifically the changes in thought established by Copernicus’ De revolutionibus orbium coelestium (On the Revolutions of the Celestial Spheres). One of the earliest documents of the scientific revolution. It re-assessed man’s place in the cosmos and placed him at no greater value than other creatures on earth.
Knowledge, it seems; is at once both expansive and contractive. It is a value exchange. For some it shakes foundations, de-stabaizes values and opens up the sheer terror of possibility. For others it signifies hope, advancement and discovery.
Avishkar Autar · Nov 30 2012 · Web Technologies
After noticing the SMIL animation in my previous post on SVG animations not working in Internet Explorer 10, I did a bit of digging to see what level of support was offered by IE10 and IE9 (previous versions do not support SVG). Simply put, Internet Explorer does not support SMIL animation of SVG. An entry from IEBlog regarding the an IE9 platform preview explains why:
… support for SMIL animation of SVG in the web development community is far from strong. The leader of the SVG standardization effort wrote that not supporting SMIL in its current state is probably best “since the SVG WG intends to coordinate with the CSS WG to make some changes to animation and to extend filters.” There’s already work started to reconcile CSS3 animations and SVG.
I’m not shedding any tears. That said, I’m not that enthusiastic about CSS3 animations for SVG either, as CSS3 animations bring with them the same loss of flexibility as SMIL. The current, flexible, cross-browser solution for SVG animation is Javascript, and I can’t see why that’s not a worthwhile solution for the foreseeable future as well.
Avishkar Autar · Nov 13 2012 · Web Technologies
I decided to play around a bit with animating SVG content. There are actually multiple ways to animate SVG: CSS (transition, transform, @keyframes), Javascript, or Synchronized Multimedia Integration Language (SMIL). Where possible, I tend to prefer Javascript, as you have far more flexibility compared to markup languages; however, out of curiosity, I did try my hand at SMIL as well.
Method 1: Javascript
Here’s the SVG markup for the object being animated.
<svg version="1.1" x="0px" y="0px" width="74px" height="74px" viewBox="-1.751 -1.751 74 74" enable-background="new -1.751 -1.751 74 74" xml:space="preserve">
    <g id="circularMarker" transform="rotate(0 35.163 35.521)">
        <path fill="#27AAE1" d="M46.336,7.908c2.174,0.678,4.236,1.538,6.199,2.54V3.69c-1.417-0.607-2.875-1.146-4.377-1.616
            C37.794-1.161,27.147-0.491,17.793,3.242v6.663C26.41,5.825,36.518,4.843,46.336,7.908z"/>
        <path fill="#27AAE1" d="M62.423,46.338c-0.679,2.173-1.537,4.236-2.538,6.199h6.757c0.605-1.417,1.147-2.877,1.615-4.382
            c3.235-10.364,2.564-21.006-1.167-30.362h-6.664C64.505,26.41,65.489,36.52,62.423,46.338z"/>
        <path fill="#27AAE1" d="M23.992,62.42c-2.171-0.678-4.236-1.536-6.199-2.538v6.759c1.418,0.604,2.877,1.146,4.381,1.616
            c10.364,3.233,21.009,2.564,30.362-1.17v-6.664C43.921,64.505,33.81,65.488,23.992,62.42z"/>
        <path fill="#27AAE1" d="M7.909,23.994c0.678-2.174,1.538-4.237,2.538-6.2H3.691c-0.606,1.416-1.147,2.878-1.617,4.38
            c-3.234,10.364-2.564,21.012,1.168,30.365h6.664C5.825,43.921,4.843,33.813,7.909,23.994z"/>
        <circle fill="#00AEEF" cx="35.163" cy="35.521" r="11.331"/>
    </g>
</svg>
To animate, the transform attribute on the #circularMarker group element is updated every frame to do a simple rotation at a rate of 0.275 deg/ms. You can see the result in the iframe below.
Here’s the Javascript code that makes it happen:
<script src="jquery-1.8.2.min.js" type="text/javascript"></script>
<script type="text/javascript">

    // setup window.requestAnimationFrame
    (function ()
    {
        var requestAnimationFrame = window.requestAnimationFrame || window.mozRequestAnimationFrame ||
                                    window.webkitRequestAnimationFrame || window.msRequestAnimationFrame;
        window.requestAnimationFrame = requestAnimationFrame;
    })();


    // set initial frame time (in milliseconds)
    var ft1 = new Date().getTime();

    // set initial angle (in degrees)
    var angleDeg = 0;

    // function to rotate circle
    function rotateCircularMarker()
    {
        var ft = new Date().getTime();
        var ftDelta = ft - ft1;
        ft1 = ft;

        // rotate at a rate of 0.275 deg/ms
        angleDeg += ftDelta * 0.275;

        if (angleDeg >= 360) {
            // full circle!, reset angleDeg
            angleDeg = 0;
        }

        // transform the #circularMarker group
        // Note: the rotation is about the center of the circle element (35.163, 35.521)
        $('#circularMarker').attr('transform', 'rotate(' + angleDeg + ' 35.163 35.521)');

        // call requestAnimationFrame to continue animating
        requestAnimationFrame(rotateCircularMarker);
    }

    $(document).ready(function ()
    {

        rotateCircularMarker();

    });

</script>
Note that window.requestAnimationFrame is used, so a modern browser is required. For older browsers it is possible to use window.setInterval as a fallback.
Method 2: SMIL
With SMIL, the SVG code remains the same, with the exception of an animateTransform tag within the #circularMarker group element.
<animateTransform attributeName="transform" attributeType="XML" type="rotate" from="0 35.163 35.521" to="360 35.163 35.521" begin="0s" dur="1.336996s" repeatCount="indefinite"/>
The attributes of animateTransform describe the animation, mainly type, from, to, begin, dur, and repeatCount.
Obviously SMIL yields less code and removes all Javascript dependencies, but it does come at the cost of losing flexibility (as you can only perform transformations and timing operations supported by SMIL attributes) and having to learn yet another markup language.
Avishkar Autar · Nov 8 2012 · Random
One of the earliest computer games I played was MegaRace, which came bundled with a Quantex Pentium 60Mhz PC by dad bought sometime around the end of 1994. It was a cheesy game (really cheesy), but it was fun to play. The FMV race tracks were visually impressive for the time and the combat racing was exciting despite only being able to move cars side-to-side.

The chiptune soundtrack, composed by Stéphane Picq, was particularly memorable. For those interested, this fan site has Ogg Vorbis encodings of the music for the race tracks as well as an MP3 of an FMV ending sequence. Well worth a listen.
Avishkar Autar · Oct 18 2012 · Graphics and Rendering
In my previous post on stipple patterns, I presented code to draw a few simple stipple patterns based on drawing single pixels at fixed locations. In this post, I’ll present something just a bit more complex: drawing circles to create a circular stipple patten, again writing a shader that makes use of the GraphicsCore and FXController classes.
Shader.circleStippleShader = function (imageData, bufWrite, index, x, y, r, g, b, a, passNum, frameNum, maxFrames)
{
    var alpha = 1.0;
    var r1 = r / 255.0;
    var rF = Math.floor((alpha * r1 + (1.0 - alpha)) * 255.0);

    var circleMaxDiam = 12;                     // circle at every 12th pixel, also defines max diameter of circle,
    var circleMaxRadius = circleMaxDiam / 2;    // maximum radius of circle

    // figure out the x, y indices of the circle we're within
    // x,y need to be shifted by the circle radius b/c circleMaxDiam defined the offset of the circle center
    // ... e.g. going along the x-axis, we are within the next circle not at x/circleMaxDiam, but at (x+6)/circleMaxDiam
    var iX = Math.floor((x + circleMaxRadius) / circleMaxDiam);
    var iY = Math.floor((y + circleMaxRadius) / circleMaxDiam);

    // multiply the circle indices by the diameter to get the actual coordinates of the circle's center
    var targetX = iX * circleMaxDiam;
    var targetY = iY * circleMaxDiam;

    // calculate squared distance to the circle we are within
    var dist = (targetX - x) * (targetX - x) + (targetY - y) * (targetY - y);

    if (dist < 25) {
        GraphicsCore.setPixel(bufWrite, index, rF, 0, 0, 255);
    }
    else {
        GraphicsCore.setPixel(bufWrite, index, r, g, b, 255);
    }

}
Shader.circleStippleShader.numPassesRequired = 1;

Conceptually, we define the center of a circle at every 12th pixel (both along the x and y axis). At every pixel (x,y) we figure out which circle we are within, and calculate the distance to the center. If the distance is less than our threshold (25), we change the color of the pixel (use the red channel only).


